TABLE OF CONTENTS
- Introduction
- Create a PLU for the Initial Direct Debit Fee(s).
- Create a PLU for the Direct Debit Discount(s).
- Creating ‘Direct Debit Schemes’
- Setting Up Membership Types
- Signing Up New Members at the Till – New Member Wizard
- Creating and Submitting the Initial Submission Instruction
- Marking Accounts as Ok / Not Ok - After Receiving ADDACS
- Accounts that Fail the ‘Initial Submission Instruction’
- How to ‘Generate a New Submission’ (Taking Payment)
- Marking Accounts as ‘Ok’/‘Not Ok’ after receiving ARUDDS
- Dealing with Members no Longer Paying by Direct Debit
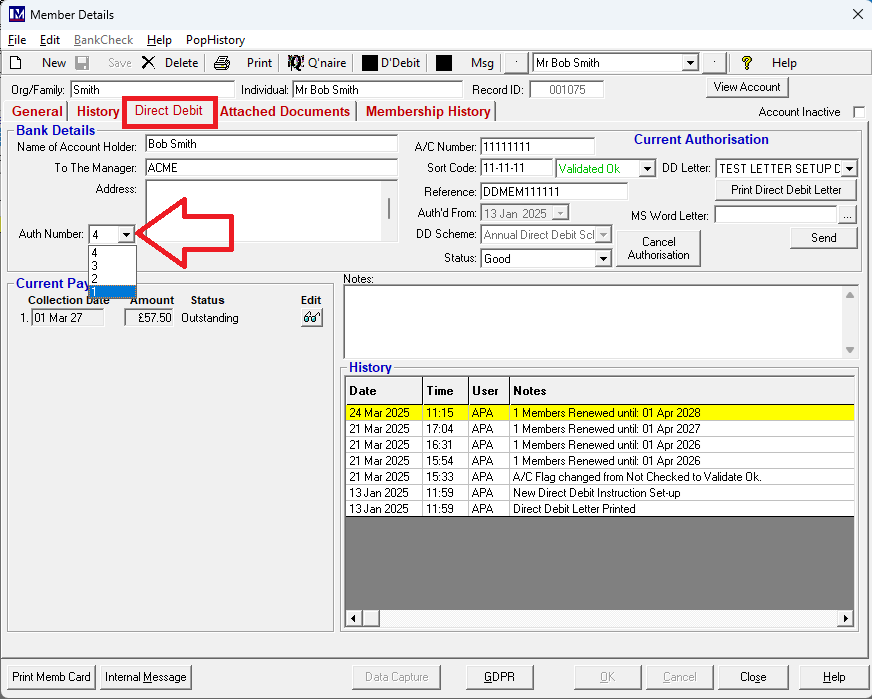
- Editing Direct Debit Payments
- Direct Debit Renewals
Introduction
Please note: The Direct Debits module is chargeable, and should not be used unless your company is paying for it and you have had training first.
The contents of this manual details what you need to do in order to set up the ‘Direct Debits’ system in the Merac back office software to work in-house only. The set up to sell direct debits online is out of the scope of this manual. The manual covers from start to finish what needs to be done in the software to set up the directs debits system, so you can in one process both sign up direct debit members at an Merac PoS (till) and take any payment using our ‘New Member Wizard’ on a till. There is also the ability just to take payment at the till only then someone can later add the member and set up their direct debit payments using the Merac back office software.
The Merac software will also create industry standard direct debit submission files (“batches” in Merac) that can be submitted to your bank, but using the 3rd party system your bank provide to submit these direct debit files. Please note this is not an integration to your banks direct debit system. As Merac only creates these submission files, how to submit these to your bank and to use the software / online portal to do this is not covered by or supported by Merac. Training or support on this process will need to be provided by your bank or their support / training service providers.
As this is not a direct integration to your bank’s direct debt system, then please note the results of direct debt submission that come back from your bank are not directly processed into Merac. There are processes in the Merac back office software that need to be carried out, to mark which record in the Merac batch submission to the bank were successfully processed or not. The relevant Merac back office process are covered off in this manual and during training Merac can provide on the direct debits system.
Online Direct Debits:
The “in-house” module for till and back office direct debit sign up and maintenance (including submission file creation and direct debit membership renewal processes) is covered in this manual. However if you require to sell direct debits online via the Merac e-commerce pages then the required web pages and additional training to set these web pages up in the Merac software will need to be ordered. For more information on either purchasing the in house and or online Direct Debits module and the relevant training, then please contact your Customer Success Account Manager for a quote.
Disclaimer:
Please note that this manual requires the user to have prior knowledge and training on the Merac back office software. Where elements of the software are not explained, this is because these features need to be set up by an experienced user of the Merac software prior to using this manual. Please note although this manual explains the concepts of setting up direct debits, it is not designed to replace the need for training and consultancy. There are various ways and means of setting up direct debit memberships to sell both in-house and online, and all these scenarios cannot be covered off under one “generic” manual. If after receiving the necessary training you are still unsure how best to set up the direct debits system, then please contact your account manager to order the required training / consultancy.
Create a PLU for the Initial Direct Debit Fee(s).
Please note the software requires you to set up a PLU for the ‘Initial Direct Debit Fee’, whether you
charge this fee or not. This is often used where your organisation wants to take an amount “up front” that will not be taken by direct debit. This is often done in order to safeguard against customers who may e.g. use their membership card to access your attraction but then cancel their direct debit before their first direct debt payment is taken. This “up front” or ‘Initial Direct Debit Fee’ can be whatever you like and a different amount can be taken up front for each membership type as required. You just have to set up as many different PLUs that you require for the various “up front” fess you wish to take. Alternatively, if you do not wish to take any ‘Initial Direct Debit Fee’ then you do need to set up a single PLU with a £0.00 value, as there needs to be an ‘Initial Direct Debit Fee’ a PLU assigned to each direct debit ‘Membership Type’ in Merac (covered in the next section of this guide).
When setting up this PLU you must ensure that you:
Set the ‘Category’ set to ‘Membership’.
Set the ‘Override Price’ to ‘No Price Override’.
Enter the price for administration fee as required, either the required price or £0.00 if no fee is charged.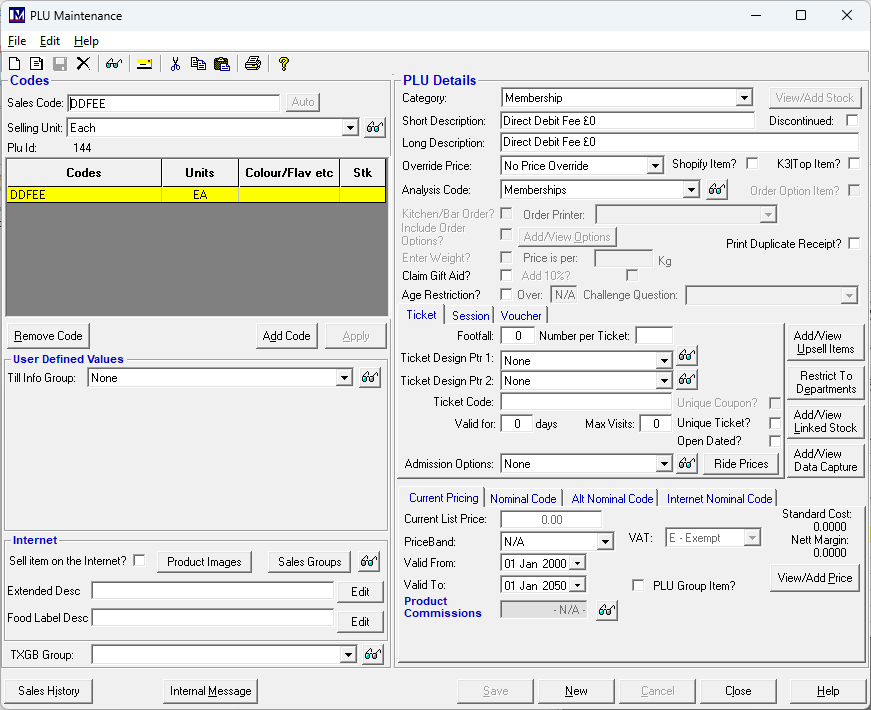
Once all the information has been entered as required, click on ‘Save’ then ‘Close’.
Please note If there is no administration fee charged, you must still create this PLU
If there are multiple different “up front” DD fees, then create as many PLUs as required. This could be just one PLU for each different up-front fee value offered. However, if the same “up front” fee is applied (e.g. £10) for different membership types and you want to get the breakdown of the quantity and value in reports separately for the Adult and Child “up front” fee, then multiple PLU’s need to be set up to get the required granularity of reporting.
Please ensure send updates to your tills in the usual way (Edit > Recreate Till Data) to ensure they have these PLUs
Create a PLU for the Direct Debit Discount(s).
When picking the option to pay by direct debit Merac can automatically apply a discount for those selecting to pay by direct debit . If a percentage discount is not offered to members who pay by direct debit, proceed to the next section of this guide.
If a percentage discount is offered to members who pay by direct debit, create a PLU for this.
When setting up this PLU you must ensure that you:
Set the ‘Category’ set to ‘Membership’.
Set the ‘Override Price’ to ‘No Price Override’.
The price of this PLU must be set at £0.00.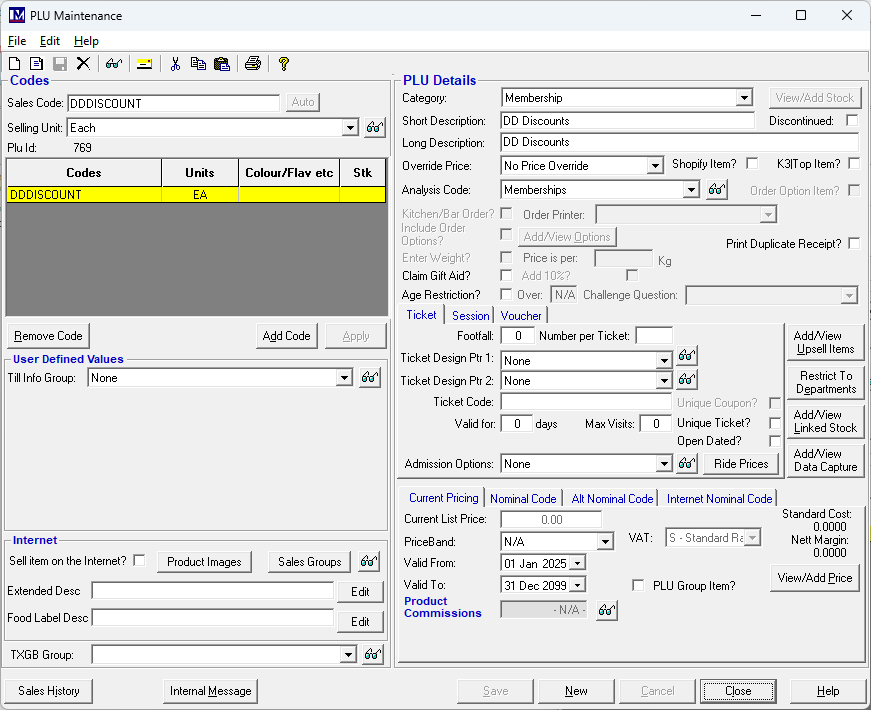
The percentage discount will be calculated and assigned to this PLU in the relevant reports.
Once all the information has been entered as required, click on ‘Save’ then ‘Close’.
As one direct debit discount PLU can be assigned to each ‘Direct Debit Scheme’ then if required you can report the direct debit discount given to a separate PLU for each ‘Direct Debit Scheme’. However, if all the discount needs to just be reported to one PLU only then only one PLU may need to be created. Set up the required number of PLUs as required fore reporting of direct debit discounts given.
Once the required PLU(s) have been created, ensure that you send the changes to the till(s) (by Edit > Recreate Till Data)
Creating ‘Direct Debit Schemes’
First you must access the relevant ‘Direct Debit Schemes’ set up screen. To do this:
Click on 1. ‘Setup’, then 2. click on ‘Customer’ then 3. double click on ‘Direct Debit Schemes’.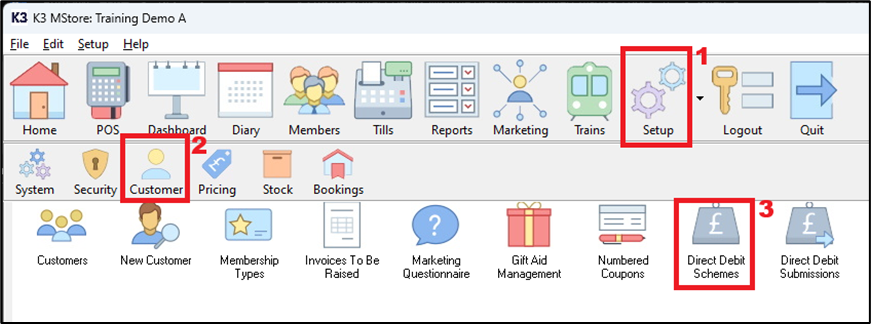
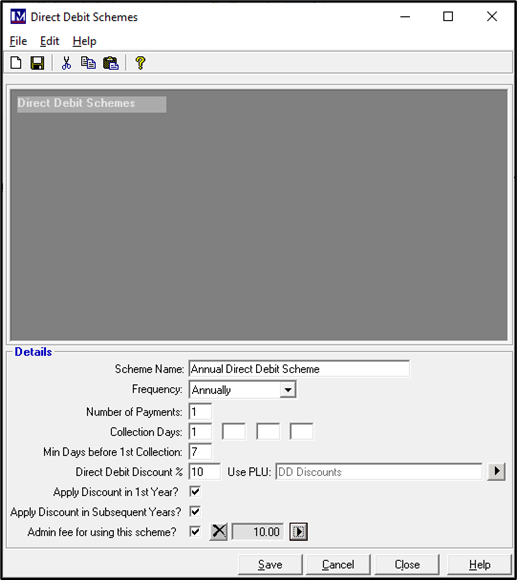
Setting up an ‘Annual Direct Debit Scheme’
If no direct debit schemes have been set up previously, then you will see the following screen.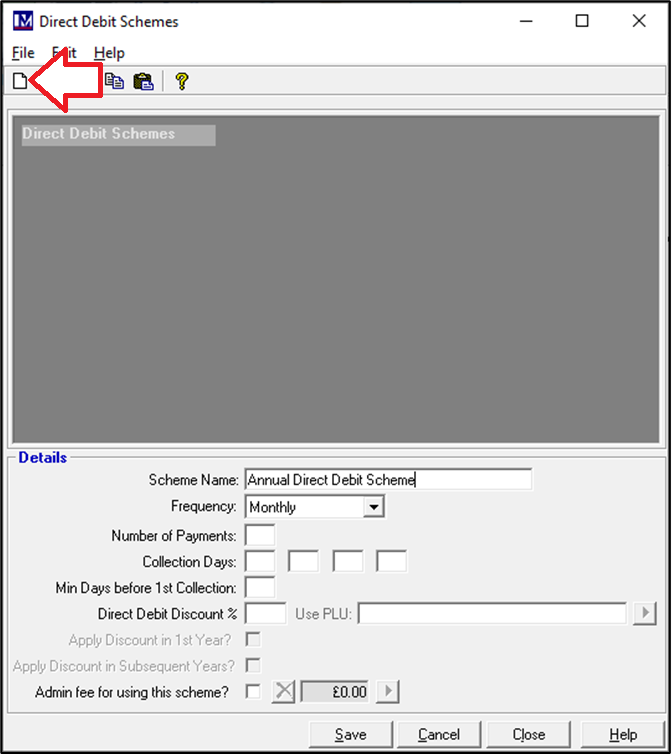
Click on the ‘New’ button (in the top left corner of the screen) to start setting up your first direct debit scheme.
Click in the ‘Scheme Name’ box and enter an appropriate description.
Enter the required description, e.g. “Annual Direct Debit Scheme”.
Now the ‘Collection Days’ must be entered.
This is the day(s) of the month on which the collection of the direct annual debit is to be made.
In this case, we want to make collections of any due annual direct debits on the 1st day of each month.
To do this, click in the first ‘Collection Days’ box and type in the number 1.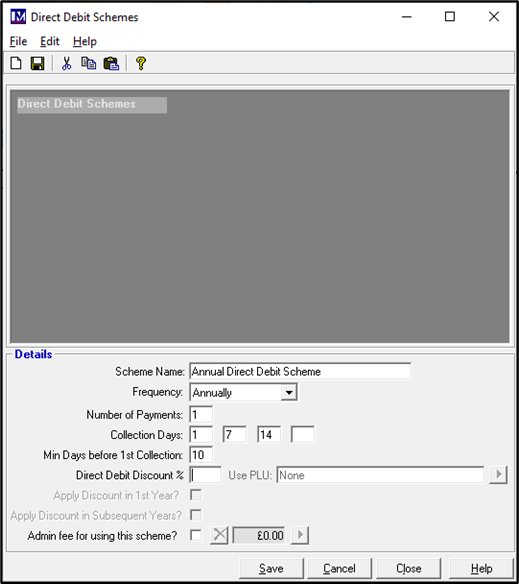
Please note there are four ‘Collection Days’ boxes but most businesses decide to only have one collection date. This is because usually you are charged by your bank for each collection attempt made. Taking into consideration you can enter a second, third and fourth collection day as required, to allow for an additional attempt to collect a direct debit to be made, if for any reason the first attempt failed. For example you may also have alternative collection dates for the 7th and the 14th day of the month. If so then you would enter 7 in the second and 14 in the third ‘Collection Days’ boxes as shown below
In ‘Min Days before 1st Collection’ this is essentially the minimum number of calendar days it takes in total to process and confirm whether or not a new direct debit customer’s details are correct.
For example, this would include the total number of days it takes for you to (i) get the necessary documentation completed and returned to you by the customer (i.e. the return of your completed direct debit mandate forms), (ii) carry out the required submission file related processes in Merac and (iii) the time for the bank to process and confirm whether or not the member’s bank account information you submitted to them was correct. Please note that Merac cannot advise you as to how long it takes your bank to carry out its part of the process, so you will need to contact your bank to confirm their processing time. Please be aware that your bank may quote their processing time days in working days rather than calendar days, so please clarify this with your bank.
Let’s say that the total processing time is 10 days, i.e. the ‘Min Days before 1st Collection’ is 10 days. This means that if a new direct debit member joined today, you could only take the first payment from this customer 10 calendar days from today’s date. Simply click in the ‘Min Days before 1st Collection’ box and type in the required number.
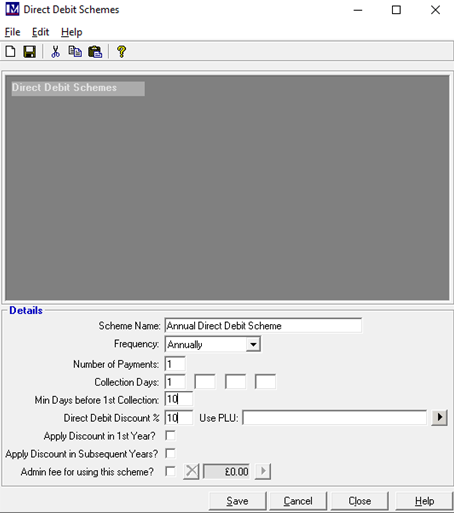
If you want to apply a discount for anyone signing up a specific direct debit scheme, then this is what the ‘Direct Debit Discount’ options are used for. This can be useful if you want to encourage paying by direct debit or perhaps to incentivise using a specific direct debit payment scheme, such as paying by direct debit as a one-off annual payment. If a percentage discount will be given for members paying by direct debit, enter the required percentage discount that will need to be in ‘Direct Debit Discount’ box For example, enter 10 in the box to apply a 10 % discount to members paying by direct debit.
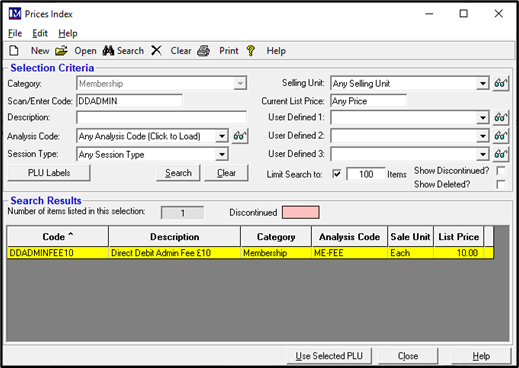
For reporting purposes any discount applied will be reported to a user defined PLU. To select the required PLU, click on the arrow icon to the right of the text ‘Use PLU’. The ‘Prices Index’ screen will now appear, so you can search for the required PLU. Enter the required search criteria to find the relevant PLU created previously and click the ‘Search’ button.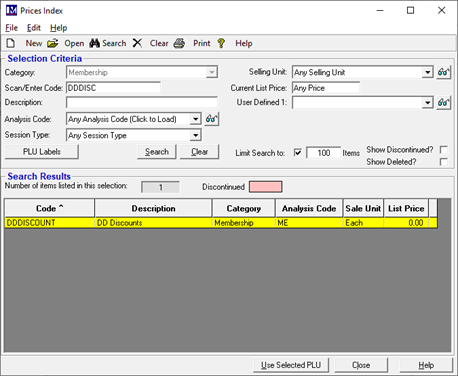
If more than one search result appears, first click on the required PLU so that it is highlighted yellow.
If only one result appears in the above screen it will automatically be highlighted yellow.
Now click on the ‘Use Selected PLU’ button.
The description of the PLU selected will now be showing in the field to the right of the text ‘Use PLU:’
If the incorrect PLU description is showing, repeat the relevant steps to select the correct PLU.
You will notice that once you enter a whole number in the ‘Direct Debit Discount’ box, then two tick options.
These tick box options are ‘Apply Discount in 1st Year’ and ‘Apply Discount in Subsequent Years’ now become active and the options are explained below:
Apply Discount in 1st Year: tick this if the defined % discount will apply in the first year.
Apply Discount in Subsequent Years: tick this if the defined % discount will apply in all subsequent years
Select the discount options as required by clicking the required boxes, so they are ticked.
If there is an administration fee for using a direct debit scheme, click in the box to the right of the text
‘Admin fee for using this scheme?’, so the box now has a tick in it.
Click the arrow button ![]() To the right of the tick box to find and select the required PLU that was set up previously.
To the right of the tick box to find and select the required PLU that was set up previously.
As mentioned previously if more than one search result appears, first click on the required PLU so that it is highlighted yellow. If only one result appears in the above screen it will automatically be highlighted yellow.
Now click on the ‘Use Selected PLU’ button at the bottom of the screen..
You will now notice that the price from the PLU you just selected is seen where indicated below.
If the incorrect PLU price is showing, repeat the relevant steps to select the correct PLU.
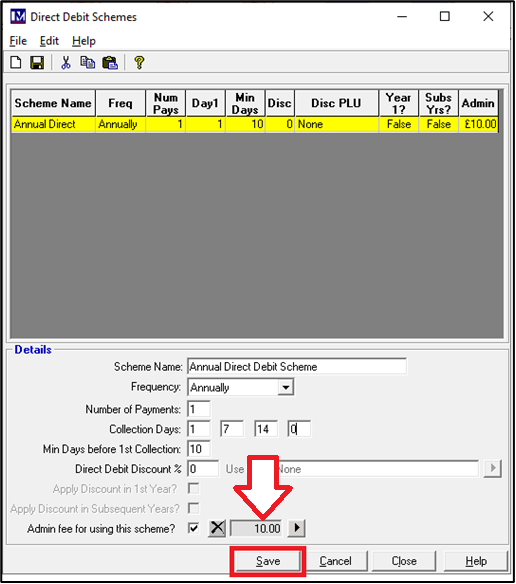
Click on the ‘Save’ button at the bottom of the screen to complete and save this new direct debit scheme.
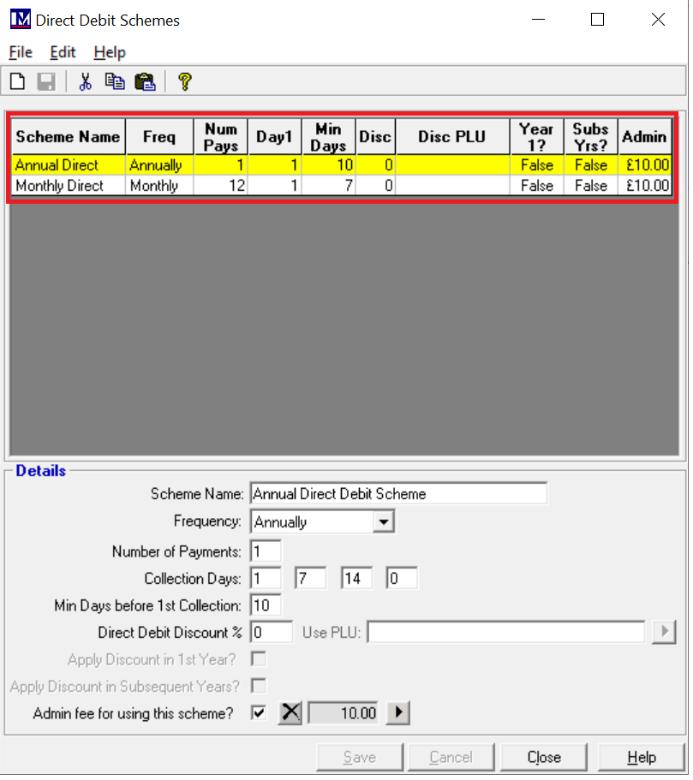
Once a direct debit scheme has been saved, 1.the summary information for the scheme appears at the top of the screen.
If you want to edit a direct debit scheme you have created, simply click on the relevant scheme at the top of the screen.
 2. Edit the selected schemes ‘Details’ in the bottom half of the screen as required.
3. Click 'Save' once all the details have been amended as required.
Please note however you should not re-use existing direct debit schemes by simply renaming or changing the parameters of that scheme unless that direct debit scheme has never been used. Once a direct debit scheme has memberships that are using that direct debit scheme, it should not be amended as can cause data and audit trail issues.
Setting up a ‘Monthly Direct Debit Scheme’
You can set up all the relevant direct debit schemes you require for your business needs. In this document we cover off setting up an annual and a monthly direct debit scheme only. You will need to set up all the options that you offer by direct debit. To add another direct debit scheme for monthly direct debits, click on the ‘New’ button.

Enter an appropriate ‘Scheme Name’, e.g. “Monthly Direct Debit Scheme”.

In this example select the frequency as ‘Monthly’.
As payments are to be taken monthly, there are twelve payments to be taken in one year.
The ‘Number of Payments’ entry is for one year, so type 12 in this box.
Select the day of the month that monthly direct debits are being collected in the ‘Collection Days’ box.
For example, monthly direct debits are to be collected on the 1st day of each month.
To do this click in the first collection day's box and type in the number 1.
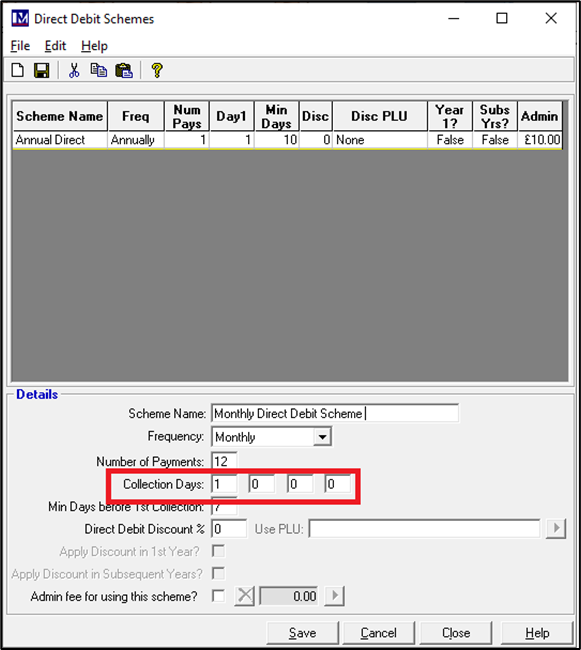
Enter the ‘Min Days before 1st Collection’ as required (see previous example for explanation).
In this case, we want this to again be set to seven working days, so click in the box and type in 7.
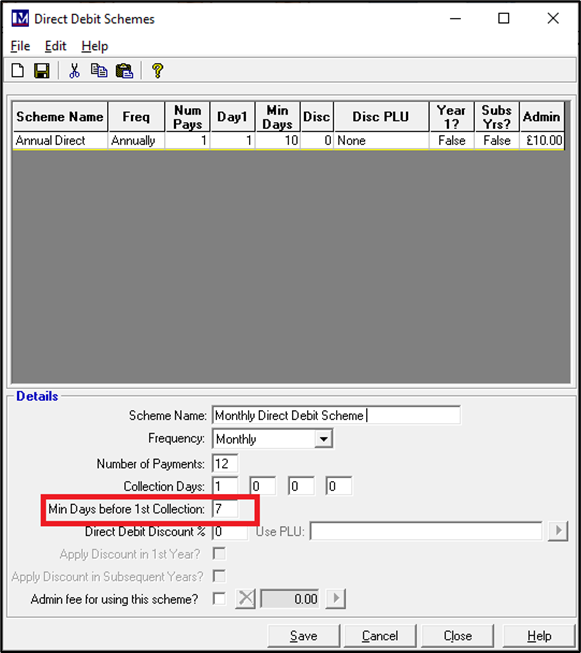
If required enter the number corresponding to the percentage discount required in ‘Direct Debit Discount’ box and select the PLU this discount will be reported to. In this scenario, those that select the monthly direct debit scheme will not receive any discount, so none of the options were selected.
If required specify the ‘Admin fee for using this scheme?’ (as explained in the previous example).
In this scenario the admin fee will use the same PLU as the same (£10) admin fee applies.
If each direct debit scheme requires a different admin fee, create the PLU’s required (covered earlier in this guide).
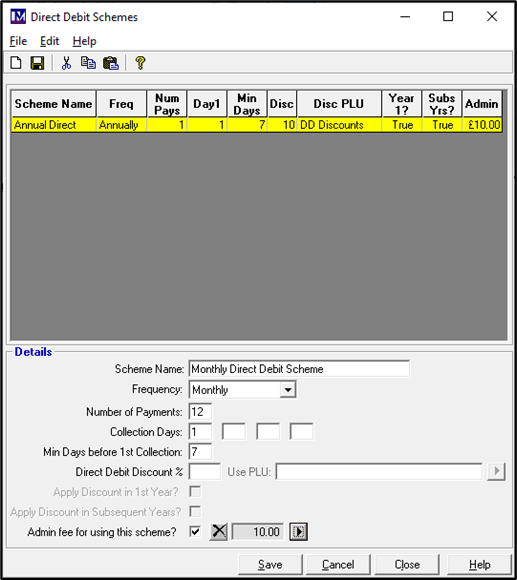
Click the ‘Save’ button to accept any changes.
You will now notice that two direct debit schemes have been created and saved.
The summary information for each scheme is shown here.
For reasons given previously it would only be recommended to amend details of any direct debit scheme before the first members has signed up using this direct debit scheme. To correct any set up issue at this point, first click on the required scheme so it becomes highlighted yellow.
Once highlighted the ‘Details’ for this scheme can be viewed in the bottom half of the screen. If you need to make any changes to this scheme amend the information, then click the ‘Save’ button.
Setting Up Membership Types
Please Note:
It is necessary to have training and consultation from Merac to determine your specific requirements and to set up the membership types accordingly. The direct debits module and online pages are chargeable add-ons to Merac, plus the training and consultation on setting up / operating the direct debits functionality is also chargeable. In this guide, direct debt memberships will be set up as separate, new membership types to any non-direct debit membership sold. This is often preferred by customers as you this allows them to get analysis of both sales and members records for both the direct debit and not direct debit membership types. However, if you need either a quote for the direct debit module charges or further training / consultation of you already have the direct debits system, then please contact your Customer Success Account Manager.
The required ‘Membership Types’ need to be set up, to start this process then you need to:
1. Click on 'Setup' then 2. Next click on 'Customer' then 3. double click on 'Membership Types'
Click on the ‘New’ button to start adding a new direct debit membership type.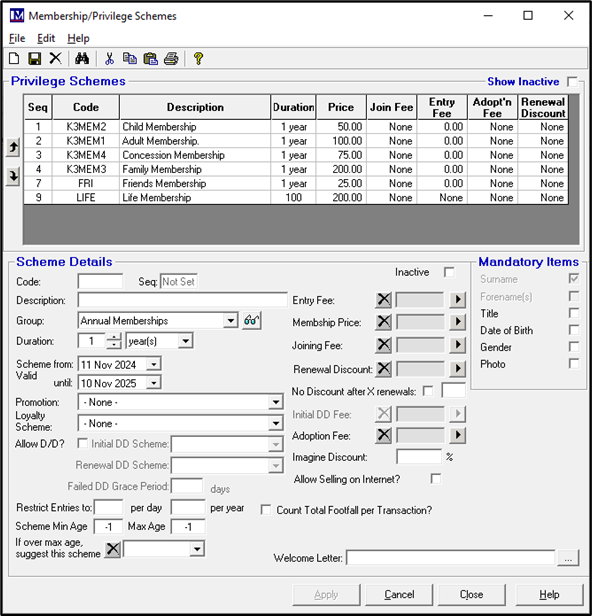
You now need to start entering the required data into the bottom half of the screen (below ‘Scheme Details’)
Please Note:
Not all the data in the membership ‘Scheme Details’ are covered off in this manual as they are already covered in detail in the ‘Memberships’ guide. The majority of the set-up is exactly the same as setting up a non-direct debit membership, so please refer to the Merac ‘Memberships’ guide if you require any the full descriptions on the fields that are common to both direct debit and non-direct membership types.
For reference the field name of these common fields are highlighted grey in the below descriptions. The additional fields that are unique to setting up direct debits are highlighted in green in the below descriptions. As these are new concepts that apply only to direct debits, these are explained in detail in this manual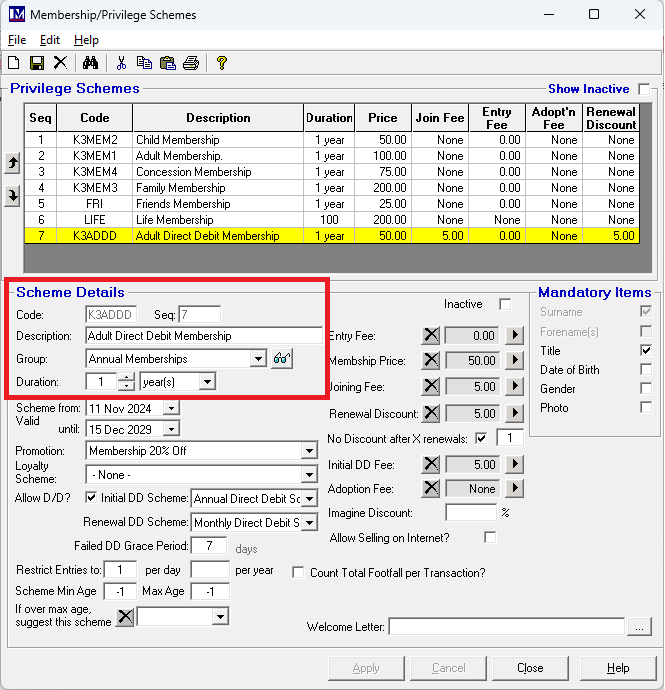
(i) Enter an appropriate ‘Code’ for the membership scheme as required: max 10 characters – e.g. K3ADAD).
(ii) Enter an appropriate ‘Description’ for the membership scheme: max 30 characters – e.g. Adult Direct Debit).
(iii) Enter the required ‘Duration’ of this membership scheme (e.g. the £50 membership fee is for 1 year)
Enter the relevant number in box to the right of ‘Duration’ (e.g. enter 1 in this box)
Then click the drop-down arrow and click the required frequency from the below options (e.g. select year(s))
In the above scenario, once a member joins this scheme their membership will last 1 year before the
membership expires and (unless they opt to cancel their membership) they will be expected to pay for the next year’s membership fees by direct debit.
Please note, direct debit memberships are not renewed at the PoS (till) or online, like non direct debit
memberships are. There is a separate Merac back office software process that needs to be run routinely (typically once a month) to bulk renew direct debit memberships in Merac ahead of their expiry (see the relevant section of this guide).
(iv) The ‘Scheme Valid from’ and ‘Until’ options are to specify the date range when this membership scheme is available to be joined. This should not be confused with the ‘Duration’ (as explained above). Please note the ‘Scheme Valid from’ will default to today’s date, so theoretically people could sign up from today as this membership type but this can be set as required. In this scenario it was left as the ‘default’ date (i.e. the date on which you set the membership type up on), so someone could join this membership type immediately.
Likewise set the ‘Scheme Valid Until’ date is set in exactly the same way to define when people can join this membership scheme until. If there is no known end date for this membership scheme (i.e. it will be offered indefinitely until further notice), set this to a date far into the future. In our example we will say this membership scheme is only available to join until 2030, so (using the same way as explained previously) the ‘Scheme Valid Until’ date for the was set to 31st December 2029. Once the ‘Scheme Valid from’ and ‘Scheme Valid Until’ dates have been specified, then outside of these dates this membership scheme will not be available for new members to join or existing members to renew to this scheme (either in-house or online). outside these dates. However, any members in this scheme will still be valid and can use their membership until the expiry date. They will just not be able to renew to this scheme outside the ‘Scheme Valid Until’ date.
Please Note:
Setting up member ‘Promotion’ and ‘Loyalty Schemes’ are both outside the scope of this guide and not covered in this guide. They are covered off in separate Merac guides and both Member Promotions and Loyalty Schemes (if required) should be set up prior to setting up your Membership Schemes. Please note both member ‘Promotion’ and ‘Loyalty Scheme’ options work at the Merac EPoS tills only, they do not work online.
(v) In the ‘Promotion’ field you can assign up to three member promotions (if required) to a membership scheme. If a membership discount is applicable click the arrow icon and select the required membership promotion. This means that on swiping any valid (non-expired) member’s card that belongs to this membership scheme, then the specified promotion will be applied for that till transaction. The relevant member promotion must be set up prior to creating the membership scheme that it needs to be applied to.
(vi) In the ‘Loyalty Scheme’ field you can assign one Loyalty Scheme (if required) to a membership scheme. If a loyalty scheme is applicable click the arrow icon and select the required loyalty scheme. This means that on swiping any valid (non-expired) member’s card that belongs to this membership scheme, then the specified loyalty scheme’s conditions will be applicable. The relevant points as applicable for that loyalty scheme will be collected when transactions are made. The option to spend any loyalty points will be offered automatically, and if the member opted to spend loyalty points then the relevant number of points are deducted. The set up of Loyalty Schemes is outside the scope of this manual and if you require more information or wish. For more information or a quote for training on how to set up the Loyalty Schemes then please contact your Customer Success Account Manager.
(vii) For any membership that will allow direct debit payment, then you need to click the ‘Allow DD’ option so it is ticked’.
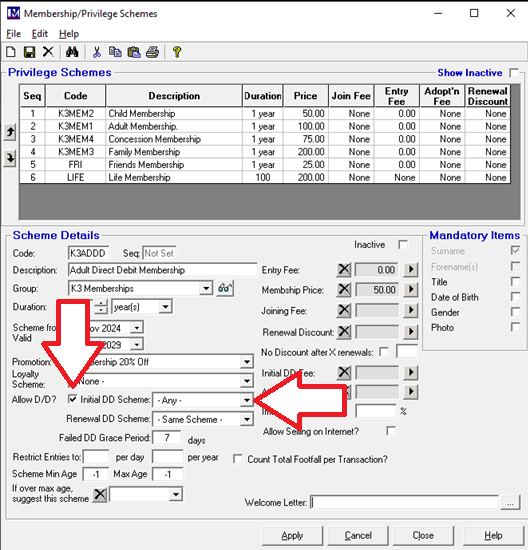
(viii) Now select the ‘Initial DD Scheme’ that is required, using the drop-down menu. Please note per membership type you can decide the initial direct debit scheme for each membership type here. An example of the options that will be presented are shown below where Annual and Monthly direct debit schemes only have been created. Any direct debit schemes set up will appear as options in the drop down list
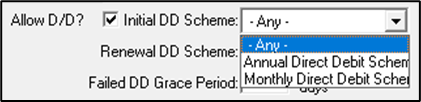
The ‘Initial DD Scheme’ for a membership type can be set to any one of the Direct Debit schemes you created. For example for all new member sign ups you may want team to pay for the first year’s membership (as our example membership duration as set to 1 year) by one single, annual direct debit payment. To do this simply select the relevant direct debit scheme, e.g. the Annual Direct Debit Scheme could be selected. Alternatively if you wanted all members that sign up by direct debit to pay by 12 monthly payments for their first years membership (as our example membership duration as set to 1 year), then this select the relevant direct debit scheme, e.g. the Monthly Direct Debit Scheme could be selected.
Please note there is also an option to select ‘Any’ in the ‘Initial DD Scheme’ drop down, which only really comes into play where more than one direct debit scheme has been set up. If 'Any' is selected, then when adding a direct debit membership "in house" in the Membership Wizard, then you can chose any of the 'Direct Debit Schemes' that have been set up. The till operator will need to ensure the required direct debit scheme is selected using the relevant dropdown. The same logic applies online, except no direct debit scheme is pre-selected online. When signing up online by direct debit the customer will have to select the required direct debit scheme, again they can select any of the direct debit schemes that have been set up.
N.B. setting up online direct debit memberships is outside the scope of this manual as online direct debits (a) is chargeable additional module that first needs to be purchased from Merac. In additional to purchasing the module (b) consultancy will also be required to advise and train you on your specific online direct debit set up requirements, as these vary per customer. If you do not already have this module please contact your Customer Success Account Manager for a quote for the module and the required training and consultancy.
As standard when signing up direct debit in house (using the new Member Wizard at the till or via the back office software) the Merac user needs to ensure they select the required DD scheme from the direct debits schemes that have been set up. The in-house, new direct member sign up process is covered later in this guide. In this scenario it has been decided that the 1st years membership will need to be paid by a single annual direct debit payment, so the ‘Initial DD Scheme’ is set to the Annual Direct Debit Scheme.

(ix) Once the initial direct debit scheme ends, you can then select the next type of direct debit scheme that this membership will be moved onto when the direct debits are renewed (by a process to bulk renewing direct debit memberships in advance of their expiry that is covered later in this guide. The direct debit scheme that this direct debit member will be moved to on renewal is known as the ‘Renewal DD Scheme’.
This can be fixed by your organisation, for example if on renewal your terms and conditions are that all direct debit memberships have to pay monthly or annually, then the ‘Renewal DD Scheme’ can be fixed by your organisation as required (e.g. as the monthly direct debit scheme as required).
If the customer was given the flexibility to choose the initial direct debit scheme on sign up, then the renewal direct debit scheme that a direct debit moves onto at renewal can be enforced to be a specific direct debit scheme for each membership type to meet tour business needs. To enforce this on renewal then set the ‘Renewal DD Scheme’ on each membership type to be as required. For example it may be that any renewing direct debit members must pay by monthly direct debit payment, then you would need to select the ‘Monthly Direct Debit Scheme’ as the ‘Renewal DD Scheme’ on each membership type you want to enforce this on.
Alternatively, there is an option for the renewal direct debit scheme to be enforced to be the same as the initial direct debit scheme that was selected by that member. This is achieved by selecting the option ‘- Same Scheme - ’ as the ‘Renewal DD Scheme’ on each membership type where this needs to be enforced. The ‘Renewal DD Scheme’ is the direct debit scheme is the direct debit payment scheme for a memberships type is the direct payment scheme all the relevant members in that membership type will be moved onto when they are renewed (please refer to the relevant section of this guide for details).
(x) The ‘Failed DD Grace period’ is the number of days “grace” you will give a direct debit member in this membership type if their direct debit payment fails before you take any action. For example you may expire their membership or perhaps even cancel their direct debt authorisation if no payment I made in this period. This is for your information purposes only and does not affect any functionality of the Merac direct debit memberships system currently. However you must enter a value between 1 and 99 in this box, otherwise you will not be able to only ‘Apply’ and save the changes to this direct debit membership type as this is mandatory data.
The following three options are not specifically required to set a membership scheme to work with direct debits, so they will be covered briefly, as they are covered in the “in house” Merac memberships set up user guide.
‘Restrict Entries to:’
This is used to restrict the member entry to either a maximum number of times per day, and / or a maximum number of times per year as required.
‘Scheme Min Age’ and ‘Max Age’:
These specify the minimum age and maximum age of members that can join this membership scheme (based on the date of birth entered for that member in the software). For this functionality to work, then ‘Date of Birth’ will need to be set as a mandatory requirement on this membership type.
‘If over max age, suggest this scheme:’
In conjunction with the above setting, if the members date of birth is over the maximum membership age, then the scheme (code) selected here will be suggested. For this functionality to work, then ‘Date of Birth’ will need to be set as a mandatory requirement on this membership type.
Next youcan select any PLU’s that to set up the membership scheme as required, the purpose of each of the required PLU’s is explained below. Creating PLU’s is outside the scope of this manual and is covered in other user guides.
‘Entry Fee:’
This is the PLU for the price charged for admission of this membership type (typically £0 price but may be or reduced priced PLU for member admission). PLU is set up in the usual way as you would set up any admission ticket PLU, but please ensure you select the PLU ‘Category’ of ‘Admission Ticket’ when creating the required PLU’s. This would typically be the PLU that records the member visit and footfall on scanning / swiping (depending on the hardware / card types purchased) / finding a member on an Merac till, so please ensure you set the footfall to be as required.
The below PLU’s need to be added using the PLU ‘Category’ set to ‘Membership’. The below are membership prices
or fees associated with signing up a membership, so generally footfall is only set on the above PLU used for member entry / re-admission.
‘Membership Price:’
This is the PLU for the full price the of the membership. For example if the member is £50 for the year, then this PLU needs to be set up with a price of £50.
‘Joining Fee:’
This is the PLU for joining fee value (if applicable). This is a one off fee applied on joining this membership type.
This fee will be added to the initial amount to collect by direct debit, but will not be charged on membership renewal.
‘Renewal Discount:’
This is the PLU for the renewal discount value (if applicable) that will be applied on membership renewal. The discount will apply to all members in a membership type and will be applied on renewal. For direct debit memberships this amount will be deducted from amount to be paid by direct debit on membership renewal.
Please note for the ‘Renewal Discount’ there is the ability to specify for how many renewals the renewal discount will apply for. If it is only to apply for X renewals then (i) click the box next to ‘No Discount after X Renewals:’ so that is ticked, then (ii) enter the required number of renewal that the discount will apply for in the box, for example 1 if the discount will only be applied the first time they renew the membership only.
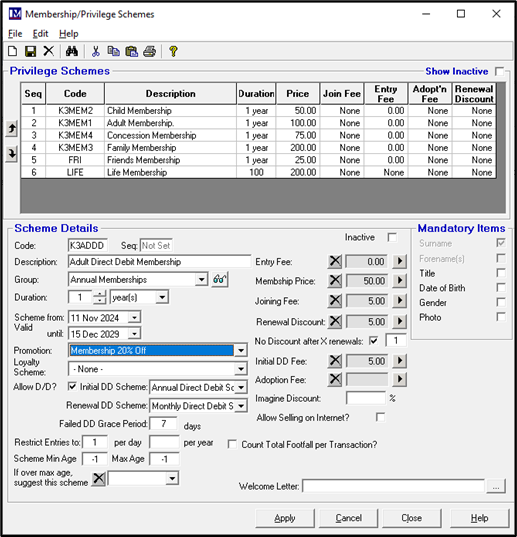
‘Initial DD Fee:’
The initial direct debit fee is a one-off “up front” fee that can be taken on signing up to a membership scheme by direct debit. For example, you may want to take an amount “up front” not by direct debit (e.g. by a debit / credit card payment) rather than the whole amount by direct debit. This is often used to cover the fact that someone could potentially become a member and select to pay by direct debit and visit your attraction, but cancel their direct debit with the bank before their first payment date. This one-off “up front” fee can be set to whatever value you want for each different direct debit membership type (e.g. the “up front” fee for a child direct debit membership could be £5, whereas for the adult direct debit membership could be £10).
You will need to create a PLU for each of the different “up front” fees you require and when creating the PLU’s please ensure the PLU ‘Category’ you select is ‘Membership’ for the various direct debit fee values you require. Please note even if you do not require any “up front” direct debit fee, then the software will require a £0 value PLU to be created and selected as the Initial DD Fee. To do this click on the relevant arrow button to select the required ‘Initial DD Fee’ PLU.
Use the search facility to find the required PLU (e.g. enter code and click ‘Search’).
If there is only one result the PLU will be highlighted already, or if there are multiple results click on the required PLU, so it is highlighted yellow. Next click on the ‘Use Selected PLU’ button.
Check all the required and correct PLU’s have been assigned to this direct membership type as require. As a quick visual check the price of the selected PLU’s appear in the relevant boxes next to where a PLU is selected. To check the actual PLU that is assigned is correct click on the ![]() button next to the PLU price to view the PLU. If a PLU selected is incorrect first click the button to clear the selected PLU. Re-select it as detailed previously. Click the ‘Apply’ button to accept any changes.
button next to the PLU price to view the PLU. If a PLU selected is incorrect first click the button to clear the selected PLU. Re-select it as detailed previously. Click the ‘Apply’ button to accept any changes.
There are other settings on this screen that are outlined below:
Imagine Discount:
Out scope of this manual as this only applies to customers with an integration to part of the Merac Imagine software suite. This option will be explained to / required but only customers with the relevant integration.
Allow Selling on Internet.
As per the reasons mentioned previously setting up direct debits to sell online is outside of the scope of this manual.
Count Footfall Per Transaction.
This option either is to the make system count customer visits either per group (one visit per transaction regardless of number of people) or per each transaction line that involved customer entry.
Welcome Letter:
The required Microsoft Word mail merge template document can be selected here using the![]() button, which opens a file explorer window for you to select the required file. Please note this will require you to have Microsoft word installed by your IT team and to also to have had training in Merac on how to create mail merge templates by adding merge fields (e.g. name, address details, membership type, membership expiry date etc) into existing Word documents. This training is outside the scope of this manual and is covered in a separate guide. Once this is set up, then on signing up a member you will be able to print welcome / sign up letters to a Windows Printer that is networked to your tills. Your IT team will need to ensure the printer is set up / available on the same network as your Merac tills.
button, which opens a file explorer window for you to select the required file. Please note this will require you to have Microsoft word installed by your IT team and to also to have had training in Merac on how to create mail merge templates by adding merge fields (e.g. name, address details, membership type, membership expiry date etc) into existing Word documents. This training is outside the scope of this manual and is covered in a separate guide. Once this is set up, then on signing up a member you will be able to print welcome / sign up letters to a Windows Printer that is networked to your tills. Your IT team will need to ensure the printer is set up / available on the same network as your Merac tills.
Mandatory Items
Per membership type you can click in the tick box to make Title (salutation), Date of Birth, Gender or Photo as mandatory requirements (the latter will require compatible web cameras to have been installed on you tills by Merac). Tick these as required then these will become mandatory when using the ‘Member Wizard’. Please note further mandatory options can be defined in Setup > System > System Options on the Membership tab. There are options to set the Address, Town, Postcode, Telephone, Email and Account Source as mandatory as required. However, these mandatory options set in System Options will be mandatory for all membership types.
Once all you have finished all the set-up for this direct membership type, click on ‘Apply’ button to save the changes. Repeat the processes detailed above to create all the direct debit membership schemes (types) as required.
Click on ‘Close’ once you have finished creating all the required membership schemes.
Signing Up New Members at the Till – New Member Wizard
Login to an Merac EPoS till that has the ‘New Member’ button on it and click on this button.
Please Note:
Someone may have renamed this button on your till. If so, please ask your colleagues what this button is called. If you do not have the button on your till then ask one of your colleagues in your organisation to add this button to your tills screens. For your information is the ‘Command’ type button and you need to select the specific command called ‘New Member Wizard’ but you can name (colour /size) and position this button as required.
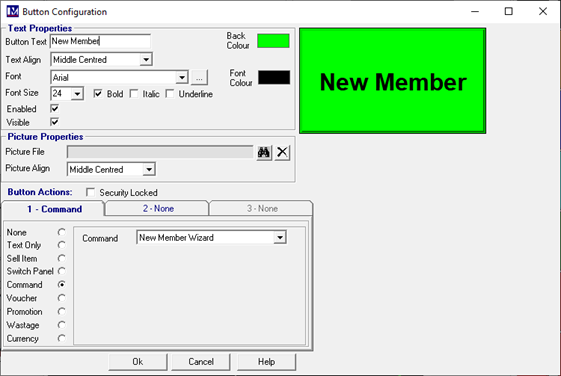
The ‘New Member Wizard’ screen will appear as shown below.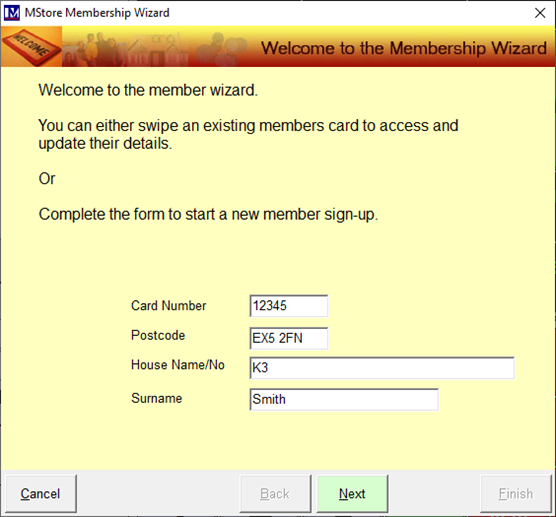
Where pre-printed, barcoded member cards have been purchased from your preferred plastic card suppliers, then simply type in the member card number from the card into the ‘Swipe Card’ box. Alternatively if the till has a barcode scanner then you can scan the barcode for the member card number on the card to populate the ‘Swipe Card’ field with the member card number. Alternatively for customers that have member card printers that are connected to their Merac tills then the members card numbers will be automatically generated. In this scenario then the ‘Swipe Card’ field will show the word ‘Auto’ and there will be no need to type in / scan the member card number, as the member card number will automatically be generated by Merac and printed onto the member card.
Next, enter the members ‘Postcode’, ‘House Name/No’ and ‘Surname’ as required, then click ‘Next’.
Please note the Surname is the surname of who this membership is being purchased for.
You will notice some of the details from the previous screen have now populated into this screen.
The ‘Card Number’ has populated the relevant field (next to the text ‘Swipe Card’).
The‘Surnme’ box has also been populated with name of the person this membership is for.
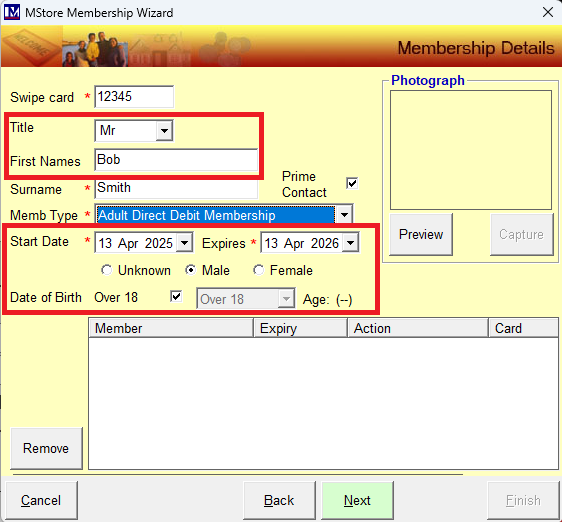
This data can be corrected at this stage if any errors were made, by editing the data in the specific field.
If required pick the ‘Title’ from the dropdown list of options.
Please note if ‘Title’ has been set to mandatory it will be required, if not then it will be optional to select this.
If the title does not already exist in the dropdown the new ‘Title’ can just be typed in as required.
In the ‘First Names’ box enter the first name / names of who this membership is for.
Next, select the required direct debit ‘Memb Type’ (membership type) from the drop-down list.
In this scenario the ‘Adult Direct Debit Membership’ type we created earlier has been selected.
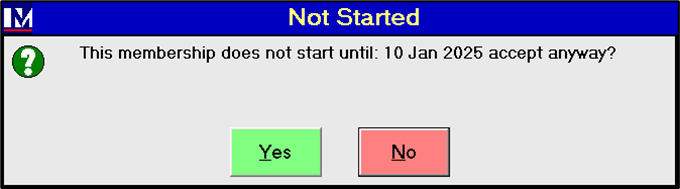
Please note the ‘Start Date’ will default to today’s date and the ‘Expires’ date will be calculated. The calculation is based on the ‘Duration’ of the membership you selected for this membership type). If the start date is not today this can be amended as required and the software will automatically recalculate the ‘Expires’ date based on the new date entered. But please note if the member tries to enter before this date the till will display a warning message as shown below. The till operator can then decide based on your own policies whether they are to be admitted, then click ‘Yes’ or 'No’ as is appropriate.
If required the gender can then be selected if required by clicking an option where shown.
There are options of ‘Unknown’, ‘Male’ or ‘Female’. Select as /if required
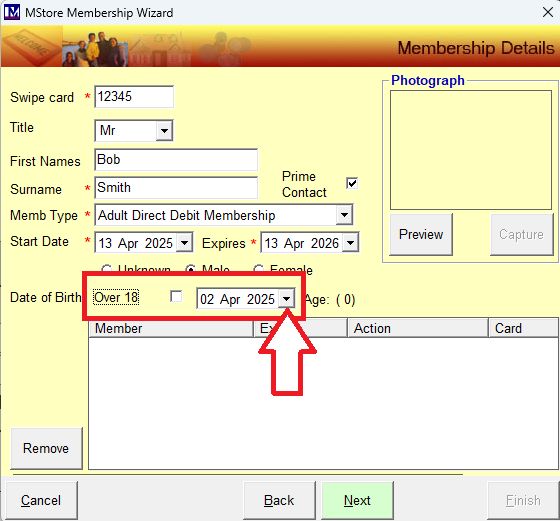
Next there is date of birth, if this is not mandatory then there is no need to select the date. However, if this has been set to mandatory or is optional for the customer to provide this then you will need to select the date of birth. If the ‘Date of birth’ is required click on the tick box the right of the text ‘Over 18’, so the box is un-ticked. Click on the dropdown where shown and select the required date of birth using the calendar that appears.
A calendar will appear. If you click on the text for the year at the top of this date selector screen
If you click on the text for the year at the top of this date selector screen then up / down arrows appear.
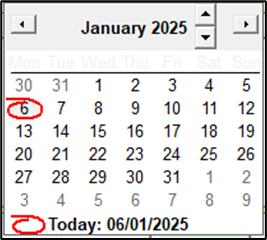
Click the arrows to the right of the year to select the year as required.
Similarly can select the month by clicking on the text for the month, then a month selector appears
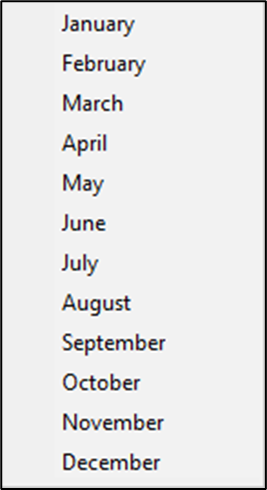
Simply click on the required month from the month pop up selector to select it.
Finally select the required date from the calendar by clicking on it, in this case the 1st (of January) was selected.
The selected birth date will now be showing in the ‘Date of Birth’ field.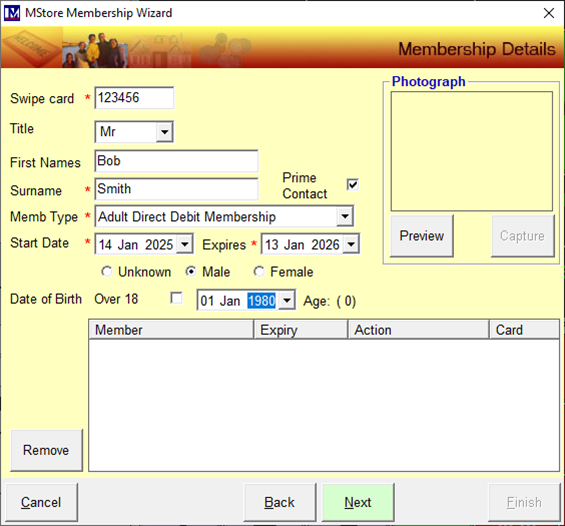
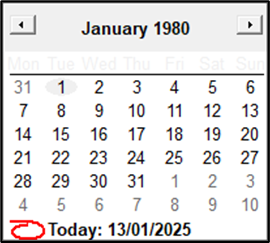
Alternatively if you prefer and it can be quicker for entering the date, first click on the year so it is highlighted.
Type in the year in 4 digit (YYYY) format, e.g. type in 1980.
Next click on the month so it is highlighted then enter the month number (1 for January up to 12 for December).
Finally, click on the day of the month so it is highlighted then enter the required number.
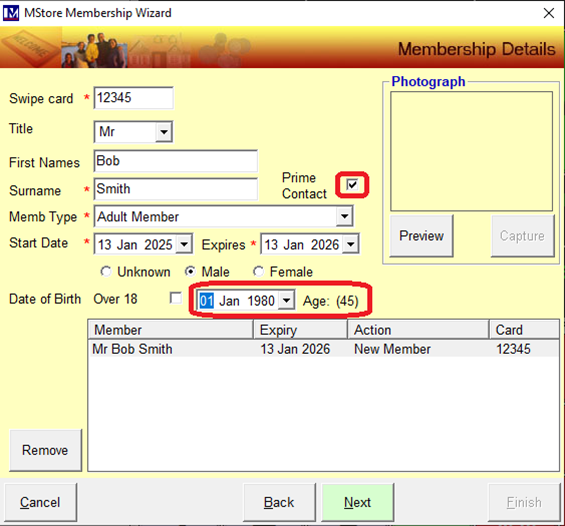
Once selected then check that the correct date of birth is showing in the ‘Date of Birth’ field.
Please note by default the first member added will have the ‘Prime Contact’ tick box ticked.
If required then a member photo can also be taken. This will need compatible web cameras to have been purchased from Merac and installed on all the tills these are required on. If you are interested in having web cameras installed for taking member photos on your tills (or back office computers), then please contact your Customer Success Account Manager.
To take a photo using a web camera first click the ‘Preview’ button.
Get the member to stand in front of the camera and check that they are positioned where required.
Click the ‘Capture’ button to take the photo and check the photo is as required.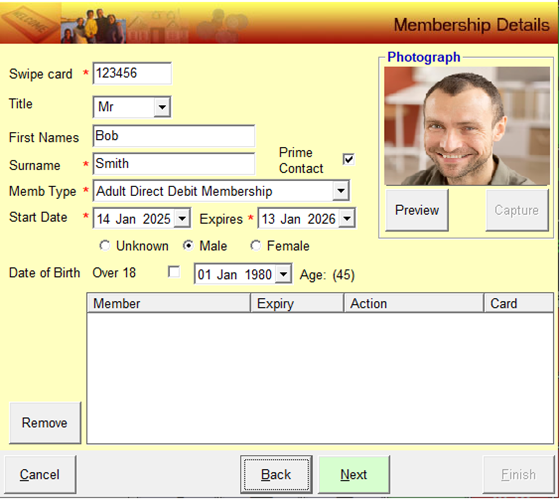
If not click ‘Preview’ button again and repeat until the required photo is seen in the ‘Photograph’ window.
This photo will be shown at the till when the member card is scanned and can be seen in the Merac software. N.B this photo can also be viewed in the member record in the Merac back office software, where it can be deleted and a new member photo could also be taken if that computer also has a compatible web camera installed.
Click on the ‘Next’ button.
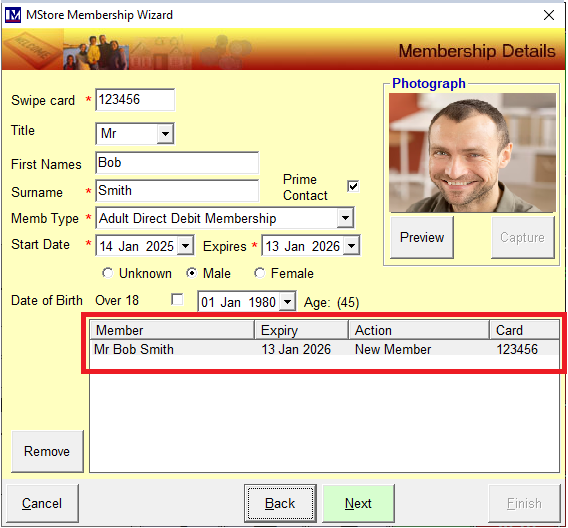
You will now see the member details showing in the bottom half of this screen.
N.B. for this guide the scenario we will use is one member, paying for their own membership by direct debit.
However, you can sign up other family members that will pay by direct debit at the same time. In the above scenario pre-printed member card are used, so the ‘Swipe Card’ field will now be blank. To add a new member then you take a new card and then scan / swipe the card (depending on the member card type and till hardware purchased) or key in the new member card number to populate the ‘Swipe Card’ field with the next card number. Then repeat the steps detailed previously starting from the ‘Title’ selection.
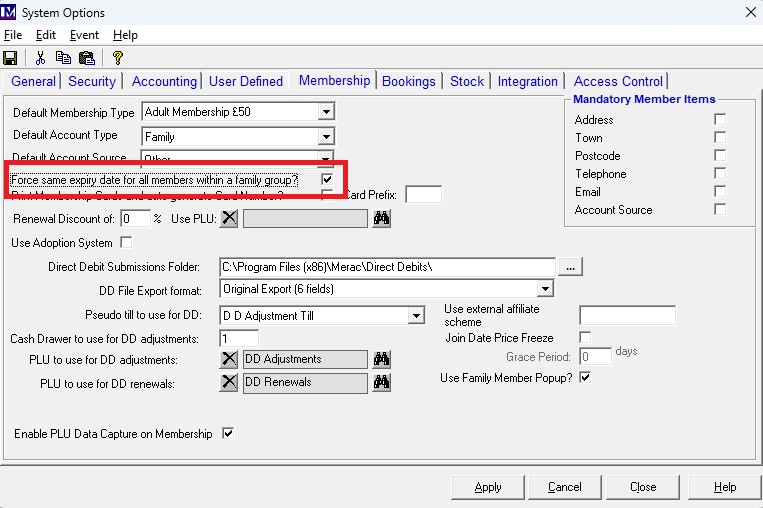
Important note: where multiple family members are being signed up by direct debit in Merac then all the membership expiry dates of the family members must be the same. Please note there is a 'System Option' that can be enabled to remind you that all family members should have the same expiry date. This can be found in Setup > System > System Options, then click on the 'Membership' tab. Click the option shown so that it is ticked and click 'Apply' to accept this change. You will now be prompted if members in a family have different expiry dates.
Where a member card printer has been purchased the ‘Swipe Card’ field would not be blank but would instead show the word ‘Auto’. To add another family member that will pay by direct debit, then likewise repeat the steps detailed previously starting from the ‘Title’ selection.
Once all the member names are showing in the bottom half of the screen, click the ‘Next’ button to proceed.
You will now be at the above screen.
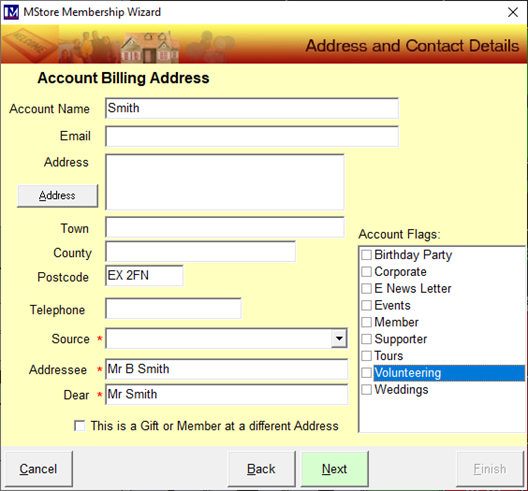
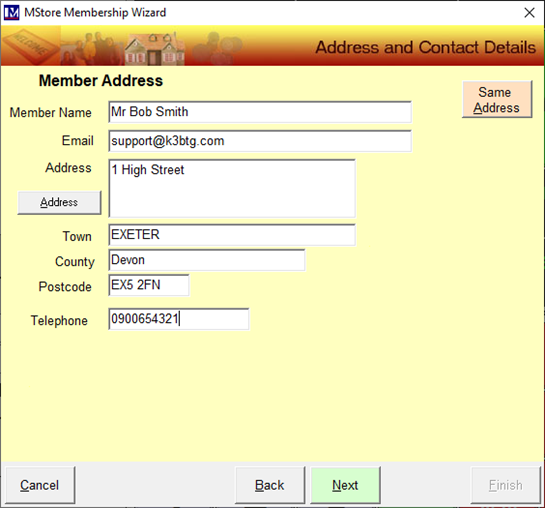
The below screen will be showing and is for entering the ‘Account Billing Address’.
So this screen is where you enter the details of the person that is paying for these memberships.
You will notice some of the fields will have been automatically populated from data entered in previous screens.
E.g. the ‘Account Name’ has been populated (with the member surname) but this can be amended if required.
Click in the ‘Email’ field and type in the required email address.
This can be left blank if it was not set to be mandatory, however you may still prefer to ask the customer for this.
If it was set as mandatory then an entry will be required in this field ( a red * shows to the left of mandatory fields)
If this field was set to mandatory but the customer does not have or declines to provide an email address, then only an entry of ‘none’ will be accepted in this in box (i.e. a blank entry will NOT be accepted).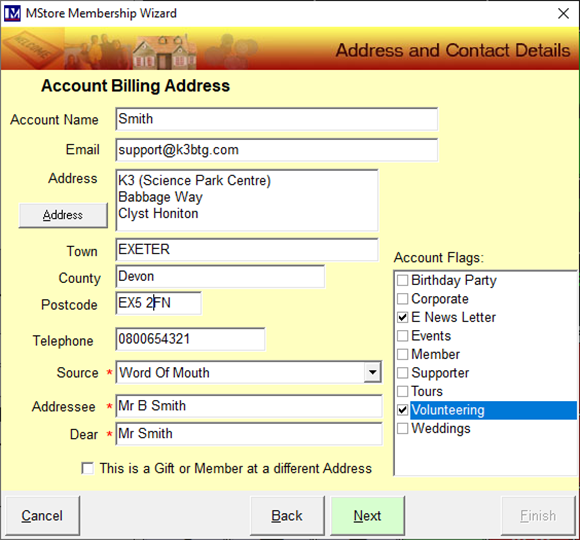
You can click and type into the address field and enter the address line 1.
Then click on the next line and enter address line 2 etc.
Alternatively click the ‘Address’ button and the following screen appears. This screen can be used to key in the address fields but will be used by those customers who have purchased the post code look up software integration.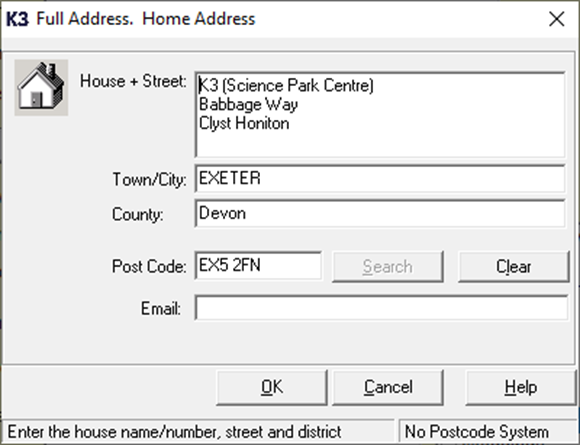
Please note for customers who have purchased the post code look up software integration only, the ‘Search’ button (o the right of the ‘Post Code’) field will not be greyed out. For those customers first enter the post code, then click ‘Search’ button. This will bring up a list of all the addresses that match the post code. You simply then select the relevant one and the other information will be automatically populated. For more details on the post code lookup software integration contact your Account Manager.
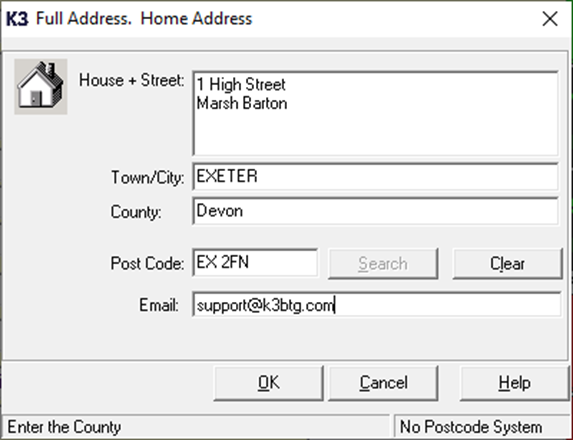
For customers without the postcode lookup software integration, the search button to the right of the ‘Post Code’ field will be greyed out and the relevant address details will need to be entered using a keyboard. The cursor defaults to the ‘House + Street’ field. Enter the house number and street using your keyboard. Enter the first address line using your keyboard.
If a second address line is required press the ‘Enter’ key on your keyboard, then type this in.
Repeat the above if a 3rd or 4th address line is required.
However, please note there are separate fields for entering town / city , county and post code.
You now need to populate the remaining data by clicking in the relevant field and entering the data as required.
‘Town/City:’ click in (or use the ‘Tab’ key to go down to) this field and type in the town / city as required.
‘County’: click in (or use the ‘Tab’ key to go down to) this field and type in the county as required.
‘Post Code’: click in (or use the ‘Tab’ key to go down to) this field and type in the post code as required.
‘Email: click in (or use the ‘Tab’ key to go down to) this field and type in the email address as required.
Click the ‘Ok’ button once all the required data has been entered
Next (if required) click in the ‘Telephone’ filed and type in the appropriate telephone number.
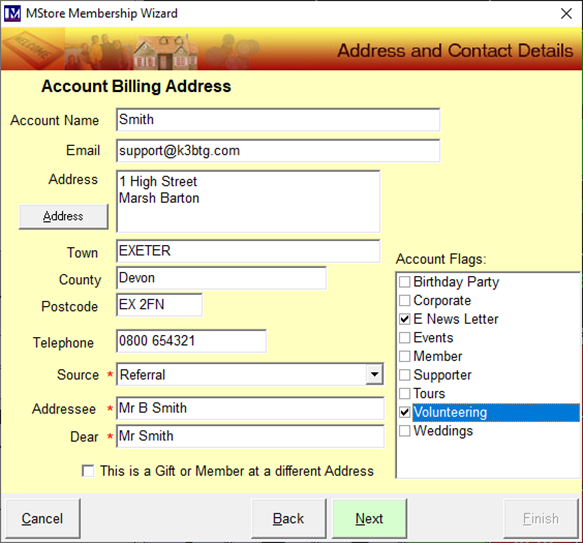
Next you must select a single Account ‘Source’ from the dropdown menu of options.
This is essentially used to “tag” this record with a specific ‘Account Source’ as required by your business. The list of options in the ‘Account ‘Source’ dropdown is set up and controlled by your business (this is done in set up in Setup > System > Lookup Items > Account Source). Likewise there is the ability to tag this customer record with multiple ‘Account Flags’. This is again a list of options that is user definable, which is set up and controlled by your business (this list of options is set up in Setup > System > Lookup Items > Account Flags). These could be e.g. to record a customer wants to receive newsletter and is happy to be contacted about volunteering (or both as multiple ‘Account Flags’ can be selected). Elsewhere in Merac (‘Member Mailing’) can use this information to extract lists of customers that have specific ‘Account Source’ or ‘Account Flags’ and these lists can be used to start a Word mail merge or the data can be exported in Microsoft Excel. Please refer to the separate user guide or contact your Customer Success Account Manager for a quote.
If required, amend the ‘Addressee’ and ‘Dear’ text as required (these were automatically populated). These fields are specifically used as the ‘Addressee’ and ‘Dear’ name for mail merges, as MeracMerac has functionality to select specific member records and then start a mail merge to those specific members using Microsoft Word. How to set up mail merge templates and using the ‘Member Mailing’ functionality are covered in a separate user guide.
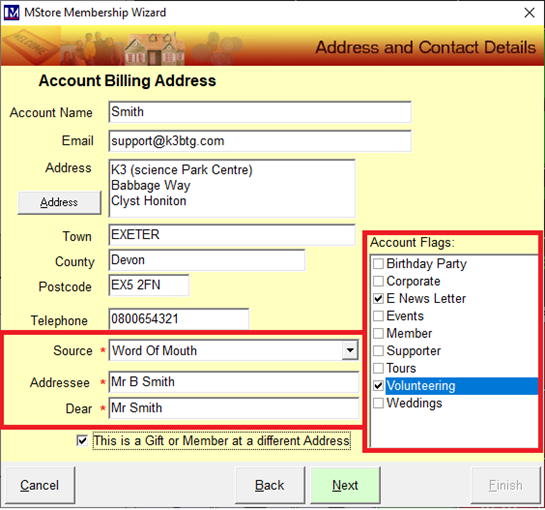
Please note although in this guide we will be using the scenario where the purchaser is buying the membership for themselves, if the purchaser was buying for someone else, then this box can be ticked labelled ‘This is a gift or Member at a different Address’.
When the previous screen has been completed and the ‘Next’ button is clicked when option ‘This is a gift or Member at a different Address’ had been ticked, then an additional screen would be seen like the one shown below. This allows you then to enter who the membership was being purchased for. If the account holder (purchaser) lives at the same address as the person they are buying the membership for, click the ‘Same Address’ button to populate this form.
For this guide we will proceed without the option ‘This is a gift or Member at a different Address’ being ticked. So once all the information has been entered into the below screen then it will not proceed to the above screen, as the option ‘This is a gift or Member at a different Address’ was unticked.
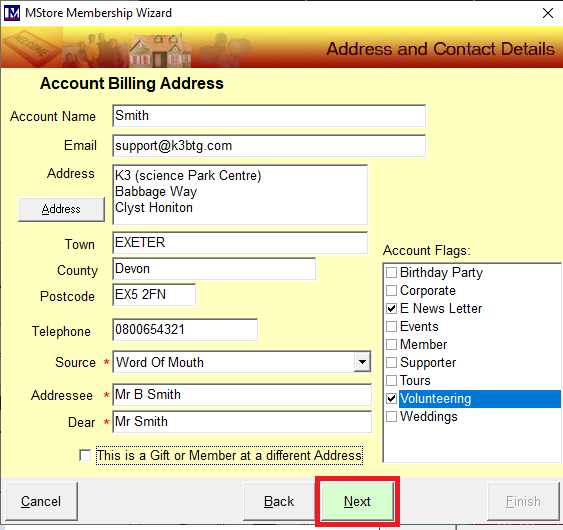
Click ‘Next’ will proceed to the screen as shown on the next page.
Please Note:
The following screen is based on customers having the GDPR functionality in place. For customers without the GDPR functionality in place then there will just be two tick box options in the top right of the above screen. There will be one tick box for ‘Ok to Mail’ and another for ‘Ok to Mail’ that can be ticked as required. These are the old pre-GDPR mailing options for the customer mailing preferences which have now been superseded by an the GDPR module which allows you to design your own GDPR options which enable you to select the relevant GDPR options both in-house and online. Please contact your Account Manager for more details on the GDPR module functionality and training.
Now click on the GDPR options for that customer so they are ticked.
If the customer wishes to opt out of all contact then simply click the ‘Do not make contact’ option so that it is ticked.
If they are not opting out then you will need to select the relevant GDPR options. Please note as standard there are three sections of GDPR options (i) Reason for Customer Data (ii) How the customer data is used (iii) Who can use the Customer data. You will have to select at least one option from each section, so click in the relevant box(es) to select the customer’s GDPR preferences.
Please note for speed if a customer want to opt in to all options in a section click the ‘Select All’ box.
Once the required GDPR options have been selected click on the ‘Next’ button.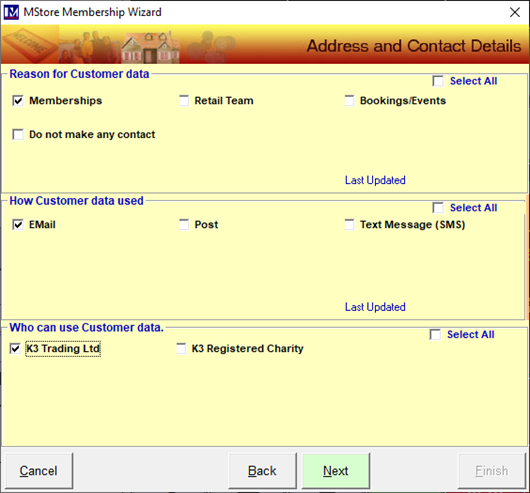
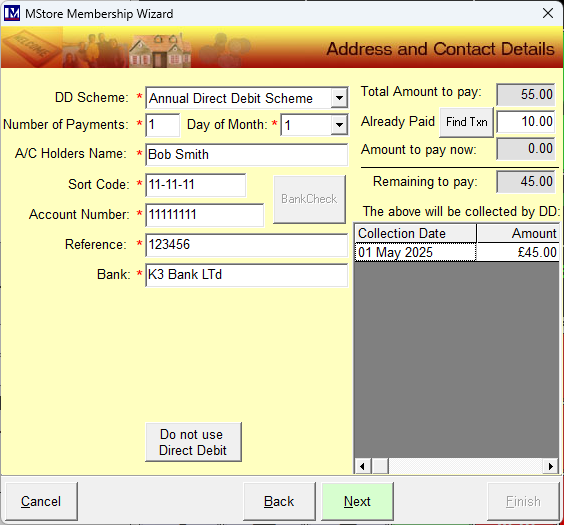
The below screen now appears in which you can select the information required to set up the direct debit.
First select the required ‘DD Scheme’ where shown using the dropdown.
N.B. is very important you check that the correct direct debit scheme is selected here
All direct debit schemes that have been set up in MeracMerac will be available from this dropdown.
Use the dropdown to select the required initial direct debit scheme. Check this is correct before proceeding.
Selecting the wrong direct debt scheme will impact the number and date of collections.
It can also impact the payment amounts, as the direct debit scheme selected can apply a discount.
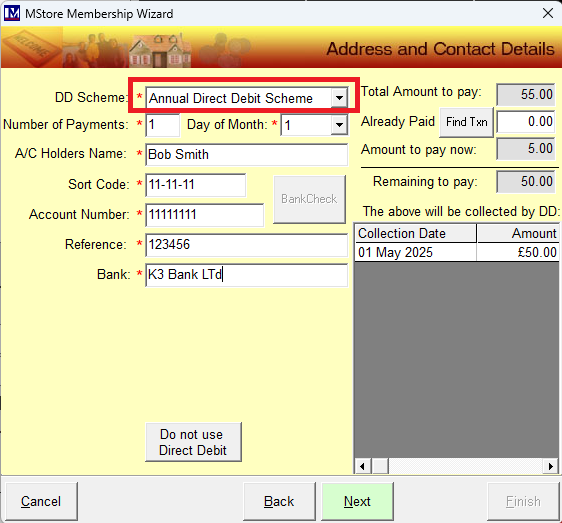
Once the correct initial direct debit scheme is selected and has been checked, then proceed entering the other data.
Please note the software automatically fills in the ‘Number of Payments’ and the ‘Day of Month’ on which the payment will be taken, based on the ‘DD Scheme’ you selected. Likewise, in the bottom right hand corner of this screen the payment ‘Collection Date’(s)are shown, these are also based on the ‘DD Scheme’ you selected.
Please check again these are correct because if not it likely you selected the wrong direct debit scheme (or perhaps you have set up the direct debit scheme incorrectly if you are still testing your setup)
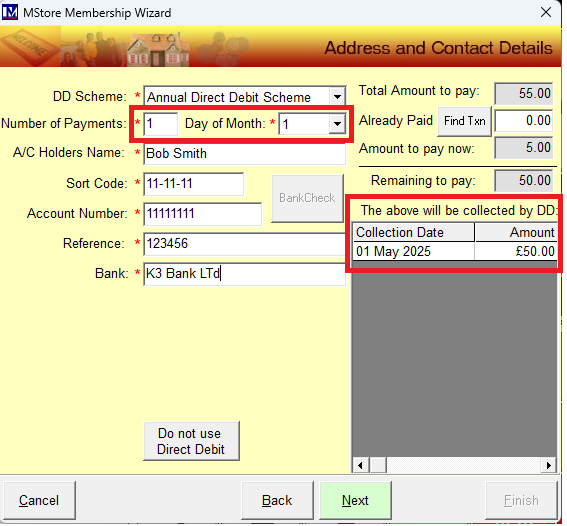
Next you need to click in each field required for taking payment by direct debit.
These will need to be supplied by the customer, so they will need to have these details to hand.
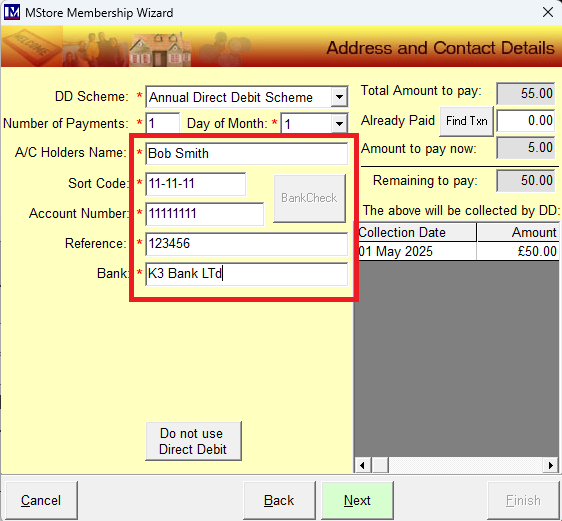
Click in each field and type in the details required. Field descriptions are given below:
A/C Holders Name: Enter the account holders name exactly as per their bank account.
Sort Code: Enter the sort code exactly as per their bank account (6 digits)
Account Number: Enter the bank account number exactly as per their bank account (8 digits).
Account Reference: Enter the reference for this payment
This will be the reference on their bank statements (18 characters maximum)
Bank: The bank name exactly as per their bank account (25 characters maximum)
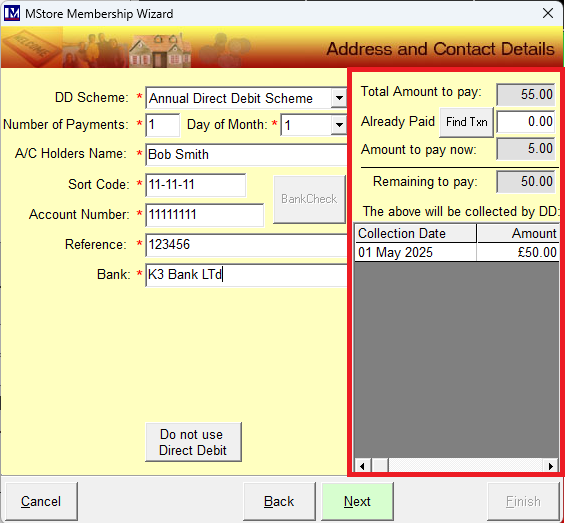
Please note a breakdown of the “up front” and any other payments and the total amount to be collected by direct debit is broken down on the right hand side. These amounts shown in this screen will depend on the set up detailed in previous sections of this manual.
Once you have checked and amended the details as required, then click ‘Next’.
If you wish to deduct the customer’s day ticket price, then you can do this using the ‘Already Paid’ box.
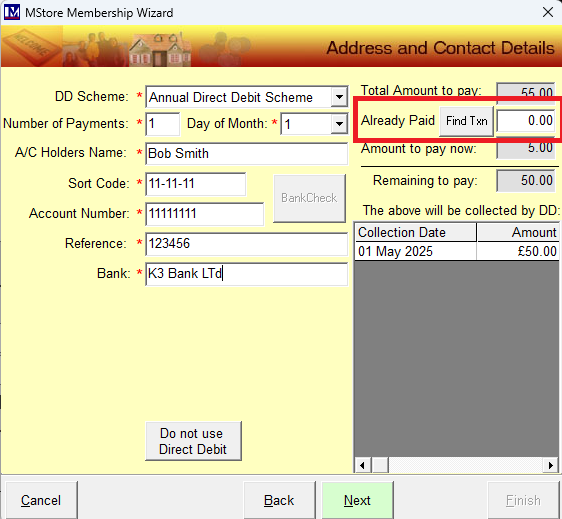
The simplest way to deduct the day ticket price is to type in the required amount to deduct in the ‘Already Paid’ box, e.g. enter 10.00 in this box to deduct £10.00).
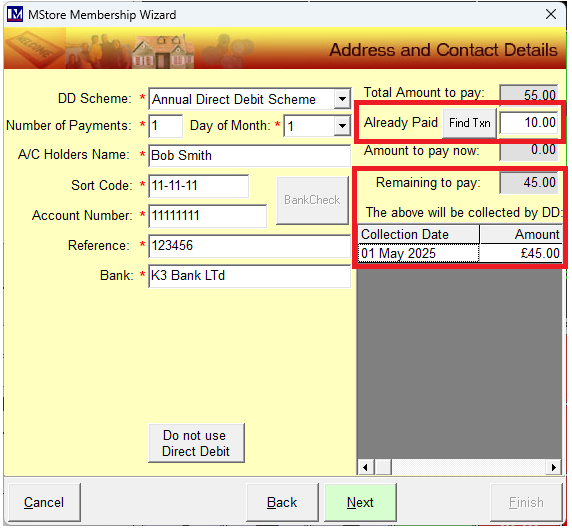
If there was a value in the ‘Amount to pay now’ box you will notice this has now been automatically reduced by the value entered in the ‘Already Paid’ box. Plus the 'Remaining to pay:' and 'Amount' figures are deducted accordingly.
Alternatively, you can look up the customer’s transaction to find the amount ‘Already Paid’, to do you will need the customer’s receipt. To do this click on the ‘Find Txn’ button
You will now see the following screen.

Find the till number and transaction number from the customer’s receipt.
Enter the till number in ‘Till No:’ box (e.g. 1) and enter the transaction number in the ‘TXN No:’ box (e.g. 768848).
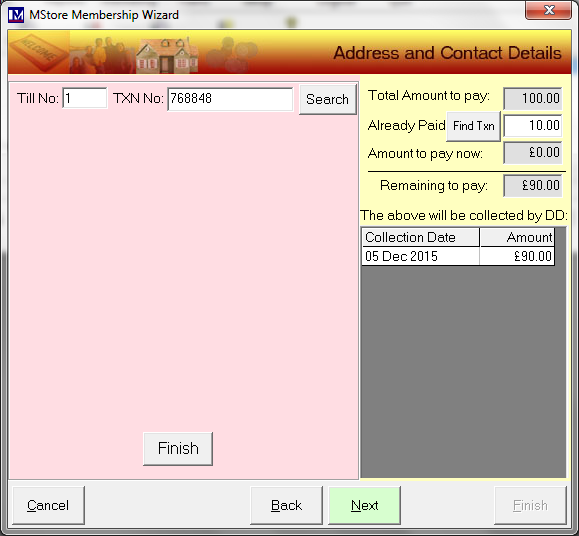
Next click on the ‘Search’ button.

You will now see the transaction lines showing on the screen
You need to select the item you required by clicking on the![]() button, to the right of the item.
button, to the right of the item.
When you do this, you will notice that this now turns to a tick ![]()
You will notice the ‘Already Paid’ box is now populated with the amount you selected.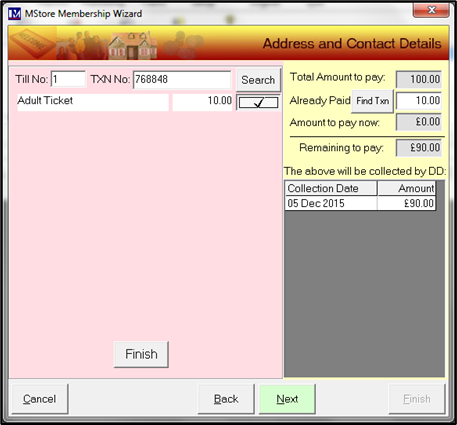
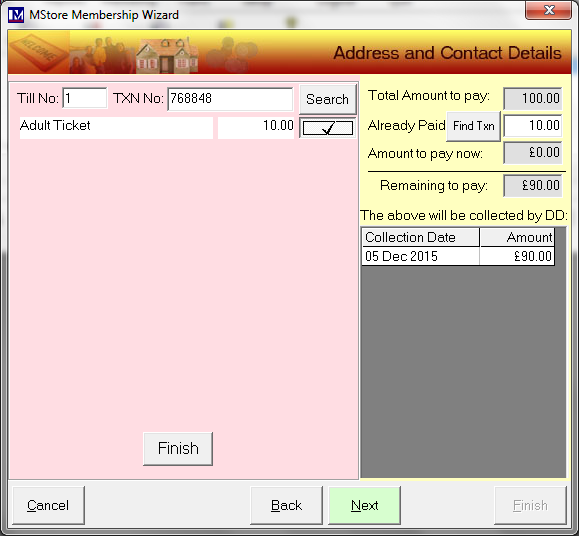
Next click the ‘Finish’ button here at the bottom of the screen.
You will now be at the screen shown below.
Confirm the details are correct and make any changes as required.
Once all the details are correct, click the ‘Next’ button.
If this membership was set up so it can be gift aided then you need to ensure the 'Gift Aid' option is set as required.
Click on the 'Gift Aid' tick box to toggle this on/off as required - ticked is gift aid on / unticked is gift aid off.
The gift aid claim date can be amended as required if you are e.g. retrospectively signing up members on the till.
If a ‘Welcome Letter’ was selected when you set up this membership type, then you will see a ![]() button to the right of the text ‘Print Welcome Letter?’ When the tick button is showing the 'Welcome Letter' will be printed.
button to the right of the text ‘Print Welcome Letter?’ When the tick button is showing the 'Welcome Letter' will be printed.
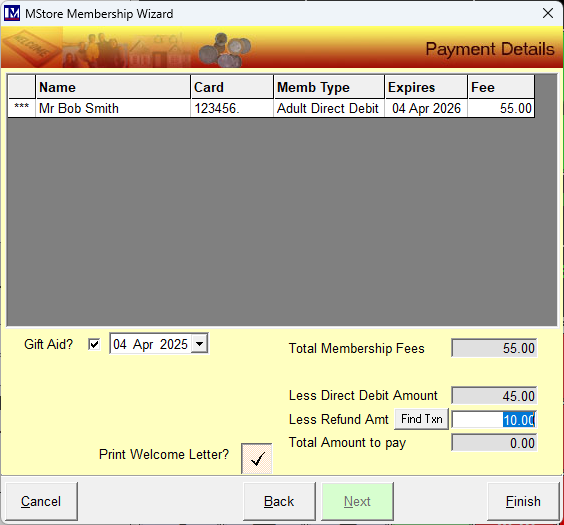
If you do not require the ‘Welcome Letter’ to be printed click on the![]() and it will change to a
and it will change to a![]()

When the ![]() is button showing, this means that a ‘Welcome Letter’ will not be printed
is button showing, this means that a ‘Welcome Letter’ will not be printed
Please note that a ‘Welcome Letter’ must first be created as Microsoft mail merge template document.
The creation of Microsoft mail merge template documents is covered in a separate manual.
Once the required options have been selected click the ‘Finish’ button.
If you selected the option to print a ‘Welcome Letter’ this document will not be printed automatically. The ‘Welcome Letter’ to print this will now open in the background in Microsoft Word, as long as Microsoft Word has been installed on this computer. Please note that installing and supporting Microsoft Word is not carried out by Merac, this must be done by your own IT Department or external IT support company. If installed, click on the Microsoft Word icon on the taskbar to view and print this letter as required.
If you (i) have a member card printer attached that was supplied and installed by Merac and (ii) your membership type(s) in MeracMerac have been configured to print member cards, then you will now see a screen asking you to select your member card printer. This is the standard Microsoft Windows printer selection screen, simply select the member card printer and ensure the quantity to print is as required, then tap the ‘Print’ button.
The till basket will show the total of all the fees expected even if they are paying by direct debit.
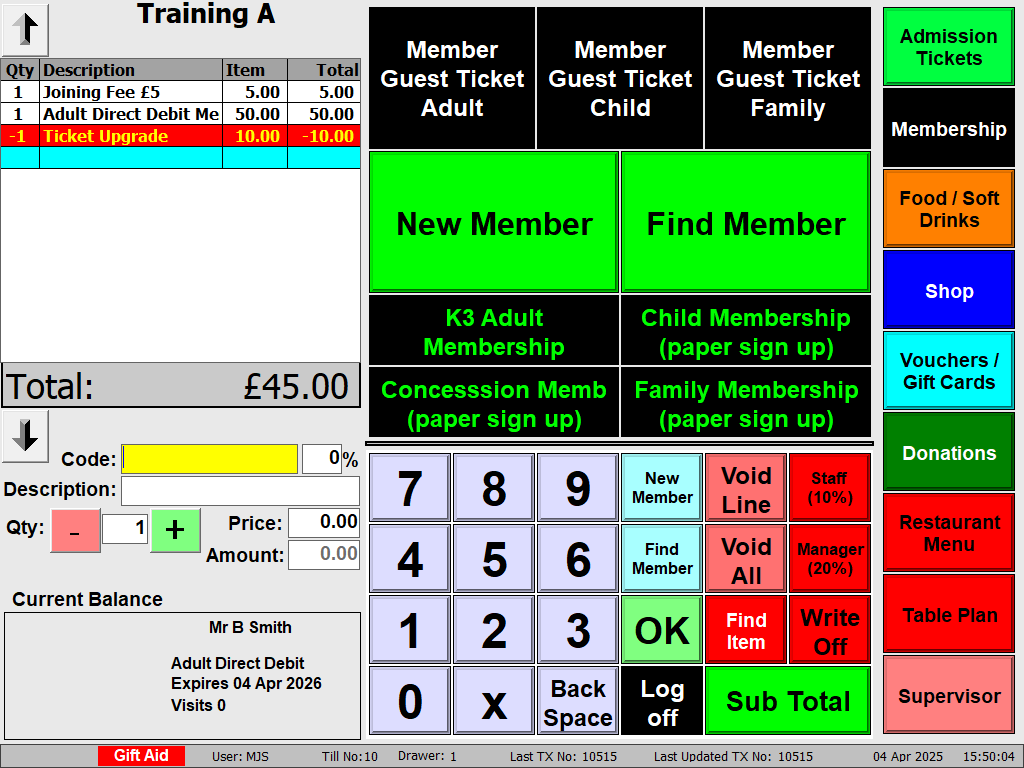
Press ‘Subtotal’ button as usual to show the payment methods.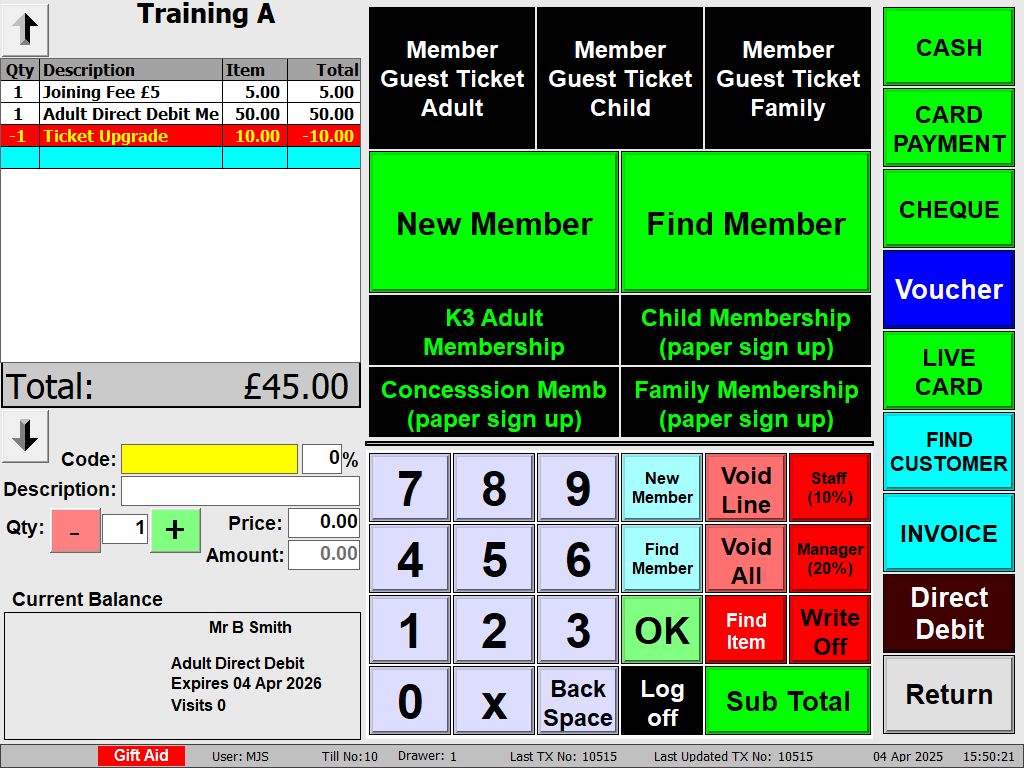
If 'Gift Aid' was selected then you will now be presented with the 'Enter Gift Aid Details' screen.

The amount to pay will only be any "up-front" fees that must be paid at this point (e.g. the ‘Initial DD Fee’ if applicable).
(i) If there are no payments necessary, you can press the ‘Cash’ button to complete the transaction.
(ii) If there are any payments required, simply complete the transaction as usual, by taking the required amount using one of the payment methods you have available (e.g. Credit Card, Cash etc).
In this scenario there were no up front payments and the £40 showing in the basket is to be paid by direct debit, so the 'Cash' button was pressed as the 'Amount to Pay' is £0. If there was any e.g. "up front fees" to pay that will not be paid for by direct debit, the 'Amount to Pay' will be populated with the money that needs to be paid "up front". If there was no amount to pay click the 'Ok' button twice to complete the transaction, pay the expected amount in the usual way. 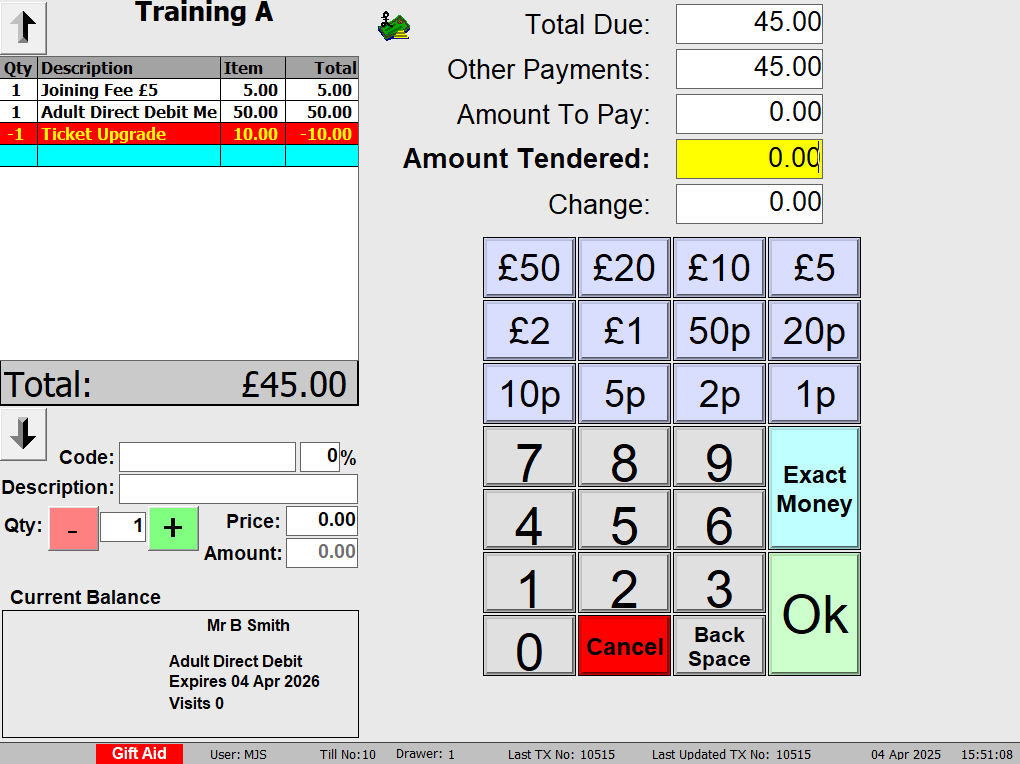
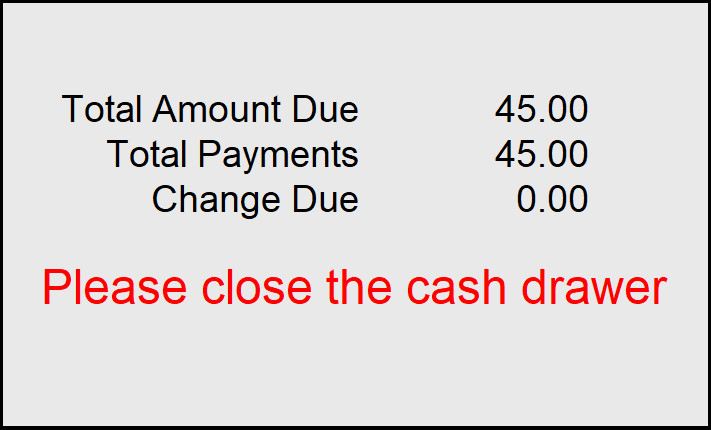
The below message will appear. Close the cash drawer in the usual way or tap this screen and this message disappears.
N.B. the member record(s) have now been created and can be found in the ‘Member’ database in Merac.
It is not necessary to find the member in the database at this point but for your information finding and amending member details is covered later in this guide.
Creating and Submitting the Initial Submission Instruction
Please note that for newly created members that have opted to use direct debits, before any direct debit payments can be taken a process needs to be carried out to both check that the bank account details that these members provided are correct and to set up the direct debit with the bank. This type of submission does not take any money from these members’ bank accounts and is known as the “Initial Instruction Submission” in Merac. A very brief overview of this process is given below:
(i) A file containing direct debit account details for checking is created using Merac.
(ii) This file is submitted by you to the bank electronically.
(iii) Your bank checks the details, which may take several days.
(iv) Your bank provides a response to say which accounts are OK and which are not.
The only part of the above process that is required in Merac, is to create the “Initial Instruction Submission” file. Please supply Merac with the preferred location of this file, so we can specify this location in the Merac software for you.
This procedure to create this file in the MeracMerac back office software is explained below:
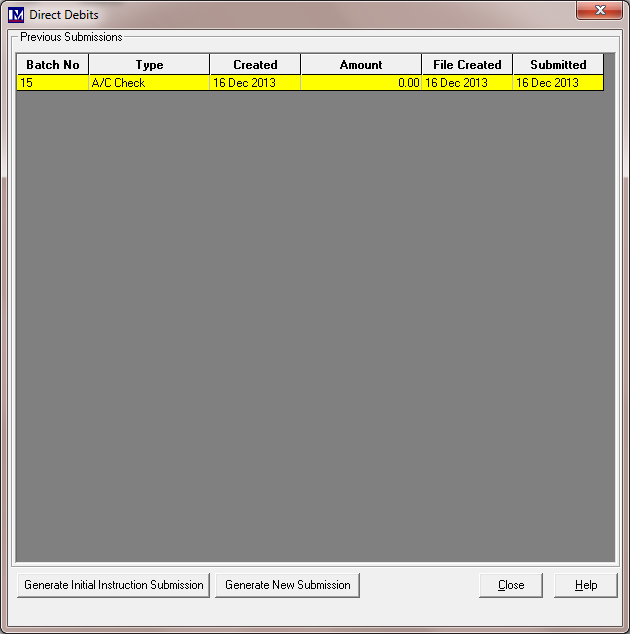
1. Click Setup > 2. Click Customer > 3. Double click Direct Debit Submissions
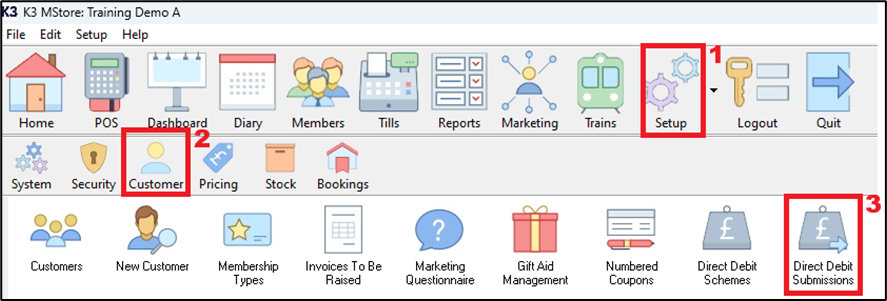
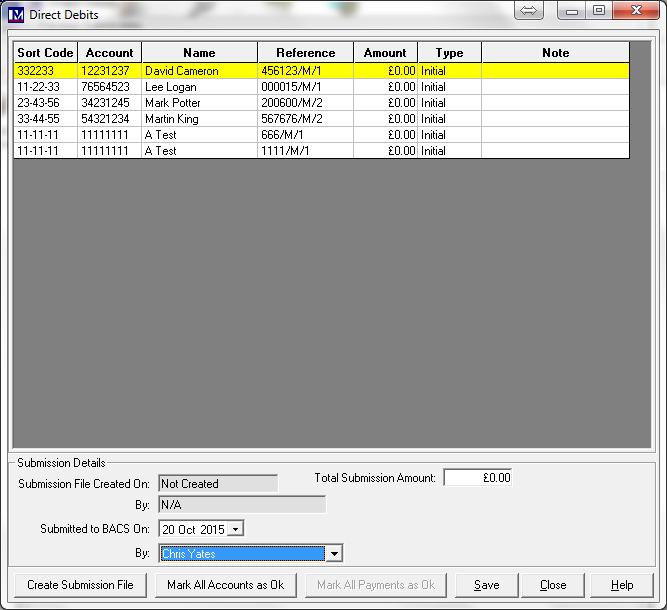
You will now see the screen below.
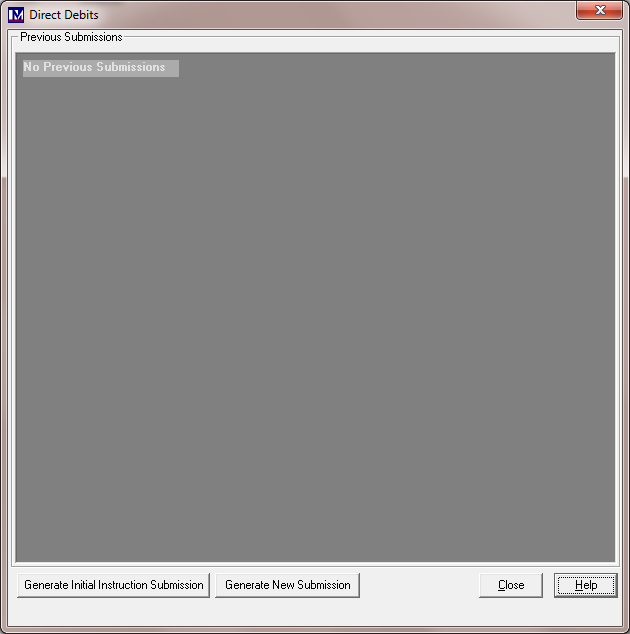
Now click on the button ‘Generate Initial Instruction Submission’ button.
This shows the account details for all members whose accounts need checking by your bank.
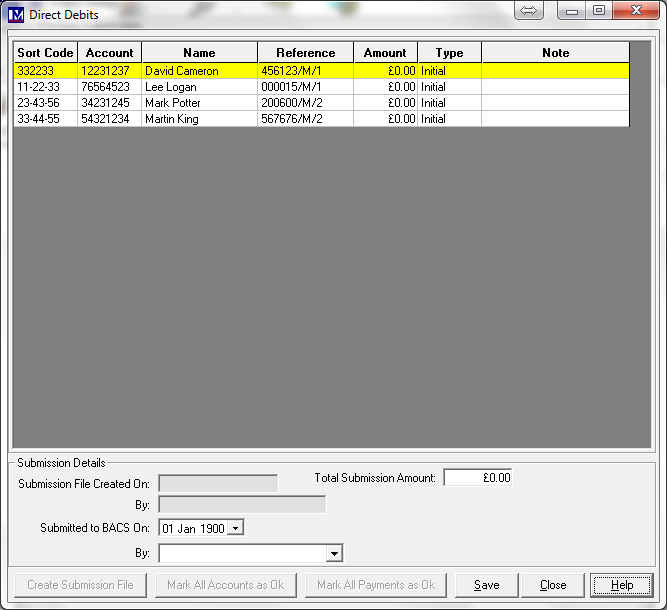
At this point click on the ‘Save’ button.
Now click on the ‘Create Submission File’ button, at the bottom left of the screen.
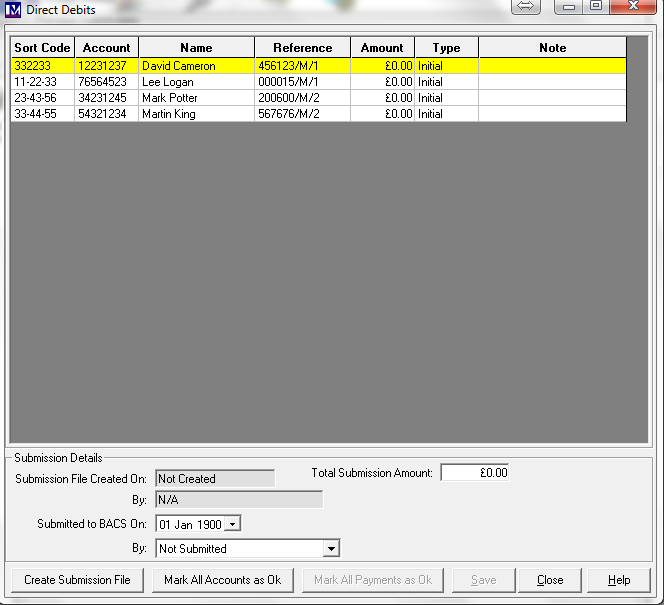
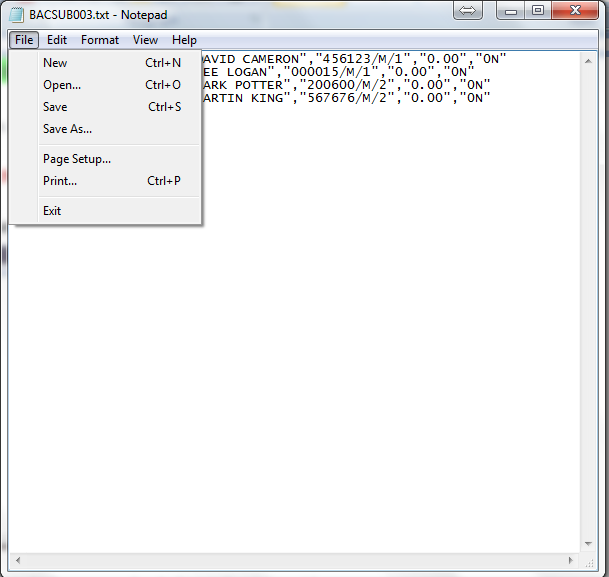
At this point, the submission file is created as a text file, which should open in Microsoft Notepad.
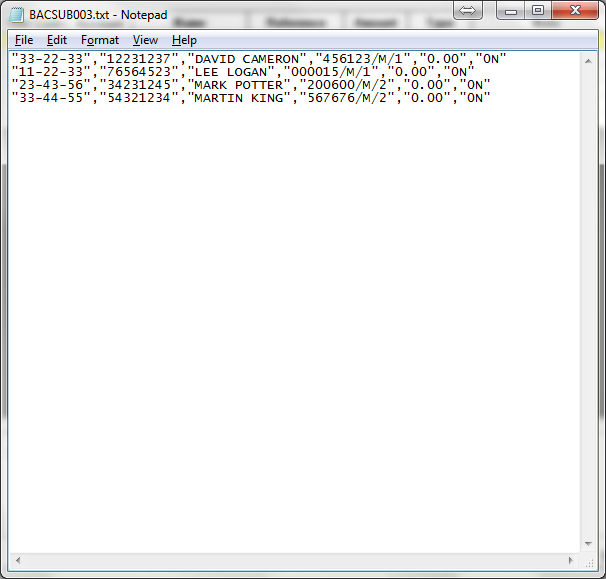
The file will be in the format of the example shown above.
Please note in some versions of Windows this file may not show automatically on your screen.
If not, then look on your Windows ‘Taskbar’ and click on the ![]() icon to view the file.
icon to view the file.
Please note – DO NOT make any changes to this text file!

Please make a note of the filename in the top left corner of the above screen (in this example it is BACSUB001.TXT), as you need to submit this specific file to your bank. This file will be automatically saved in the location you specified.
From the main menu in simply select ‘File’ button.
Now click the ‘Exit’ button at the bottom of the dropdown. Alternatively click the cross button in the top right corner.
Now you need to submit this file electronically to your bank. N.B. Merac cannot advise you on this process of how to submit the “Initial Instruction Submission” file to your bank. You will need to consult your bank and they must inform you as to how you submit this file electronically.
Once you have submitted the file to your bank all you need to do in Merac is to record:
(i) the date that this file was submitted to your bank and (ii) the person who made the submission.
Use the ‘Submitted to BACS On:” drop-down selector select the date you submitted this file to the bank.

Use the drop-down selector here to select the person that submitted this file to the bank.
Once you selected the required click on the ‘Save’ button at the bottom right of the screen.
Now simply click on the ‘Close’ button at the bottom right of the screen.
As you aware this process submits the account details of new members for checking. However, whenever you either update or edit the account details of an existing member in Merac that pays by direct debit, this process also submits these account details for checking. Please note that this check batch will not take any money from these members’ bank accounts. For this reason, it is recommended that you carry out the submission of the “Initial Instruction Submission” file to your bank every week. This is so that you are informed by the bank as soon as possible as to any bank account issues.
You now wait until you get notification from the bank as to whether the direct debit ‘initial instruction submission’ has been approved or rejected. Please consult with your bank about how long this procedure will take them to carry out and how they notify you as to whether the ‘initial instruction submission’ has been approved or rejected. Merac cannot advise you on this process.
For your information, the bank normally refers to these results as the Advice of Direct Debit Amendments and Cancellations (also referred to as ADDACS). Once you receive these ADDACS results from your bank you need to go into Merac and mark which accounts were OK and which account were not OK.
Marking Accounts as Ok / Not Ok - After Receiving ADDACS
When you receive the ADDACS results from the bank, go back into ‘Direct Debit Submissions’:
1. Click Setup > 2. Click Customer > 3. Double click Direct Debit Submissions
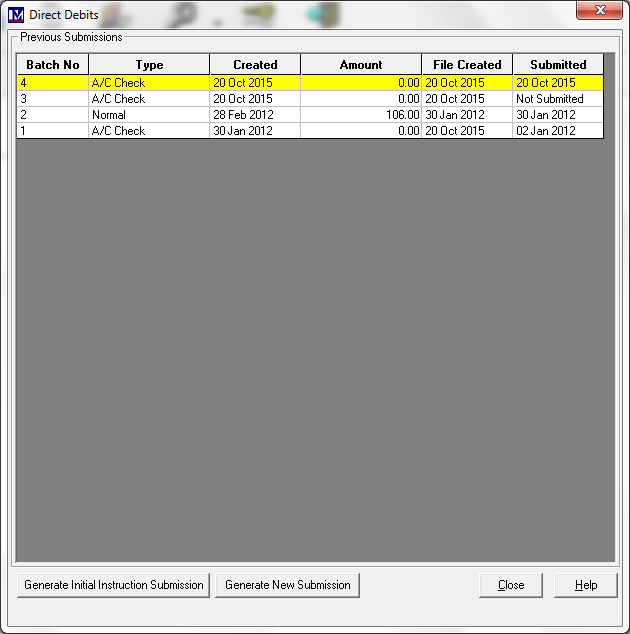
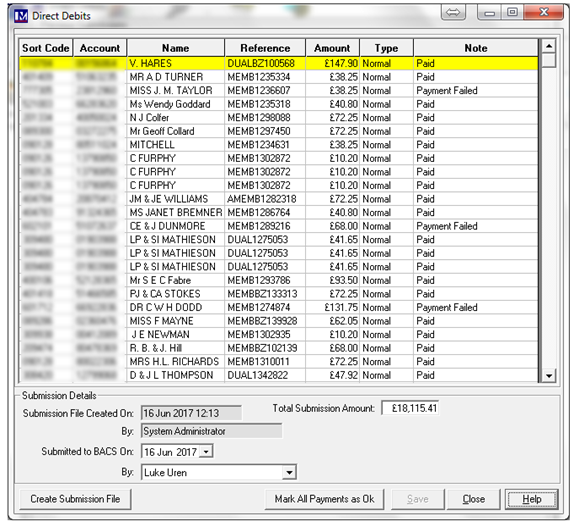
All your direct debit submissions will show in this screen.

Initial submission instructions that were created will show in the ‘Type’ column as ‘A/C Check’.
Double click on the relevant initial submission instruction that you need to process.
As seen previously this will open a screen showing all the accounts details of the members that were included in that “Initial Submission Instruction” submission batch.
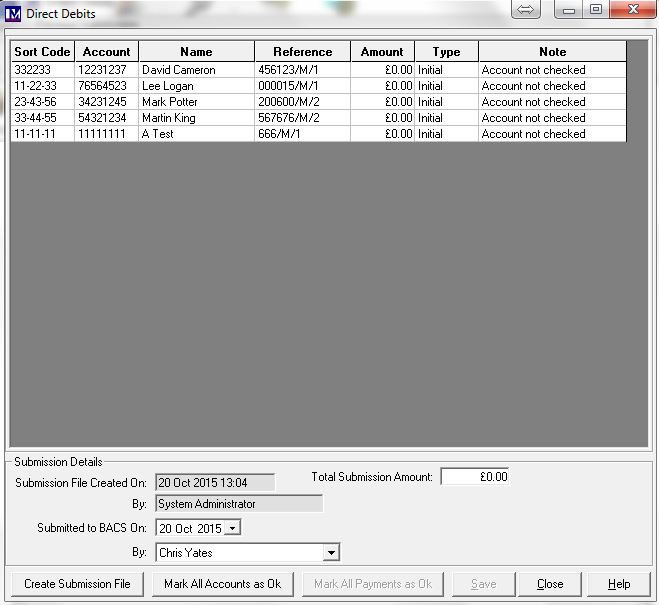
You then need to click on the relevant account, so it is highlighted yellow.

Now right mouse click on the selected account to bring up the options (as shown above).
For each account where the direct debit received the banks approval, select ‘Mark Account as Ok’.
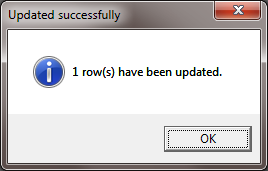
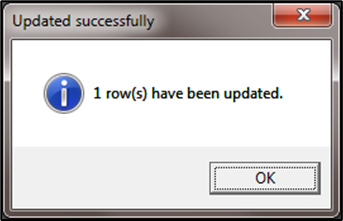
You will see the above message pop up - click ‘OK’ to confirm this change.
Repeat the procedure until all the required accounts are marked.

For all accounts where ‘Mark Account as Ok’ was selected, you are now able to generate a submission file.
Proceed to section entitled “How to Generate a New Submission”.
Please note for speed if ALL accounts were ok, you can just click the ‘Mark All Accounts as Ok’ at the bottom of the screen. But if you do this you then please remember you WILL NOT be able to undo this from this screen, or use the ‘Mark Account as Not Ok’ option (explained next) for any account in this initial instruction submission batch.
Alternatively, where the bank declines an account in the check batch, right click the required member’s account.
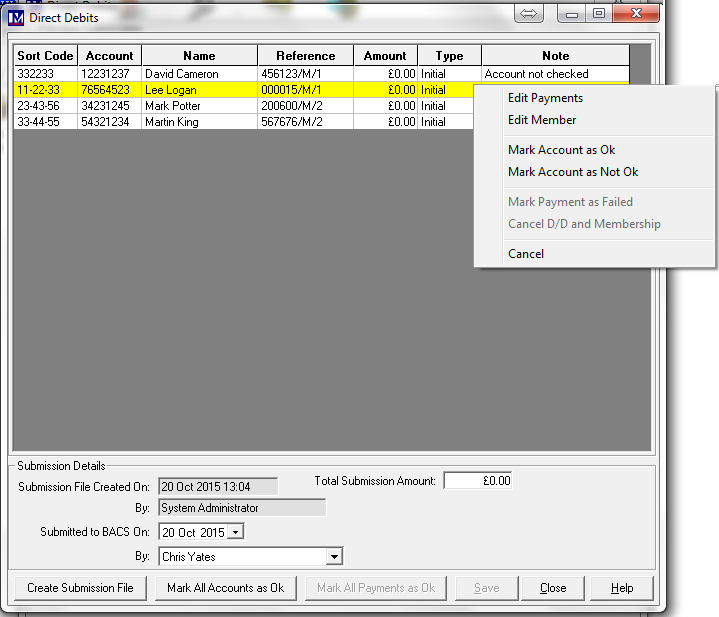
This will bring up the options (as shown below). Select ‘Mark Account as Not OK’.
Click ‘OK’ to confirm this change.
For all the above accounts, you now must check and correct the member(s) bank account details
See the next section that covers with how to Deal with 'Accounts that Fail the ‘Initial Submission Instruction’.
If there were no ADDAC’s failures, please proceed to the section 'How to ‘Generate a New Submission’ (Taking Payment)'.
Accounts that Fail the ‘Initial Submission Instruction’
For all accounts where the ‘Mark Account as Not OK’ was selected you must go back to the member(s) and inform them that the bank rejected the initial instruction submission. For each member where the bank rejected the initial instruction submission, they need to confirm that both the bank account details that they provided were correct. If there are any amendments that need to be made, then these must be made in the ‘Member Details’ screen. This is most easily accessed while you still have the below screen open. Right click any member where the ‘Mark Account as Not Ok’ option was selected and then left click ‘Edit Member’ option .

The below screen appears. Click on the ‘Direct Debit’ tab.
N.B. for any member’s account where ‘Mark Account as Not OK’ was selected, you will notice that the status here now appears as ‘A/C Invalid’. 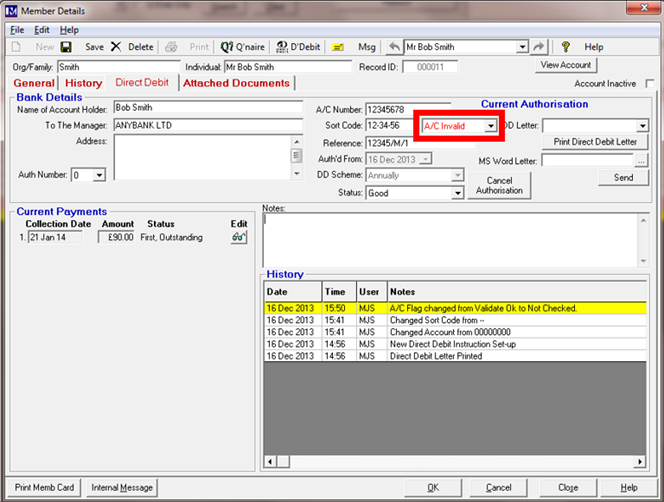
Amend the details (e.g. ‘Name of Account Holder’, ‘Sort Code’ and ‘A/C Number’ etc) in this screen as required.
Click ‘OK’ once the required information has been entered.
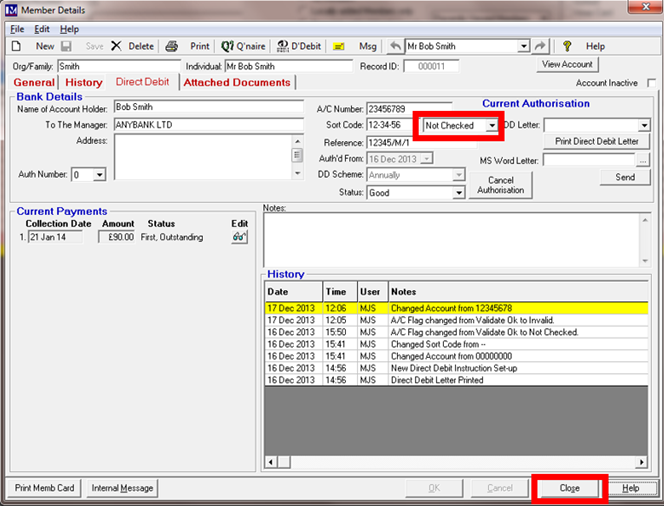
You will now notice the status of this account will now change from ‘A/C Invalid’ to ‘Not Checked’.
Next click the ‘Close’ button.
For all accounts whose status is now ‘Not Checked’, follow the procedure in the section entitled 'Creating and Submitting the Initial Submission Instruction'.
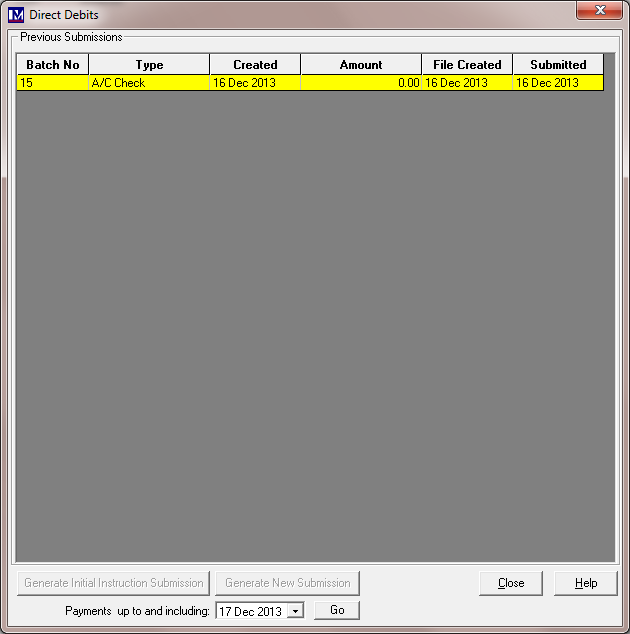
How to ‘Generate a New Submission’ (Taking Payment)
For all accounts where ‘Mark Account as Ok’ was selected, it is now possible to initiate the
procedure to submit this information that instructs your bank to collect these direct debit payments.
To do this, click on ‘Generate New Submission’ button.
You must now specify the date up to which you are collecting the direct debit payments for.
This is done using the ‘Payments up to and including’ drop-down selection.
Click on the drop-down arrow then select the required date from the calendar.
Please Note:
You should consult your bank as to when you need to carry out your direct debit submission by. For example, you want to carry out a submission every month for ‘Payments up to and including’ the last day of that specific month. Your bank may specify that in order to have sufficient time to process this request this submission must be carried out and submitted to them sent by e.g. the 14th of each month. This means that you may have to carry out the above process on e.g. the 14th of each month but select ‘Payments up to and including’ date as the last day of that month. Once you have selected the required ‘Payments up to and including’ date, then click on the ‘Go’ button.
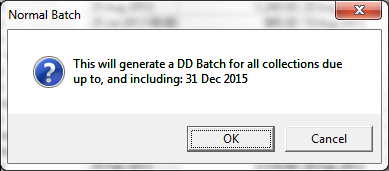
You are now asked if you want to generate a new submission file to the bank for the date criteria selected
(referred to as a “DD Batch”). Then click on ‘OK’ to proceed with creating the submission file.
If there are direct debits due for collection for the date selected, then you will see the following message.
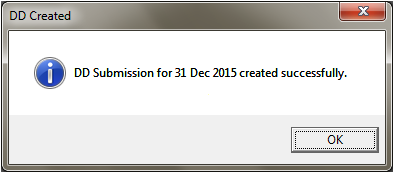
Then click on ‘OK’.
N.B. if there are no direct debits to submit for the selected period, the following screen appears.
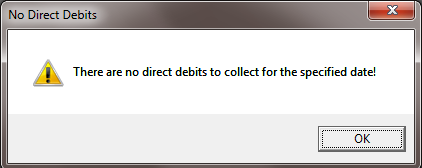
Click ‘Click ‘OK’ if you see this screen.
Assuming there were direct debits to collect, you will now see the following screen.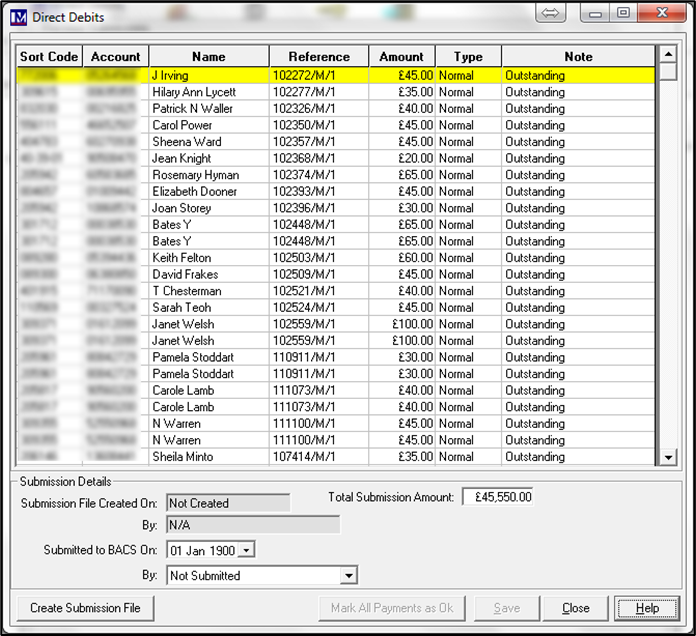
This shows the each member’s bank account and payment details that will be included in the submission file.
Next click the ‘Create Submission File’ button.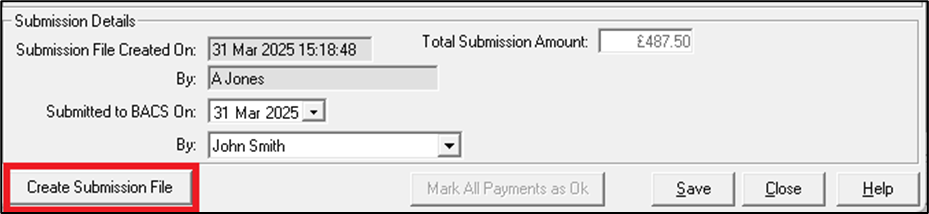
The submission file is created as a text file, which should open in Microsoft Notepad (sample content given below).
The file will be in the format of the example shown above.
As stated previously in some versions of Microsoft Windows this file may not show automatically on screen.
If so then look on your Windows ‘Taskbar’ and click on the Notepad icon to view the file.
Please note - do not make any changes to this text file!
Please make a note of the filename at the top of the screen, in this case it is BACSUB001.txt. You need to submit this specific file to your bank for this submission. Please note the number at the end of the filename (BACSUB001.txt) relates to the batch number in Merac (in the above screenshot this filename is for Batch 1 in Merac).
This file will be automatically saved in the location you specified previously.
(as defined in Setup > System > System Options > Membership tab > Direct Debit Submissions Folder)
From the main menu in simply select ‘File’ button.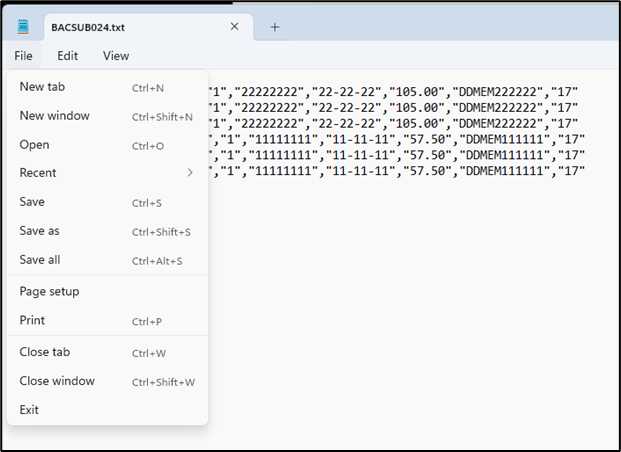
Now click the ‘Exit’ button at the bottom of the dropdown (alternatively click the cross in the top right corner).
Please note that unlike the Initial Instruction Submission’ “check batch”, once you submit this batch to the bank this will initiate the process to try and collect direct debit payments from these member’s bank accounts!
Do not submit this file to your bank unless you have checked the contents of this batch are correct.
Now you need to submit this file electronically to your bank. Merac cannot advise you on this process of how and when to submit this file to your bank. You will need to consult your bank and they must inform you as to how you submit this file electronically. Once you have submitted the file to your bank all you need to do in Merac is to record:
(i) the date that this file was submitted to your bank and (ii) the person who made the submission.
Use the ‘Submitted to BACS On:’ drop-down selector to select the date you submitted this file to the bank.
Select today’s date or if this was not submitted today, select the required date from the calendar.
Next use the ‘Submitted to BACS By:’ drop-down selector to record who submitted this file to the bank.
Click on the drop-down arrow here and select the required back office ‘User’ from the list.
Once the required date and user name has been selected, click the ‘Save’ button (which will now be active).
Next click the ‘Close’ button.
Marking Accounts as ‘Ok’/‘Not Ok’ after receiving ARUDDS
When you receive the ARUDDS (Automatic Return of Unpaid Direct Debits) from bank:
1. Click Setup > 2. Click Customer > 3. Double click Direct Debit Submissions.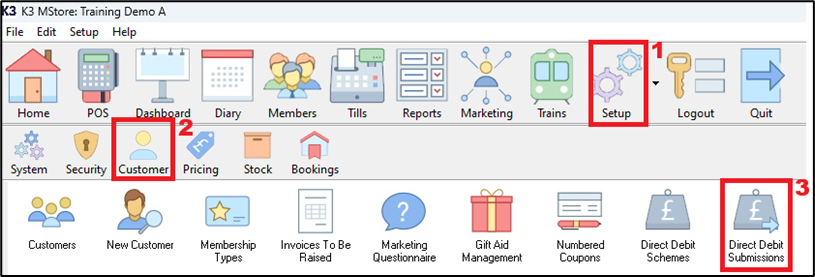
All your direct debit submissions will show in this screen. New submissions that were created will show in the ‘Type’ column as ‘Normal’. Double click on the relevant submission that you need to process.
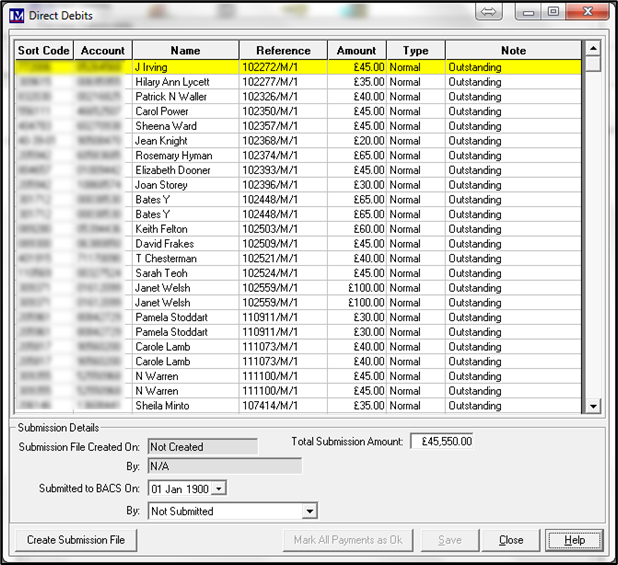
This will open a screen showing all the accounts details of the members that were included in that submission.
You will notice that in the ‘Note’ column these show as ‘Outstanding’.
This is because these are direct debit payments that are awaiting you to confirm that have been paid.
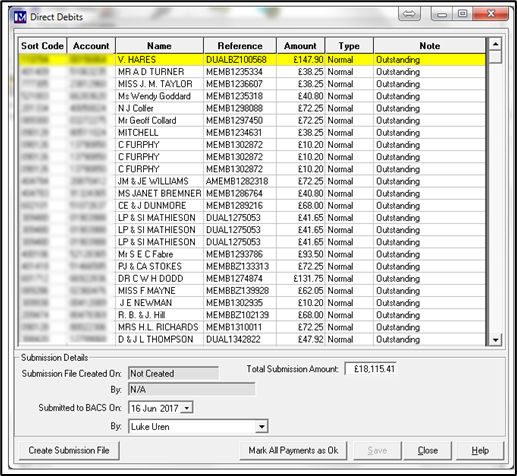
Now click on the ‘Mark All Payments as Ok’ button.
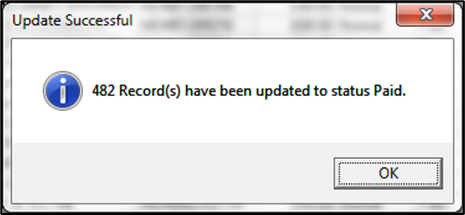
A message will appear confirming the number of records updated. Click 'Ok'.
You will see the that each direct debit payment record has now changed to ‘Paid’ in the ‘Note’ column.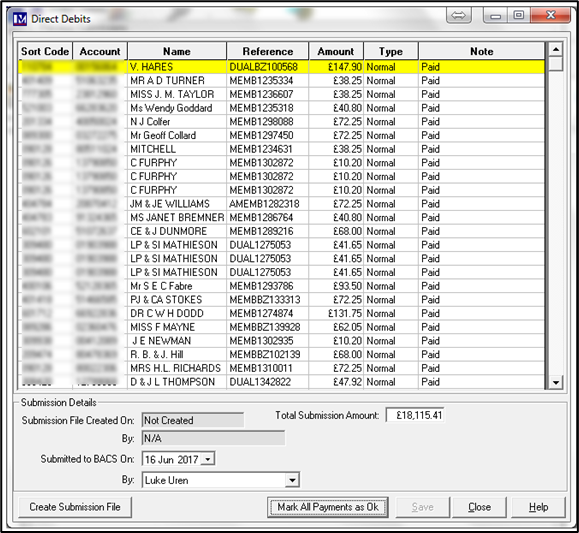
Now for any direct debit payment that failed collection, right mouse click on the payment.
Now with a left mouse click, select ‘Mark Payment as Failed’.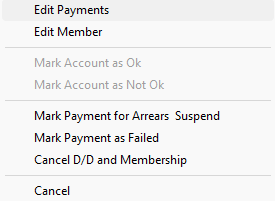
Repeat the procedure until all the accounts are marked as required.
For all people whose direct debit payment failed, please note that Merac cannot give you the explanation for the failure. You would have to contact your bank directly for the reason for direct debit payment failures.
Once you have contacted your bank you would need to contact the member(s) concerned, e.g. to confirm their bank account details, take payment by another method (e.g. cash, cheque or credit card) , or arrange for an increased/additional direct debit payment to be set up to cover the failed payment.
The payment may have failed due the customer changing their bank account details since they were originally provided. Checking and amending bank account details is covered later in this guide.
If the failed payment needs to be taken on a till you would need an appropriately named PLU to be set up in in Merac (e.g. ‘Failed DD Payment’), which must be set up with the ‘Override Price’ set to ‘Forced Price Entry’. You would then use the ‘Find Member’ button on the till to find the member before selling the ‘Failed DD Payment’ PLU to the required method of payment. Please note setting up PLU’s and till buttons is not covered in the scope of this manual.
Alternatively a member might want to:
(i) cancel the membership, direct debit instruction and any outstanding payments.
(ii) re-schedule the direct debit payment for the next convenient date as required.
Both these processes are covered later in this guide.
Please note in this screen you can also cancel the direct debit and membership in the below screen.
Simply right click the required record and select the ‘Cancel D/D and Membership’ option.
At the next screen click the ‘Yes’ button.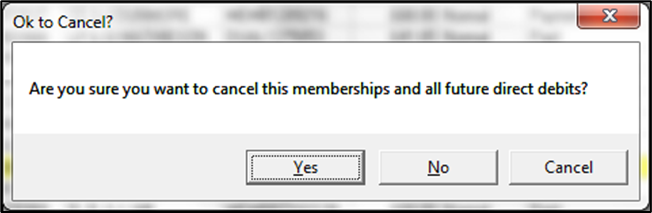
This will cancel their direct debit authorisation, any outstanding payments and also expire their membership.
Once you have finished in this screen click ‘Close’ then ‘Close’ again to exit the ‘Direct Debits’ screen.
Alternatively, if you do not find out at this point that a customer wants to cancel, the process of cancelling a direct debit is explained in the following section.
Dealing with Members no Longer Paying by Direct Debit
For each member who responds confirming they do not want to continue to pay for their membership via direct debit, you need to amend that member’s record to reflect this. Find and open this member’s record and access the direct debit details (as explained in previous sections).
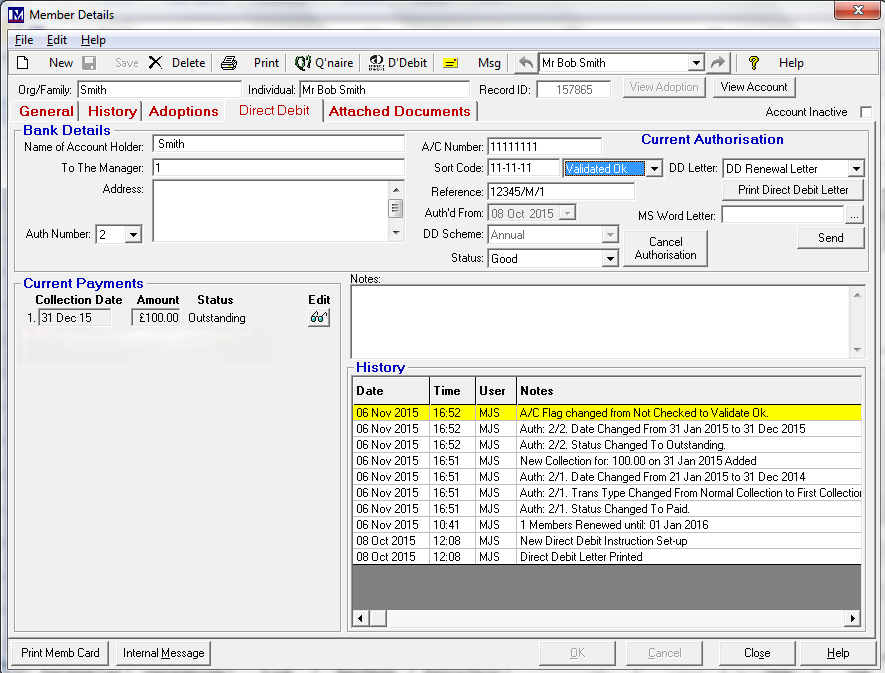
Next click the ‘Cancel Authorisation’ button.
At the following screen click 'Yes' (or click 'No' if you do not want to do this now).
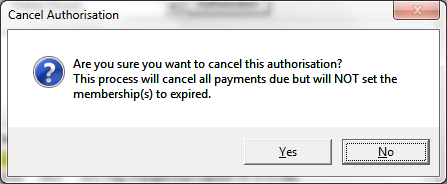
Any payments that were outstanding will now be marked 'Payment Cancelled' (see ‘Current Payments’ section of screen).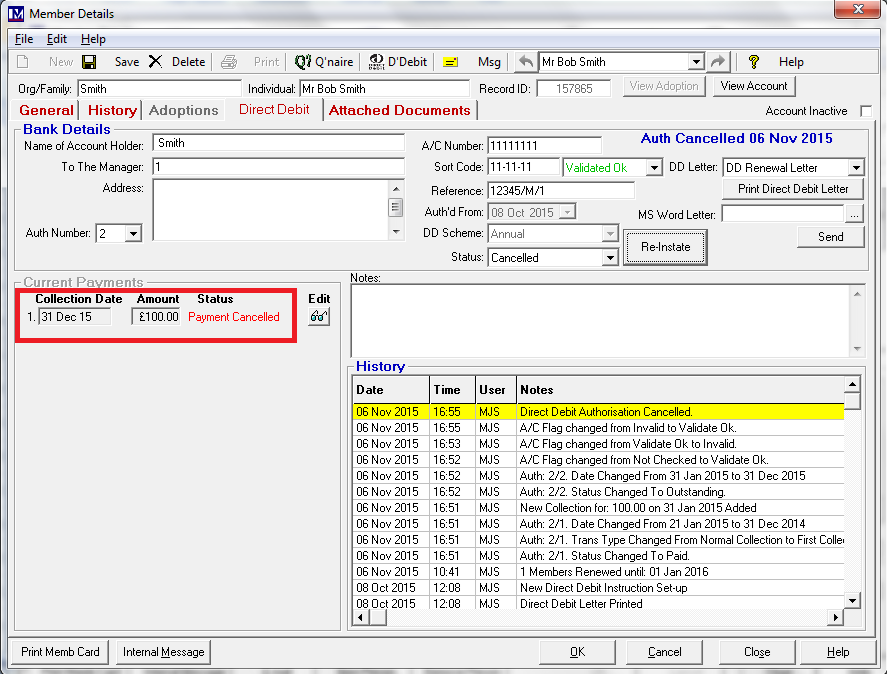
You should now also click on the drop down here and select ‘A/C Invalid’.
 Next click the ‘OK’ button (at the bottom of the screen) to accept this change.
You will notice that the information in the ‘History’ section has updated to show these actions.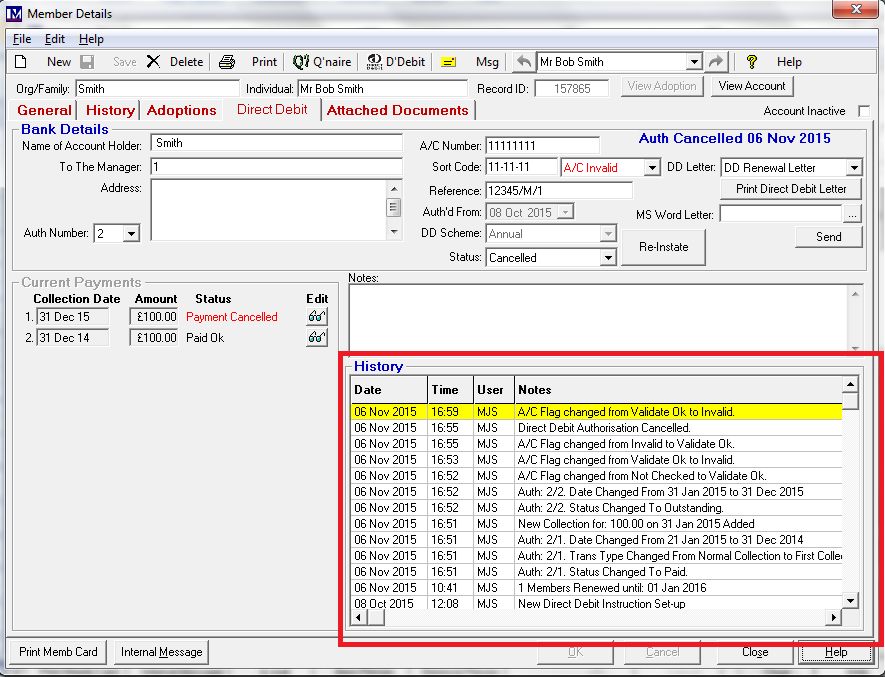
You will notice that the information in the ‘History’ section has updated to show these actions.
You now must ensure you change the ‘Expires On’ date. This could be set to today’s date or a past and future date.
This really depends on your terms and conditions as to when their membership expires on cancelling a direct debit.

Click the ‘Ok’ button to accept the change.
Repeat the process for each member as required.
Editing Direct Debit Payments
There may be the need to change the direct payment schedule for a member. Common examples would be to e.g. amend the value of a current payment, create a totally new payment, or change the status of a current payment. These scenarios are explained below.
Important Note:
Although the MeracMerac software has the flexibility to allows you to amend / add direct debit payment please first check with your direct debits expert and / or your bank whether you are legally allowed to amend a direct debit payment and what consent / documentation you may legally require to do so.
First find and open the member record and click on the ‘Direct Debit’ tab.
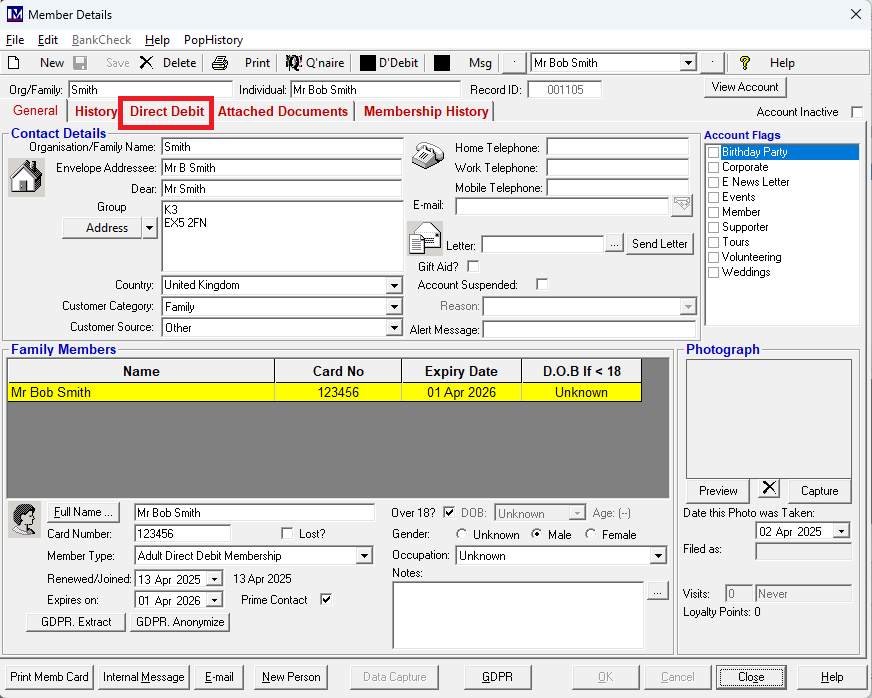
Next click on the ‘Edit’ button.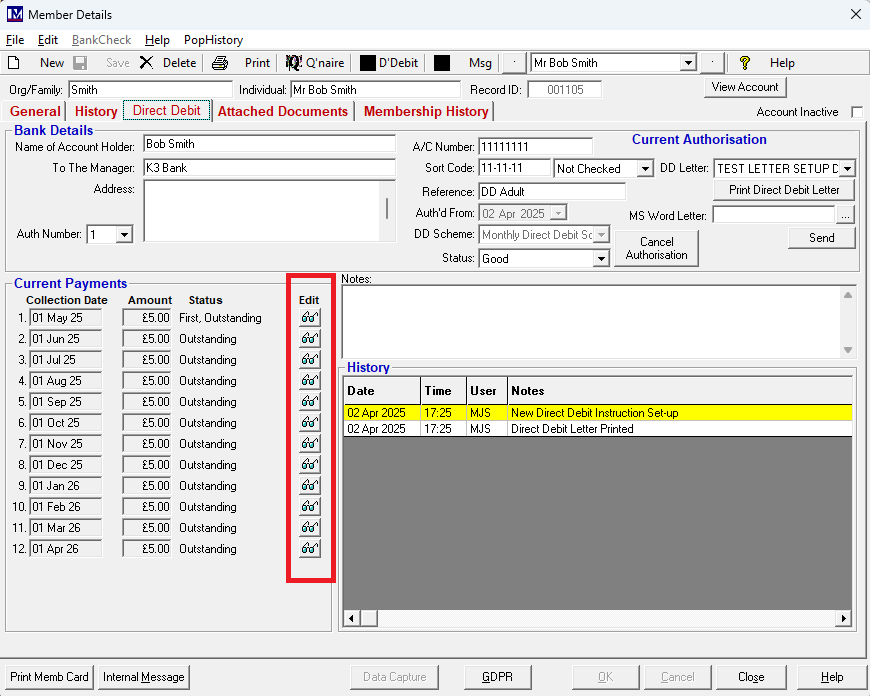
Please note when adding or removing or amending direct debit payments it is optional whether this will create a transaction in Merac which will post a +ve or -ve adjustment to a specified till in Merac. If this is required please contact your Customer Success Account Manager for a quote for the necessary configuration and training to enable this functionality (also see below *). By default no transaction will be made on adding / adjusting / cancelling direct debit payments, unless this functionality have been previously enabled.
You can click on any existing payment so it is highlighted, then amend the details as required.
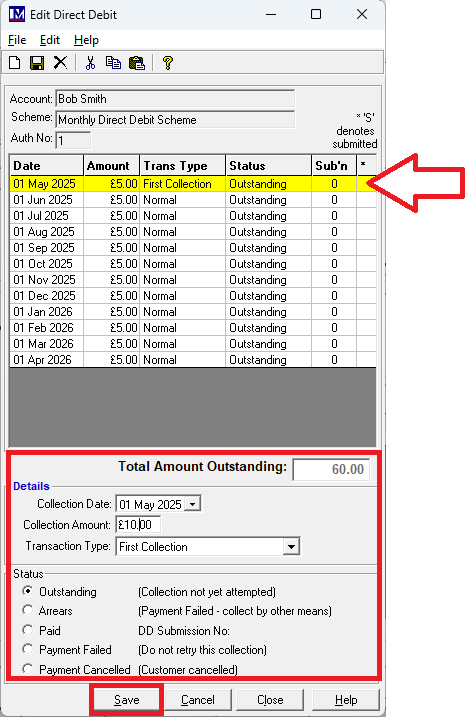
Click 'Save' once the required changes are made.
The fields that can be amended are:
Collection date: Use the date drop-down selector to select the required date for this payment.
Collection Amount: Amend the amount in this box to be as required.
Transaction Type: Use the date drop-down selector to select from the available options as required.
(i.e. ‘First Collection’, ‘Normal Collection, ‘Represented Collection’, or ‘Final Collection’)
‘Status’: Click the required status to select from the available options as required.
(i.e. ‘Outstanding’, ‘Paid’, ‘Payment Failed’, or ‘Payment Cancelled’).
Please not you can also remove a payment.
Click on the payment so that it is highlighted yellow, then click on the ![]() button.
button.
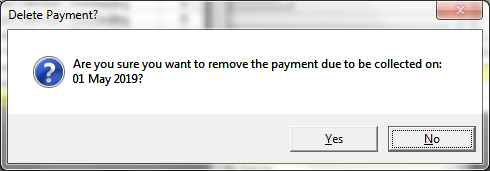
If required you can also create a totally new direct debit payment.
To do this click on the ‘New’ button to create a new payment.
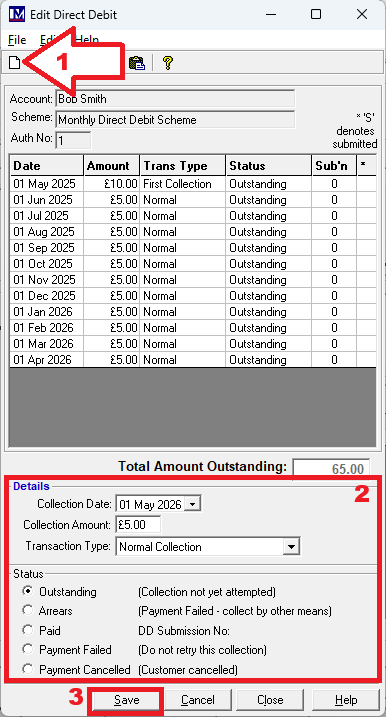
Enter the required details and check these, then click 'Save'.
Once all the payments in this screen have been amended as required, click ‘Close’.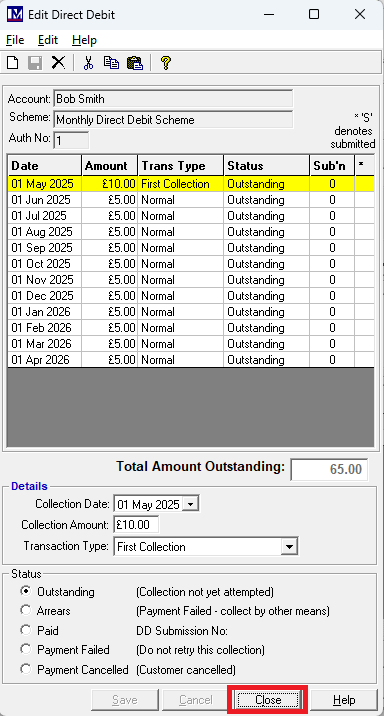
Please note (see above*) if on clicking 'Close' you see a message (like the one below) stating that either a positive or negative adjustment has been posted. This means you have the setup already in place that is creating a positive or negative adjustment that will be reflected in your transaction reports for the date you made the adjustment.

At the next ('Member Details') screen click ‘Close’ again to return to the main ‘Members’ screen.
Direct Debit Renewals
To carry out direct debit renewals click on the ‘Members’ button then the ‘Renew DDs’ button.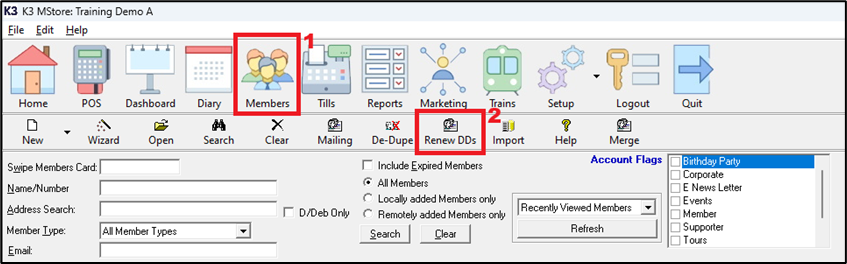
You now must select the required date criteria for the direct debit memberships you want to renew.

(i) ‘Renewal all Direct Debit members expiring on or before’.
Select the membership expiry date for direct debt memberships that you want to renew. For most organisations that offer direct debits this is typically a date several weeks ahead of today’s date, as this process is typically carried out several weeks in advance. The exact number of weeks in advance of the expiry will need to be decided by your own organisation’s requirements, but could be e.g. we six weeks in advance of the membership expiry dates. For example, for all customers whose direct debits memberships are due to expire on or before the 31st of December, then you may want to carry out process should be carried out in e.g. mid-October. This is to allow adequate time for any direct debit letters to be sent, received and responses returned by your direct debit members and then any action to be taken in Merac as required.
(ii) ‘Direct Debit Scheme’
Next select the required direct debit scheme you want to run renewals for. This will default to ‘Renew All Schemes’. For those customers who offer multiple direct debit payment schemes (e.g. annual and monthly),if required you can run the renewals process separately. However many customers have only a single direct debit scheme, or are happy to run the renewal for all direct debit schemes (for the expiry date selected in step 1). Select as required for the way you want to control and run the direct debit renewals process.
(iii) ‘Show All Direct Debits for Renewal’
Once steps 1 and 2 have been done and checked, click the ‘Show All Direct Debits for Renewal’ button to see the memberships that will be renewed. Please note clicking this does not carry out the renewal itself. This allows you to view and check the direct debit memberships that would be renewed if you carry out the relevant steps to renew the members displayed when you click the ‘Show All Direct Debits for Renewal’ button.
1. You will now see the direct memberships that will be renewed.
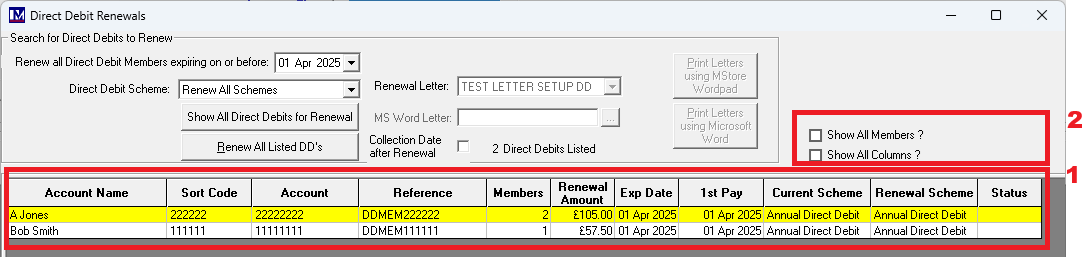
2. If required you can click the extra options which will add extra data into the grid (if applicable)
‘Show All Members’
Clicking this will show all the members being paid for by direct debit (where applicable) under each bank account.
It is quite normal for two or more memberships being paid for by direct debit from one person’s bank account, as in Merac you can sign up multiple membership at a time under one “family” account.
‘Show All Columns’
This adds extra columns of data into he results which may be required.
Export to Excel
Once the required options are selected and before the renewal has been completed, then (if required) the records that are about to be renewed can be exported to Microsoft (MS) Excel at this point by clicking the ‘Export to Excel’ button that is located at the bottom left corner of the ‘Direct Debit Renewals’ screen.
![]()
That is as long as your IT Team have installed Excel on your computer. Clicking this button should open the results in Excel. If there are any issues ask your IT team to investigate, as MS Excel has its own security (‘Trust Center’) settings that can prevent third part application like Merac from opening MS Excel. If there are still issues then you or they can log a ticket with Merac's Support team to investigate further.
Click the Excel icon ![]() on your computer’s 'Taskbar' to view this export.
on your computer’s 'Taskbar' to view this export.
If required you can then save these results as an Excel file in the usual way to the required location, this allows you’re your organisation to save a record of what is being renewed by this process. This is the easiest way to retain an audit trail of which direct debit memberships have been renewed by this process.
To renew these listed direct debit members in Merac now click the ‘Renew All Listed DDs’ button.
You will then see the following screen, to proceed with the renewals click ‘Yes’ if you want to renew the members.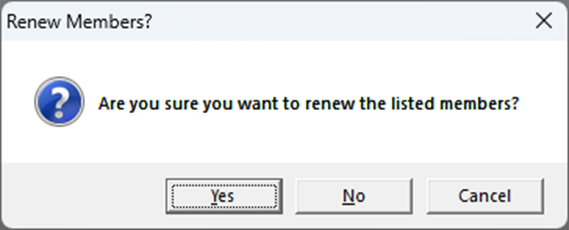
Alternatively, if you are unsure and want to make any checks at this point click ‘No’ or ‘Cancel’.
For example you may have forgotten to do the export to Excel, so you could click ‘No’ and run the export.
For all the members listed (if required) you can now generate their direct debit renewal letter using the Word’s mail merge functionality in MS Word. This will require your IT team to have installed MS Word on your computer. To use this functionality you will have already need to have had training on and know how to set up MS Word mail merge templates using Merac. Please note this content us covered in a separate user guide.
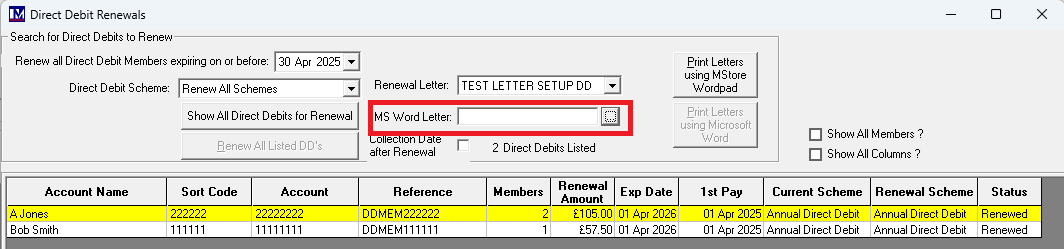
Click the ![]() button where shown and the Windows ‘File Explorer’ screen will appear.
button where shown and the Windows ‘File Explorer’ screen will appear.
Navigate to and select the require mail merge template documents you have already set up (see above *).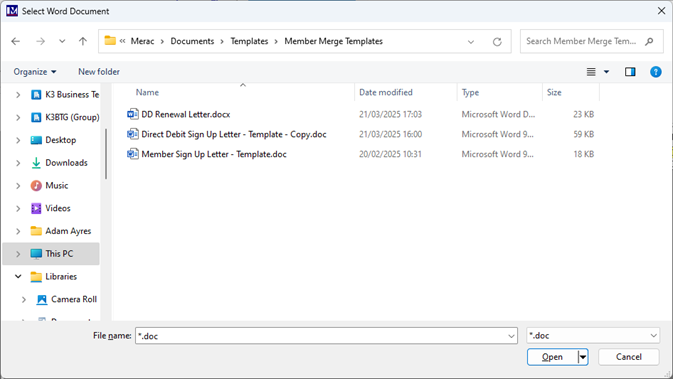
Click on the required MS mail merge template document and then click the ‘Open’ button.
1. The selected MS mail merge template document will now appear where shown.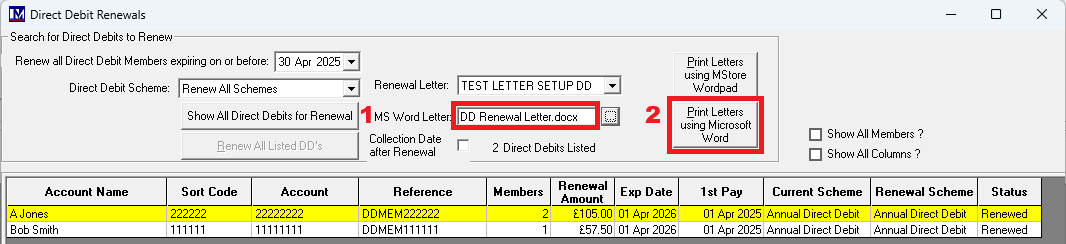
2. On clicking the ‘Print Letters using Microsoft Word’ the following pop-up message appears.

If Microsoft Word was not already open the ‘Word’ icon ![]() will now be showing on your task bar.
will now be showing on your task bar.
Please note as with the ‘Export to Excel’ functionality, MS Word has its own security (‘Trust Center’) settings that can prevent third part application like Merac from opening MS Word. If MS Word does not open or errors at this point please get your own IT to check the relevant Microsoft security settings. If there are still issues then you or they can log a ticket with Merac’s Support team to investigate further to see if they can assist but please note Merac do not (i) provide support or (ii) training on using Microsoft Word itself, including how to use it mail merge functionality.
For some versions of Word it has been noted that unless you first minimise then maximise the Word application then you are not able to access all the mail merge functionality withing MS Word and that is out of Merac’s control. If when MS Word opens nothing happens when you click mail merge specific functionality in MS Word, then please minimise then maximise the Word application.
Carry out the mail merge in MS Word and save any Word documents as required.
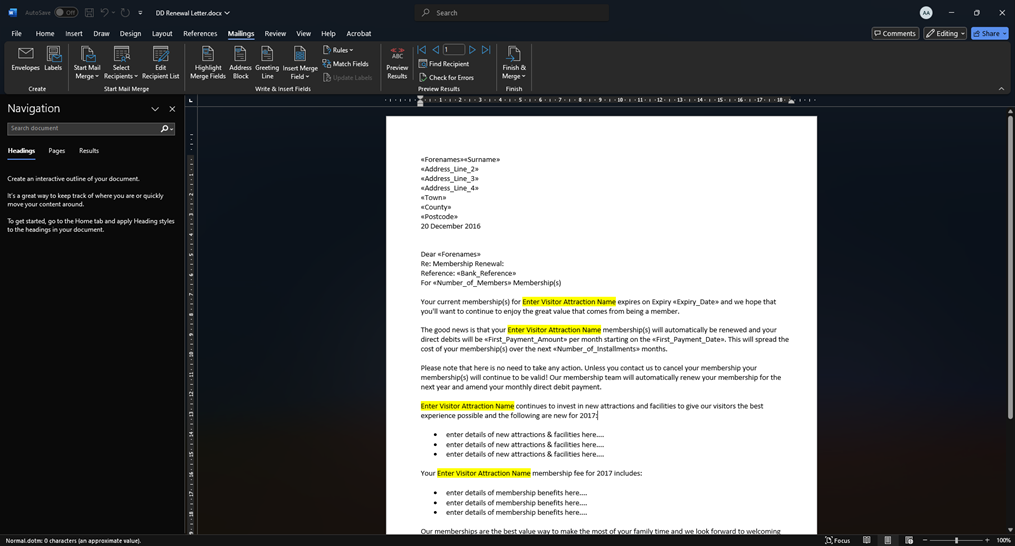
Save any documents before exiting the MS Word application.
Please note if you decide not to proceed with carrying out any mail merge in Word and try and close the Merac ‘Direct Debit Renewals’ screen without carrying out a mail merge in Word, you will get a pop up warning and reminder in Merac.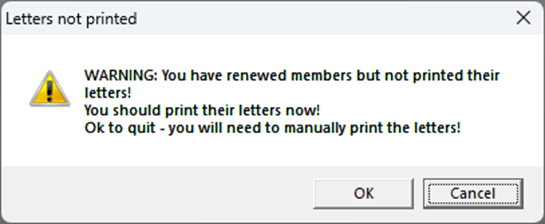
Clicking ‘Cancel’ will return the Merac ‘Direct Debit Renewals’.
So if required you could still follow the process and carry out a mail merge using MS Word.
Clicking ‘Ok’ will close the Merac ‘Direct Debit Renewals’ screen.
All the direct debit members that were listed in the Merac ‘Direct Debit Renewals’ screen. are now renewed and the process to generate the required submission files and will continue as normal.
If you first selected a specific direct debit scheme (as opposed to the ‘Renew All Schemes’ ) then (if you have more than one direct debit scheme) then you may need to repeat the above process as explained above for each ‘Direct Debit Scheme’.
As discussed previously the above direct debit renewal process is often typically carried out several weeks in advance of expiry depending on your organizations' requirements. The reason for this is to enable you to have time to process each member’s response to sending out your direct debit renewal letters prior to the next submission being generated using Merac. For each member who responds confirming they do not want to continue to pay for their membership via direct debit, this allows adequate time for you to cancel any member(s) direct debit authorisation in Merac prior to the next submission. This process must be done to stop further direct debit payments being taken.
To see how to cancel a member’s direct debit authorisation in Merac is covered in a previous section entitled 'Dealing with Members no Longer Paying by Direct Debit'. Alternatively, for members that wish to continue to pay for their membership via direct debit, then no further action is required. Their details will continue to be submitted by the direct debit submissions files processes as detailed in the earlier sections on creating / processing direct debit submission files.
Please Note:
The direct debit renewals process will automatically renew the memberships of all relevant members and it will update their expiry date to the new one. The new direct debit payments will automatically be created in each of the direct debit memberships renewed by this process (under a new ‘Auth Number’). This can be seen if you find and open a direct debit member record that has been renewed by clicking the ‘Direct Debit’ tab. By default you will be seeing direct debit payments for the current ‘Auth Number’. But you can click on the dropdown selector and select the required ‘Auth Number’ to the historic information. This is useful to know for auditing and troubleshooting purposes.
N.B. the first payment direct debit payments history will show under ‘Auth Number’ 1, then when they are renewed the next lot of direct debt payments that are expected will show under ‘Auth Number’ 2. This number will increase by 1 each time their direct debit memberships are renewed.