TABLE OF CONTENTS
- Introduction
- Security Group Settings
- Launching the Gift Aid Manager
- Settings
- Searching for Claims
- Gift Aid Claims Table
- Export to Excel
- Submitting a Claim
- Submission Response
- Adjustments to Previous Gift Aid Claims
Introduction
This document explains how to setup and use of the Merac 'Gift Aid Management module'. This document is aimed at our customers that want to submit gift-aid claims directly from Merac to the online HMRC portal by using our 'Gift Aid Management' module. Please note that the 'Gift Aid Management' module is not installed by default. For all those with Merac users that need to run and submit gift aid claims directly to the HMRC, they will need the 'Gift Aid Management' module installing on their computer. If you have already purchased and are using the 'Gift Aid Management' module then you will already have been supplied the installation files and instructions that your own internal IT team or external IT support provider need to install. For customers who do not have this module already, as this module requires background installation, set up and training, please contact your Customer Success Account manager for more information and a quote.
Security Group Settings
For all Merac 'Users' that need access to the 'Gift Aid Management' module there are specific settings need to be applied to all the 'Security Groups' that need access to this module. Please ask the colleagues in your organisation that manage Merac 'Security Groups' to apply the settings detailed below. A separate guide covers setting up 'Security Groups' but in brief this is done as below in Setup > Security > Security Groups.
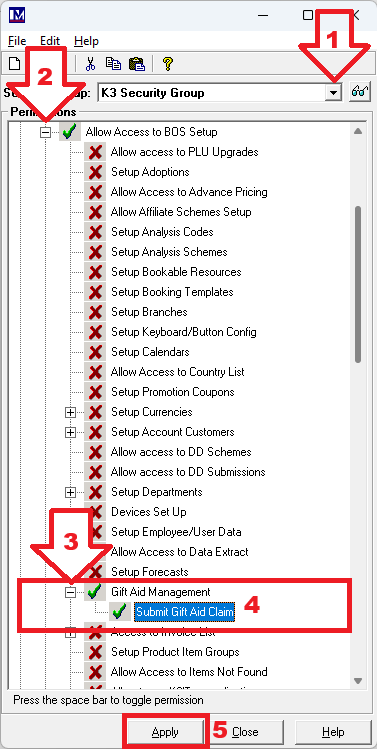
1. Select the first 'Security Group' that needs access to view / submit Gift Aid claims.
2. Click the + symbol to the left of the 'Allow Access to BOS Setup' (it will change to a - symbol, as shown below).
3. Scroll down to and click the + symbol to the left of the the 'Gift Aid Management' options (and it changes to a - symbol).
4. Right click on the settings as required so they are ticked, to allow access to view and submit gift aid claim data as required.
(please note if you accidentally turned and option on or off then right click it again to change this back as required)
5. Click 'Apply'.
Repeat as required for each of your 'Security Groups' that need access to viewing/submitting Gift Aid claims. N.B. 'Users' need to log out than back into Merac for these settings to apply. Please note these settings alone will not make the 'Gift Aid Malmanagement' module work. This module will only work if the required background installation and configuration work has been carried has also been carried out. If you require more information and a quote for the set up and training then please contact your Customer Success Account manager.
Launching the Gift Aid Manager
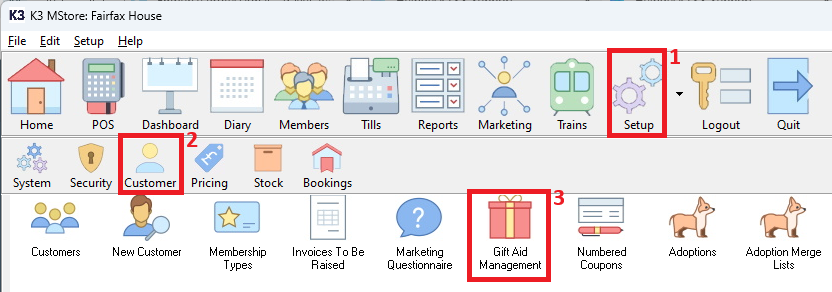
Login to Merac. Click on 1. 'Setup' then click 2. Customer then 3. Double-click on the ‘Gift Aid Management’ icon
User Interface Overview
1. Gift Aid 'Charity Selector' (only used if you have multiple charities that you separately submit gift aid claims for )
2. Search Options
3. Number of search results
4. Number of invalid postcodes (in these search results)
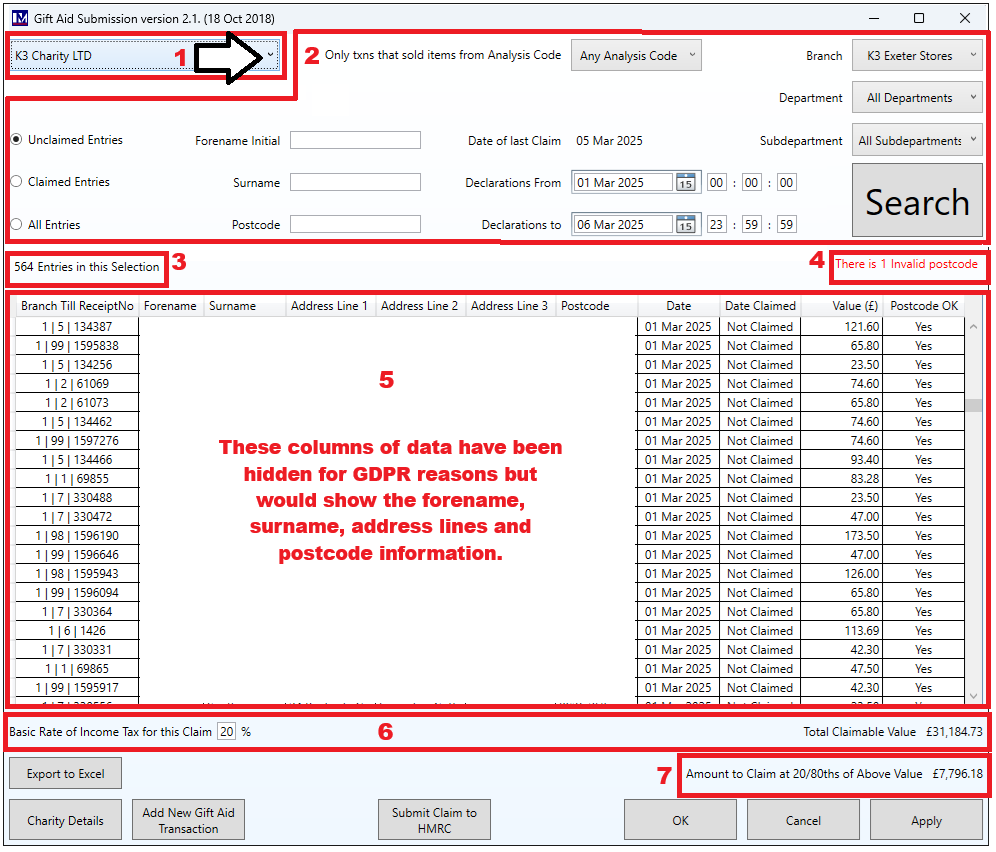
5. Grid displaying gift aid claims
6. Claim totals and tax rate
7. Calculated 'Amount to Claim'
Settings
Charity Details
Before you can submit a claim for the first time, you will need need to contact the HMRC and obtain the required information concerning your HMRC account then enter these 'Charity Details' in Merac. Please note Merac cannot advise on obtain these details for you, or advise if they are correct, the HMRC would need to provide this information. If these details are entered incorrectly in Merac then the submission will fail with a validation error, which is covered later in this guide..
To enter the details provided by the HMRC, click the ‘Charity Details’ button, in the bottom-right corner of the above screen,

Next click the 'New' button.![]()
Enter the account information provided by the HMRC.
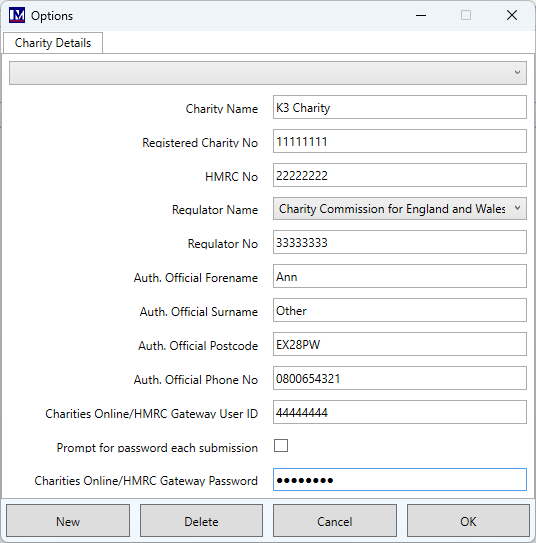
Please note for security if you don't want the password to be stored, click the 'Prompt for password each submission' box, so it is ticked. You then cannot enter a password and will have to enter this each time you generate a submission

Click 'Ok'.
You will see the below, click 'Yes'.
Repeat as required if you have more than one charity for HMRC gift aid submissions.
Data Security
All of these details are contained in every gift-aid submission and are stored in our database.
The HMRC Gateway password is stored encrypted.
Searching for Claims
The options you can use to filter search results as shown below are detailed in this section.
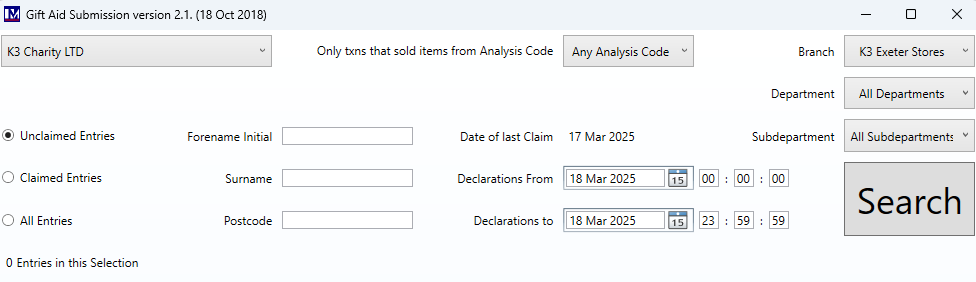
Unclaimed Entries/Claimed Entries/All Entries
This filters results based on whether they have been submitted to the Inland Revenue.
The software will not allow you to perform a submission if it includes any claims marked as previously submitted.
Customer’s Details
Forename Initial: The first character of the customer’s forename.
Surname: The customer’s surname.
Postcode: The customer’s postcode. It does not matter whether a space is present.
Analysis Code
This filter results to only transactions which sold an item from this 'Analysis Code'.
Date Range
Date of last claim: This is the date on which you last performed a gift aid submission.
Declarations From: The date from which gift aided transactions should be included.
Declarations To: The date up to, and including, which gift aided transactions should be included.
Branch
Most Merac customers will not require and use the 'Branch' so this filter can be ignored inmost cases.
For any customers that have been advised to and use this, then the required 'Branch' can be selected.
Department / Sub-Department
By default, all departments are included, however you can also filter results by which Merac 'Department' and 'Sub-Department' processed the transaction.
Search
When you click the ‘Search’ button, the program performs several functions:
1. Retrieves all of the gift aided transactions matching the above criteria.
2. Analyses each of the Postcodes to check whether they match the expected format.
Any which do not match the expected format are marked as ‘No’ in the ‘Postcode OK’ column.
3. Formats addresses so that they are presented in a consistent format.
4. Calculates the total claim value.
Please note you can also use the column headings to order data as this may help trouble shooting invalid data. For example if the search showed '1 invalid postcode' you can then click on e.g. the 'Postcode OK' column and it will sort data by this column. You can click on the column again to toggle the sort order as required. In this case is was toggles so that the 'No' entries showed at the top of the list. Any column can be ordered this way to assist checking and amending data as required.
Gift Aid Claims Table
This grid presents the retrieved gift aid claims after the ‘Search’ function has formatted them.
The claims can be sorted by each column, by clicking on the column headers. This is especially useful when editing invalid postcodes, as you sort by whether the Postcodes are OK and see at once all of the records that require editing. The ‘Postcode OK’ column has a particular purpose: All claims must now have postcodes that match a valid postcode format.
Please note - all claims must either have a valid postcode or be deleted.
Please note that HMRC have specified a maximum length for the Forename and Surname of thirty-five characters each, and a maximum length of forty characters for the entire address (not including the postcode).
Characters beyond this limit will either be truncated when saving, or that field will not be saved.
Editing a Claim’s Details
The ‘Forename’, ‘Surname’, ‘Address’ and ‘Postcode’ fields can be edited. The ‘Date’, ‘Date Claimed’, ‘Value (£)’ and ‘Postcode OK’ fields cannot be edited. To edit a claim’s details, simply double-click on the details you wish to edit and change them as required. In this example an invalid post code was entered and is edited as required.

Changes are not saved until you either click on the ‘OK’ or ‘Apply’ buttons.

However, please note clicking ‘Apply’ will prompt to save the changes but leaves the 'Gift Aid Submission' screen open.
Clicking ‘Ok' will prompt to save the changes but then will close the 'Gift Aid Submission' screen.

Please note after changes are saved if you made any errors, then you will then edit the data again to make any corrections.
Deleting a Claim
A claim may require deletion if the Postcode is invalid and cannot be corrected, or if the customer has asked for their claim to be cancelled. To delete a claim, select the claim and either:
a. Press the ‘Delete’ key on your keyboard, or
b. Right-click on the claim and select the ‘Delete’ option.
The changes are not saved until you either click on the ‘OK’ or ‘Apply’ buttons.
Again ‘Apply’ will save but leave the screen open, whereas ‘OK’ will save and close the screen.
Please note, after changes are saved, they cannot be automatically undone.
This is particularly important to remember when deleting a claim as undoing the deletion requires you to add the claim manually, requiring you to know the customer’s details and the transaction number.
Adding a New Claim
To add a new gift aid claim, click on the ‘Add New Gift Aid Transaction’ button and fill in all of the fields.

The ‘Receipt Code’ must be filled in and match the transaction’s receipt code, as a gift aid claim must be linked to a transaction record. You are also required to fill in at least the customer’s ‘Forename’, ‘Surname’, house name/number (in e.g. ‘Address Line 1’).
and ‘Postcode’.
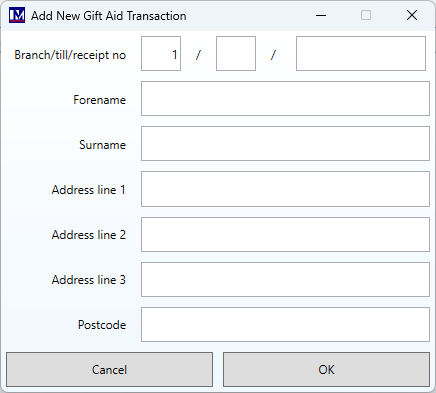
Click 'Ok' once the required data has been entered into this form (or 'Cancel' to exit this screen)
Please note if you do not enter a valid Merac till and transaction number, the following message will show.
You will not be able to proceed and add the gift aid claim unless a valid till / transaction number is entered.
Click 'Ok' and you are returned to the 'Add New Gift Aid Transaction' form.
Please note if you enter an Merac till and transaction number where there is already a gift aid claim entry, then the following message will show. You cannot add a transaction unless it is for a transaction where there is no claim already present.
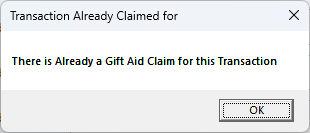
In this scenario the system will not let you add this submission.
Click 'Ok' and you are returned to the 'Add New Gift Aid Transaction' form.
If you entered a valid till transaction that does not already have a gift aid claim entry, the below will show,
Click 'Yes' and this added transaction will now be visible in the relevant claim searches.
Claimable Value and Tax Rate
These figures do not form part of the submission; they are just used to inform you of the amount you are claiming.
The basic rate of Income Tax is set by default to 20%.
![]()
This can be changed, and the change will then be reflected in the claim amount.
Export to Excel
If Microsoft Excel has been installed on the computer by you own IT team or IT support provider, then clicking on the ‘Export to Excel’ button will open an Excel worksheet containing the contents of the gift aid claims grid.
![]()
Submitting a Claim
To submit a claim, click on the ‘Submit Claim to HMRC’ button.

This will submit a claim to the HMRC of all of the gift aid claims in the grid.
A submission will only be made if:
1. All postcodes are valid, and
2. None of the claims are marked as previously submitted
If you have not marked your historical gift aid claims as submitted, do not resubmit any of these claims as you cannot simply edit / cancel them using the HMRC portal! Instead you must contact HMRC to resolve this.
Please Note:
Zero-value submissions are not accepted by HMRC: Although they are presented in the grid and marked as submitted when appropriate, this is just for your reference and they are not actually sent. Negative-value claims cannot be sent individually: instead, the value is totalled, and they are sent as an adjustment to current claim’s value.
Submission Response
The submission is divided into batches of 1,000 records: This so that if you have a slow internet connection you will not time-out when submitting records. Each batch is sent in turn to the HMRC portal, and then the software waits for a response stating whether each submission was successful.
Marking Claims as Submitted
If the submission was successful, each claim is immediately and automatically marked as submitted. Whether it was successful or not, you can view the message sent from the HMRC for the last batch by clicking the ‘View Details’ button.
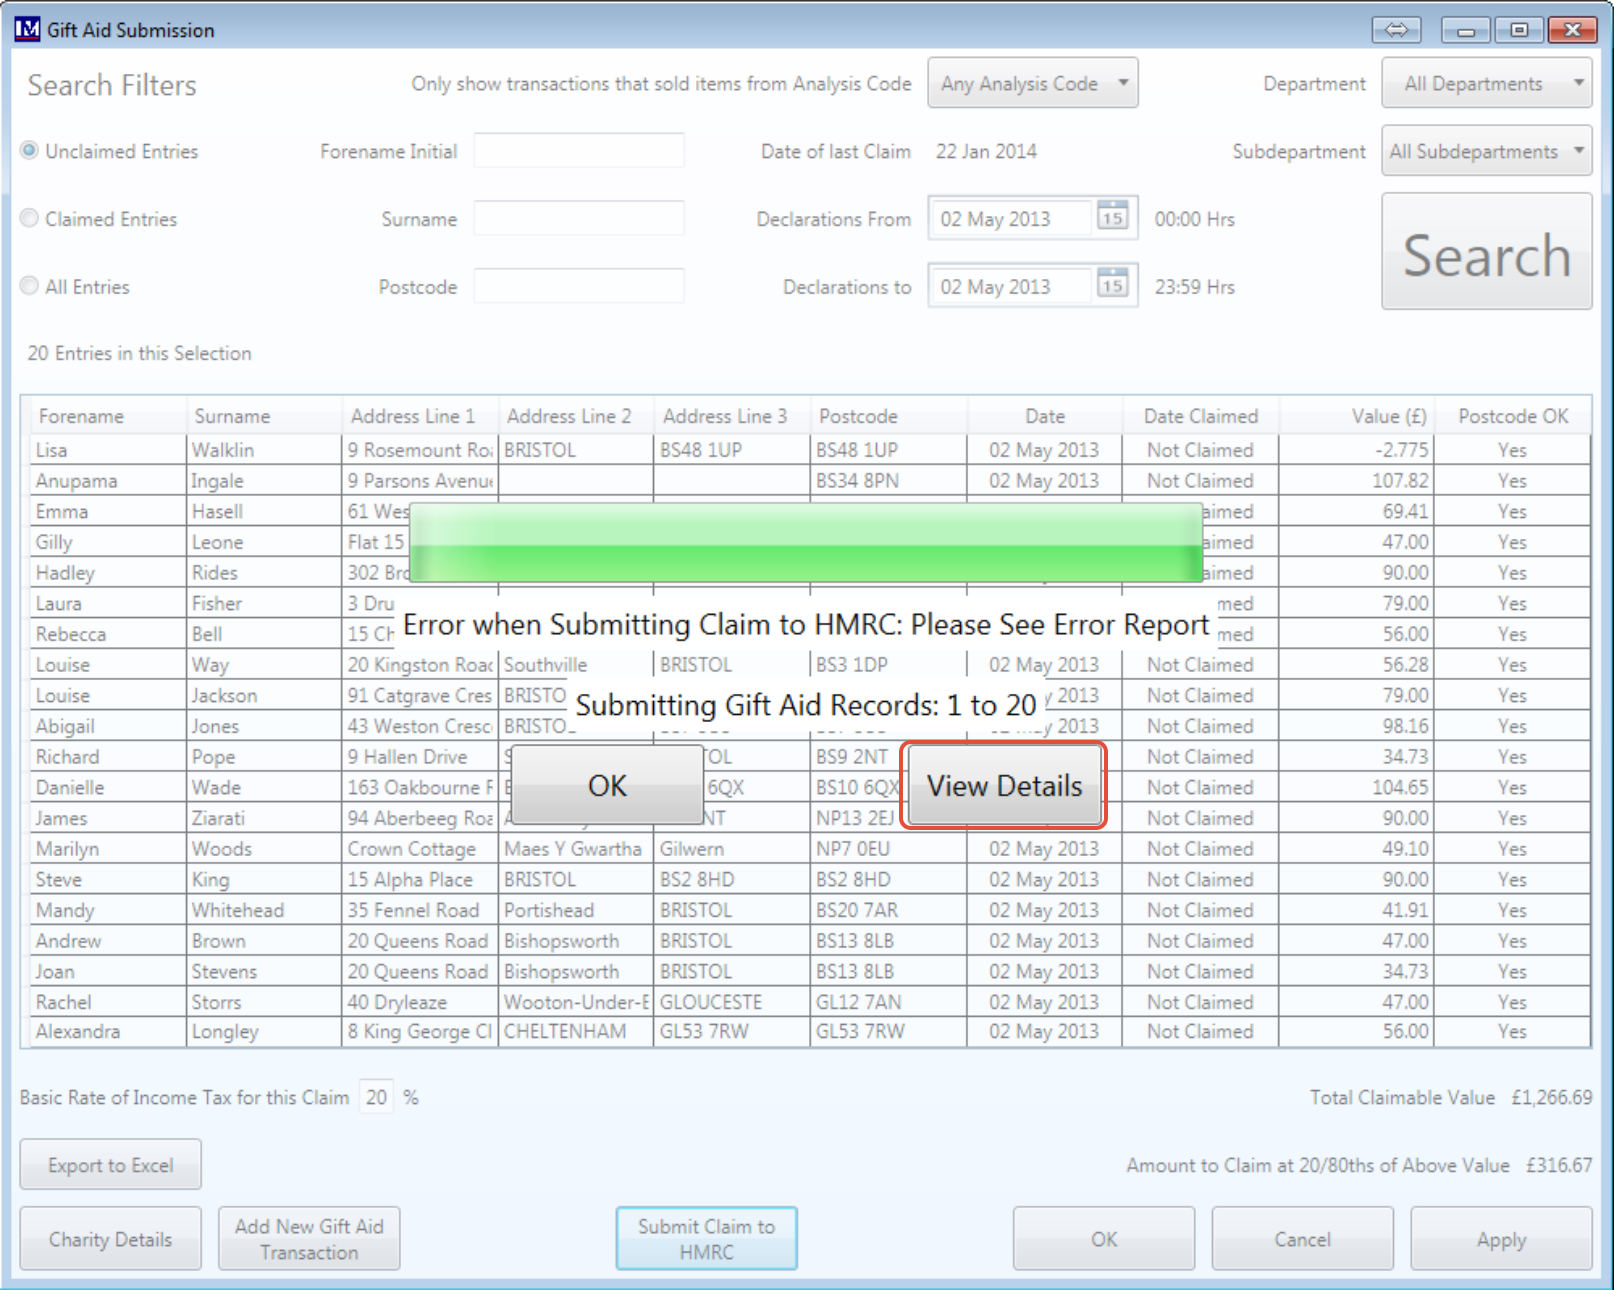
Submission Errors
In the above instance this will open the error received from the HMRC in a web browser:
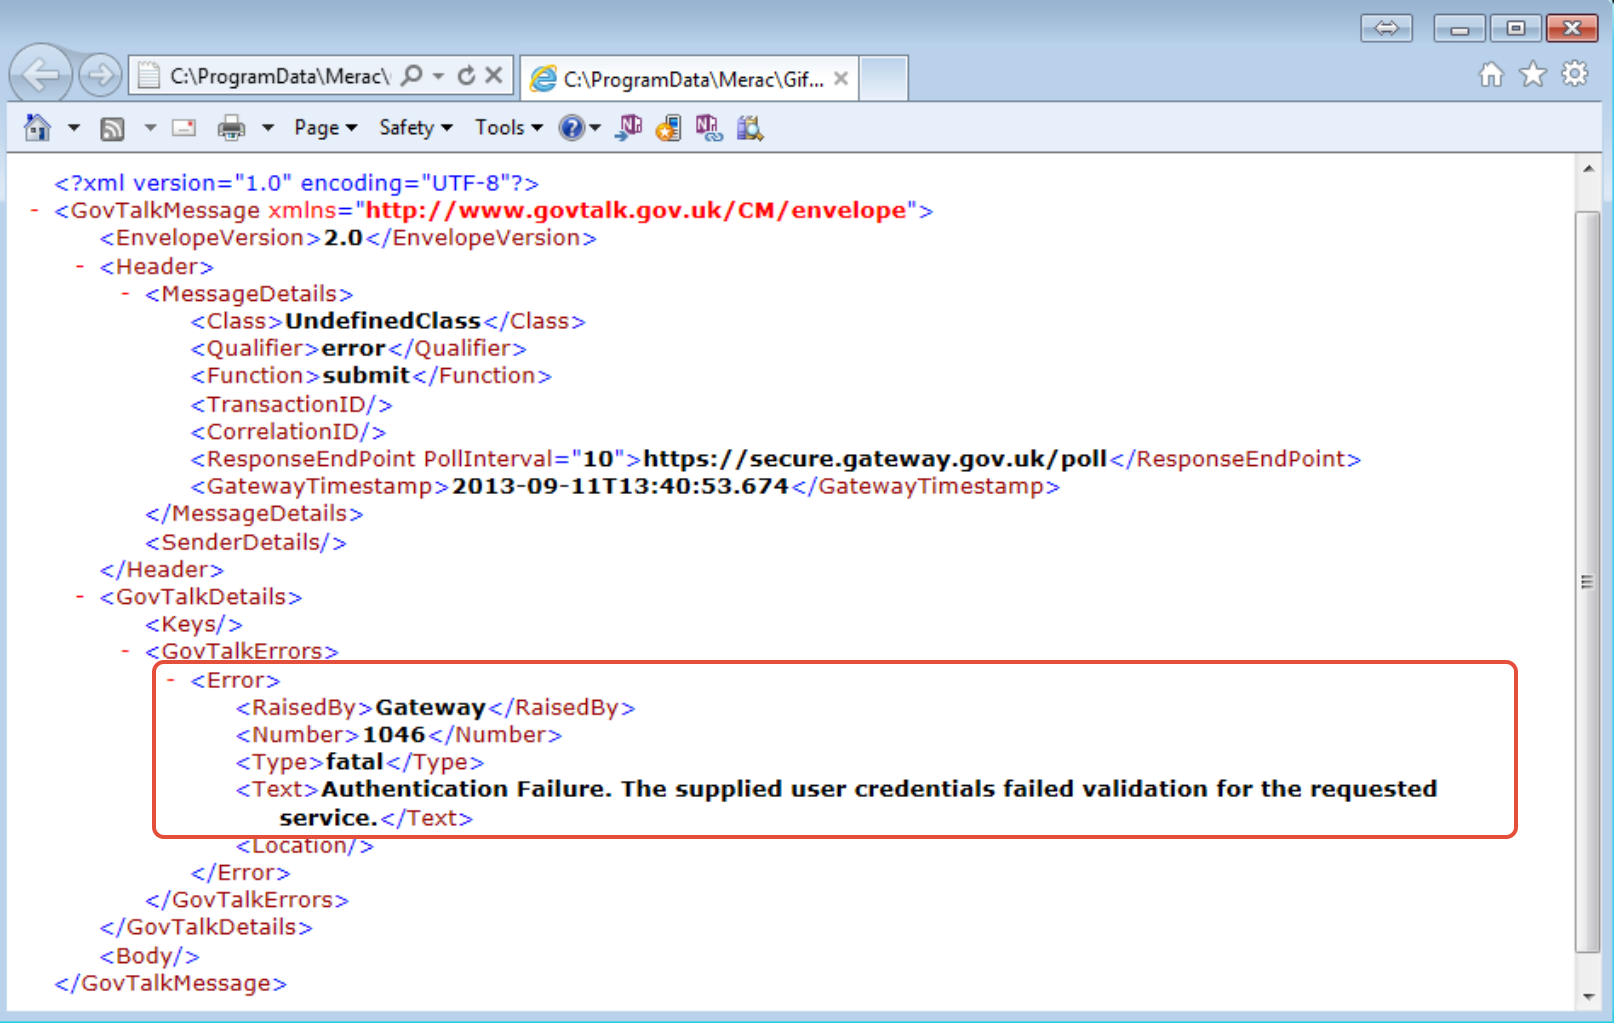
Although the error report looks complex, the only important point is the cause of the error, circled above.
In this case the charity details are not valid.
All submission files are saved in the computer’s common application data folder. This is located in: C:\ProgramData\Merac\Gift Aid\
The files display their type (submission request or response) and the date. Note: The HMRC reference, 'irMark', cannot be added to the filename as it uses special characters that Windows will not allow as part of a filename. It must be found in each file by searching for ‘irMark’.
They are not saved anywhere else, so please backup this folder if you require an audit trail:
Customers have reported that HMRC have no gift-aid reporting tools!
Adjustments to Previous Gift Aid Claims
Occasionally you may need to adjust a previous submission, for example when a customer tells you that they are unable to gift aid, but you have already submitted their claim. As transactions are batched before sending to HMRC and the overall claim value must be positive for each batch, the maximum negative adjustment should not be more than £1,000 without contacting us first. We have looked for a method to make this very easy for you but have been unable to find such a method that leaves an audit trail and does not affect your Transaction / Cashup reports. As such, the process to create a gift aid adjustment is to sell a gift aided item, then refund that item but non-gift aided. Detailed instructions are below.
The process to file an adjustment is as follows:
Prerequisite: You must do this before you wish to make your first adjustment.
- Add a new PLU with the following specification (please ask whoever normally adds PLU’s):
- Barcode: GIFTAIDADJUSTMENT
- Category: Admission Ticket
- Short Description: Gift Aid Adjustment
- Long Description: Gift Aid Adjustment
- Override Price: Allow Price Override
- Price: £1.00
- Claim Gift Aid: Yes
- Analysis Code: Select the correct one as required for this PLU to report to.
Then, when you wish to make an adjustment there are two stages:
Stage 1: Add gift aid adjustment by putting through a transaction
- Go to a till which has a keyboard (or take one with you).
- Type into the barcode box ‘GIFTAIDADJUSTMENT’ and press the Enter key.
- Click on the price.
- Enter the adjustment amount (ignore whether it’s positive or negative for now) that you wish to make and press the enter key. Please note that this value is treated as a normal gift aid transaction, i.e. the actual adjustment to the claim will be 20/80ths of this value.
- If the adjustment is negative then refund the above item (how you do this will depend on your till configuration, but normally you would select the item, then go into the ‘Supervisor’ menu and press the ‘Refund’ button).
- Press the ‘Subtotal’ then the ‘Cash’ button.
- The ‘Gift Aid Details’ screen will appear. If your adjustment is negative these details are not sent to the HMRC but are just a record for the adjustment reason. Some details like the postcode though will need to appear genuine for the program to let you continue.
- Press the ‘Exact Money’ button to complete the transaction.
Stage 2: You must now cancel-out the value of the above transaction by putting through another transaction of the opposite value, but which is not gift aided. This ensures the cash-up and transaction reports will be correct.
- Type into the barcode box ‘GIFTAIDADJUSTMENT’ and press the ‘Enter’ key.
- Click on the price.
- Enter the adjustment amount (ignore whether it’s positive or negative for now) that you wish to make and press the ‘Enter’ key. Please note that this value is treated as a normal gift aid transaction, i.e. the actual adjustment to the claim will be 20/80ths of this value.
- If the adjustment you just performed was positive then you will need to make this balancing transaction negative by refunding the above item (how you do this will depend on your till configuration, but normally you would select the item, then go into the ‘Supervisor’ menu and press the ‘Refund’ button).
- Toggle gift-aid off (there will normally be a button on the till screen that does this).
- Press the ‘Subtotal’ then the ‘Cash’ button.
- The ‘Gift Aid Details’ screen will appear. If your adjustment is negative these details are not sent to the HMRC but are just a record for the adjustment reason. Some details like the postcode though will need to appear genuine for the program to let you continue.
- Press the ‘Exact Money’ button to complete the transaction.