Introduction
The following document details how to set-up a seating plan using the Merac back office software’s ‘Seating Plan Designer’. This document is primarily written for customers who require seats to be assigned when selling or booking train tickets, however exactly the same functionality that is detailed in this manual can be used to create seating plans for e.g. theatre, concert and cinema venues.
Please Note:
Seating plans can only be used in conjunction with ‘Sessions’ in the Merac back office software. For this reason, you must have had training on, and have set up all the required ‘Sessions’ in advance of using this manual. Likewise, you need to have received training on, and have set up all the required PLU’s and then link them to the relevant ‘Session Type’ before using this manual.
Accessing Seating Plan Designer
For customers with the ‘Trains’ functionality enabled:
1. Click the ‘Trains’ main menu option, then 2. click on the ‘Formation’ button.
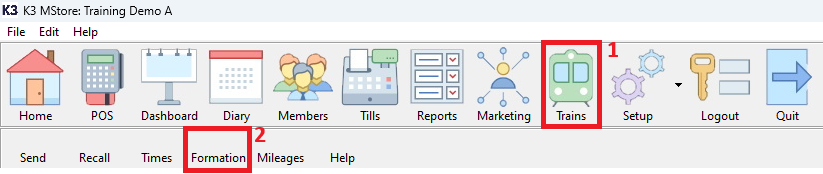
This brings up the ‘Seating Plan Designer’ window – proceed to Section 2.
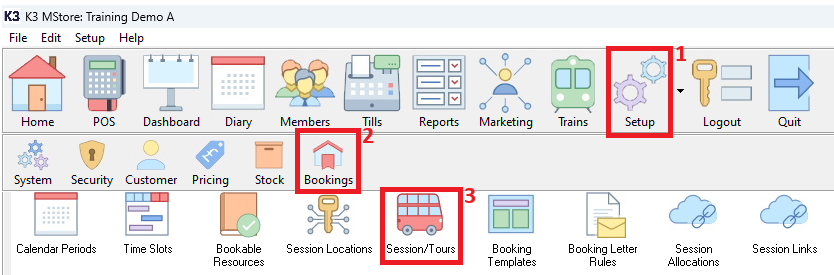
For customers who do not have the ‘Trains’ functionality enabled:
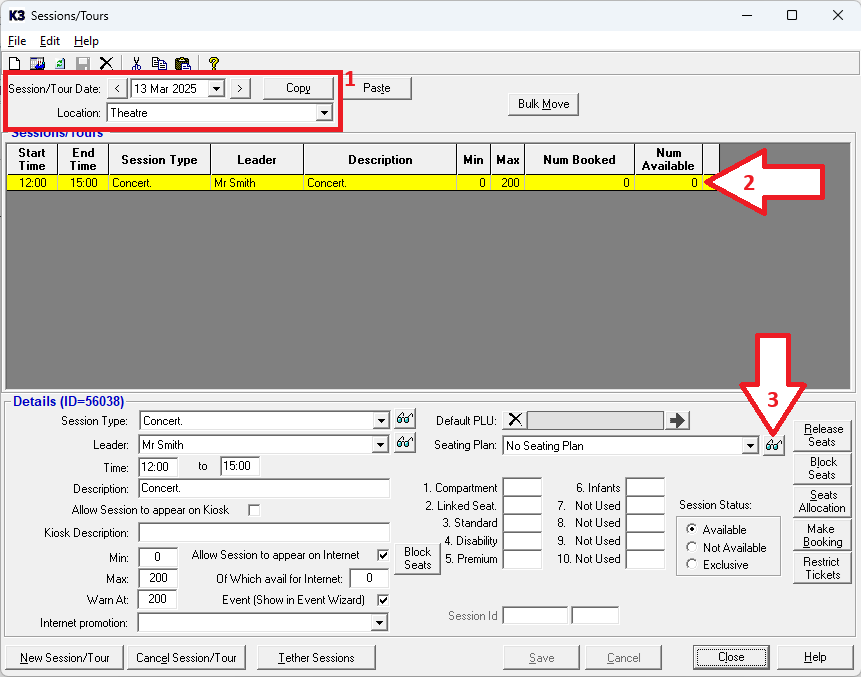
Click 1. 'Setup', then 2. click 'Bookings', then 3. finally, double click 'Sessions/Tours'.
Next, select 1. the required ‘Session/Tour Date’ and ‘Location’ using the relevant dropdowns.

Now, click on 2. the first session time that you want to create a seating plan for (so it is highlighted yellow).
Finally, click 3. the button shown to bring up the ‘Seating Plan Designer’ window.
Creating a New Seating Plan
Please note that first, you simply give this seating plan a ‘Code’ and a ‘Description’.
The design of ‘Locomotives’, ‘Carriages’ and ‘Seat Blocks’ used in seating plans is covered later in this manual.
For our customers who are using the ‘Trains’ functionality:
Seating Plans are created for all the possible combinations of engines and coaches that may ever be used.
Alternatively, for our customers who are not using the ‘Trains’ functionality:
Seating Plans are created for all the possible seating layouts used for concerts, theatre or cinema performances.
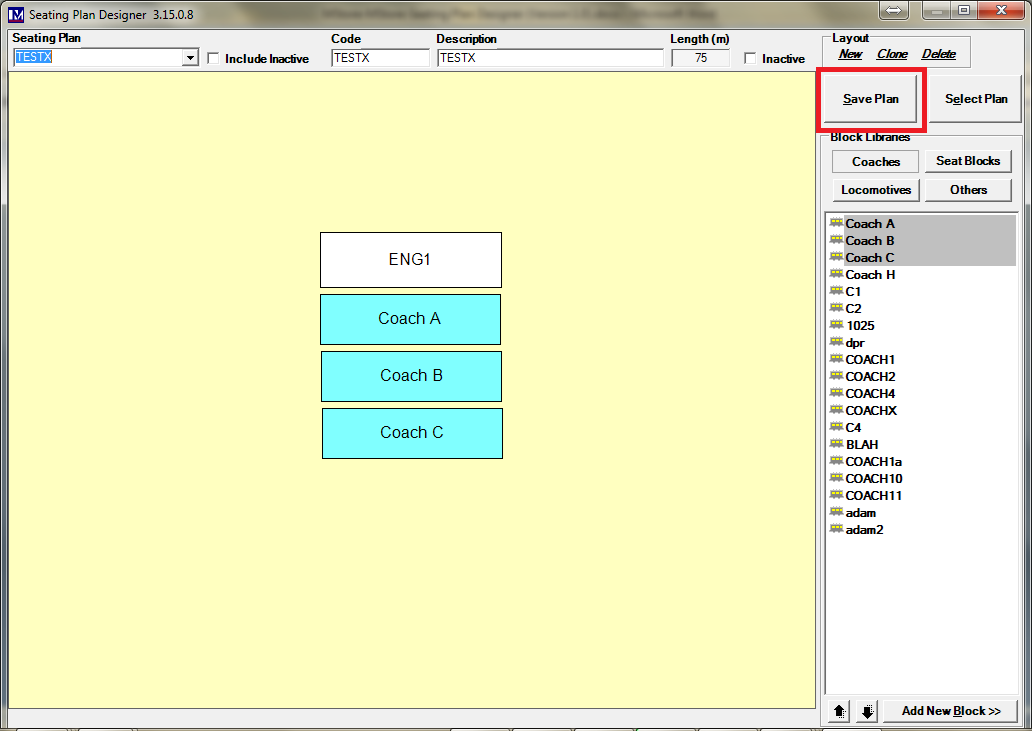
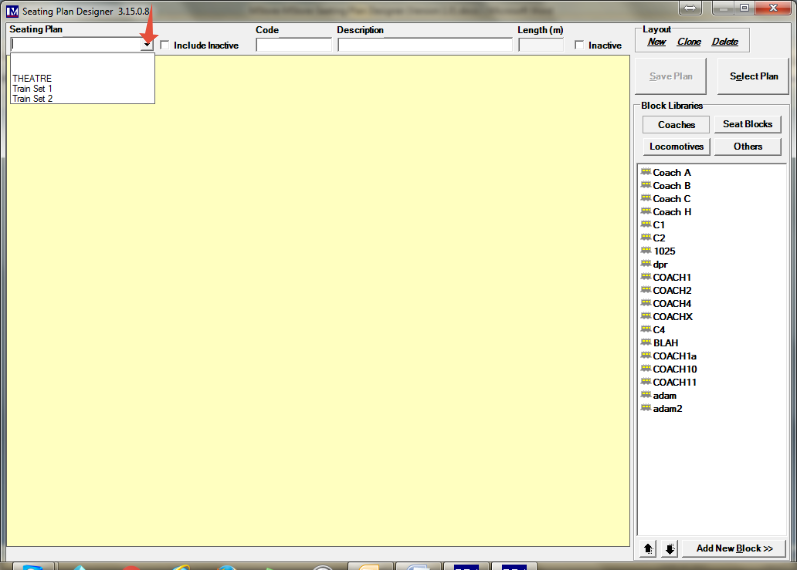
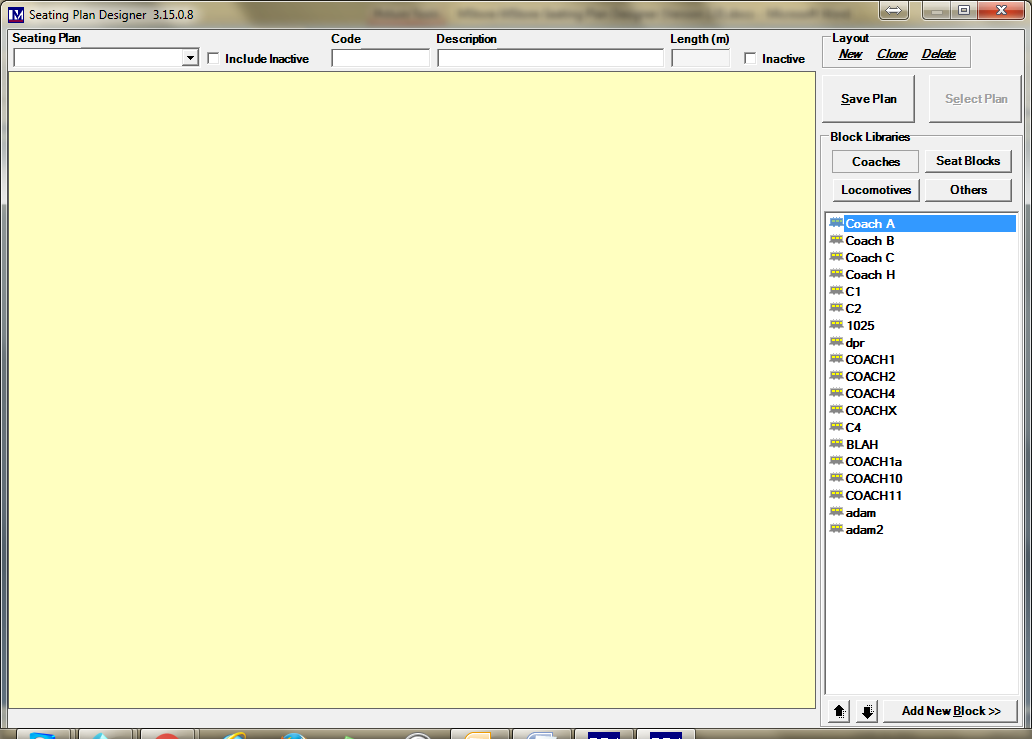
To create a new ‘Seating Plan’ simply type in the required name of this plan in the ‘Seating Plan’ box.
Then type in the required ‘Code’, then ‘Description’ for this seating plan where shown.
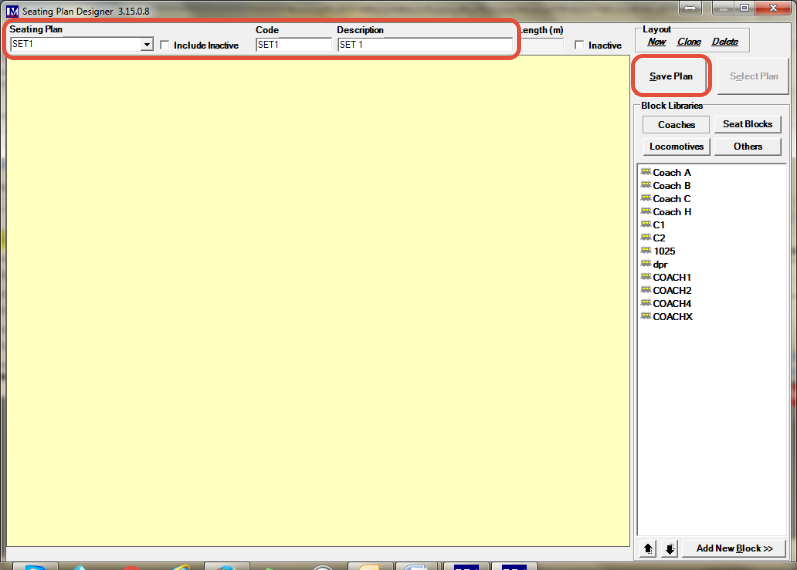
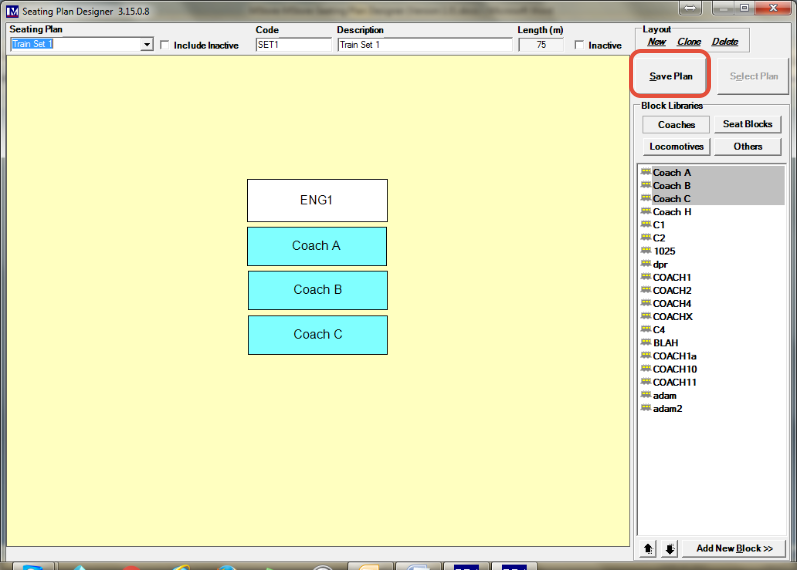
Once these details have been entered, click on the ‘Save Plan’ button.
In order to create a ‘Seating Plan’, first:
For customers using the ‘Trains’ functionality:
All the required ‘Locomotives’ and ‘Coaches’ need to be made.
Alternatively, for our customers who are not using the ‘Trains’ functionality:
All the required ‘Seat Blocks’ need to be made only.
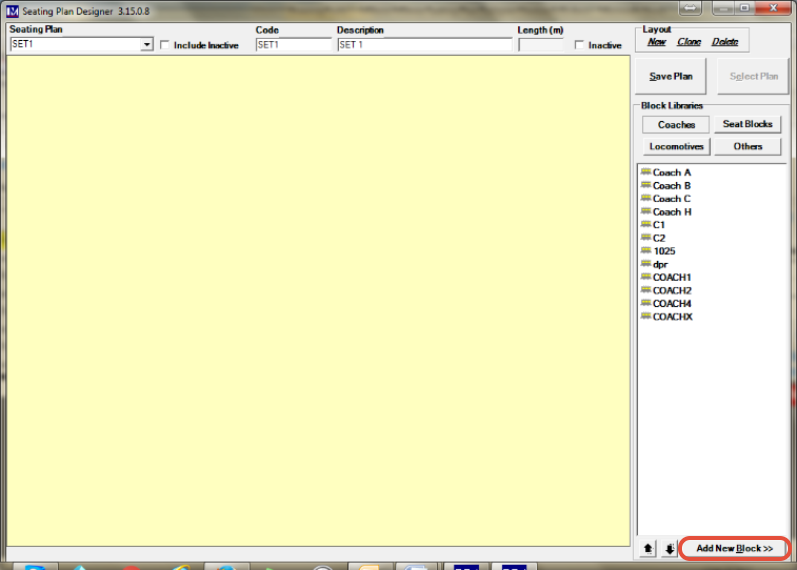
To create new ‘Locomotives’, ‘Coaches’, or ‘Seat Blocks’, then click the ‘Add New Block’ button.
Important notes for our customers who are not using the ‘Trains’ functionality:
If you are creating a ‘Seating Plan’ for e.g. a theatre, concert or cinema venue, then the majority of the concepts in the manual still apply, however some concepts are unique to trains and are therefore not required. Below is a breakdown of the sections of the manual that are applicable, with some relevant guidance notes:
Start at Creating Coaches but instead you create the block ‘Type’ of ‘Seat Block’(s) from the relevant dropdown.
Please note, if you have a simple seating layout, then only one seat block may be adequate for the entire seating plan. If you have a more complex set-up (e.g. many different seating sections each with different ticket prices), then you may need to set up multiple seat blocks in your seating plan.
Next, go to Adding Coaches to a Seating Plan but instead in the ‘Block Libraries’ section, select ‘Seat Blocks’.
Next, follow Amending Coach Dimensions & Adding Seats.
Entry of ‘height, ‘length’ and ‘width’ data is not mandatory but can be entered if required for customers operating trains.
Finally, follow Editing Existing Seating Plans but you would only be editing ‘Seat Blocks’ in a seating plan.
Creating Locomotives
If you need to include specific ‘Locomotives’ in your seating plan, then follow the instructions in this section.
If your seating plans only need ‘Carriages’, then go to Creating Coaches.
You should now be at the following screen.
Enter the ‘Code’ and ‘Description’ for this locomotive in the relevant boxes here.

Select the type ‘Locomotive’ from the dropdown selection box here.
Click on the ‘Save’ button.
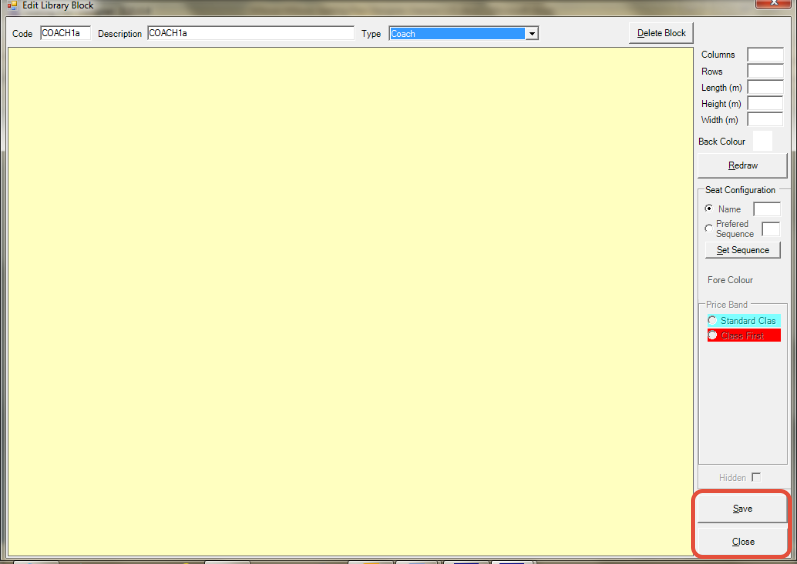
Click on the ‘Close’ button.
Repeat as required until all locomotives are created.
Creating Coaches
You should now be at the following screen.
Enter the ‘Code’ and ‘Description’ here for this coach as required.
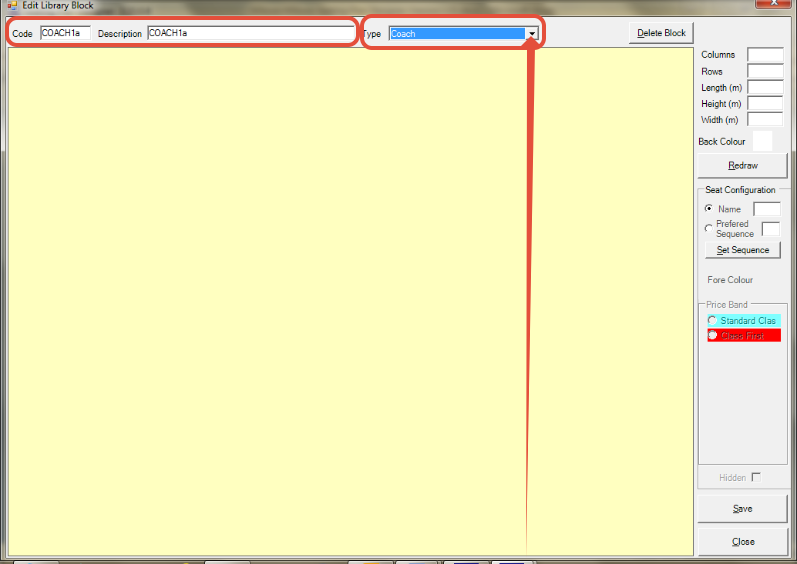
Select the type ‘Coach’ from the dropdown selection box here.
(Remember for customers not using the ‘Trains’ functionality, here you select ‘Seat Block’ instead)
Click on the ‘Save’ button.

Click on the ‘Close’ button.
Repeat as required until all ‘Coaches’ are created.
N.B. all other aspects of configuring and using coaches in seating plans are covered later.
Adding Locomotives to a Seating Plan
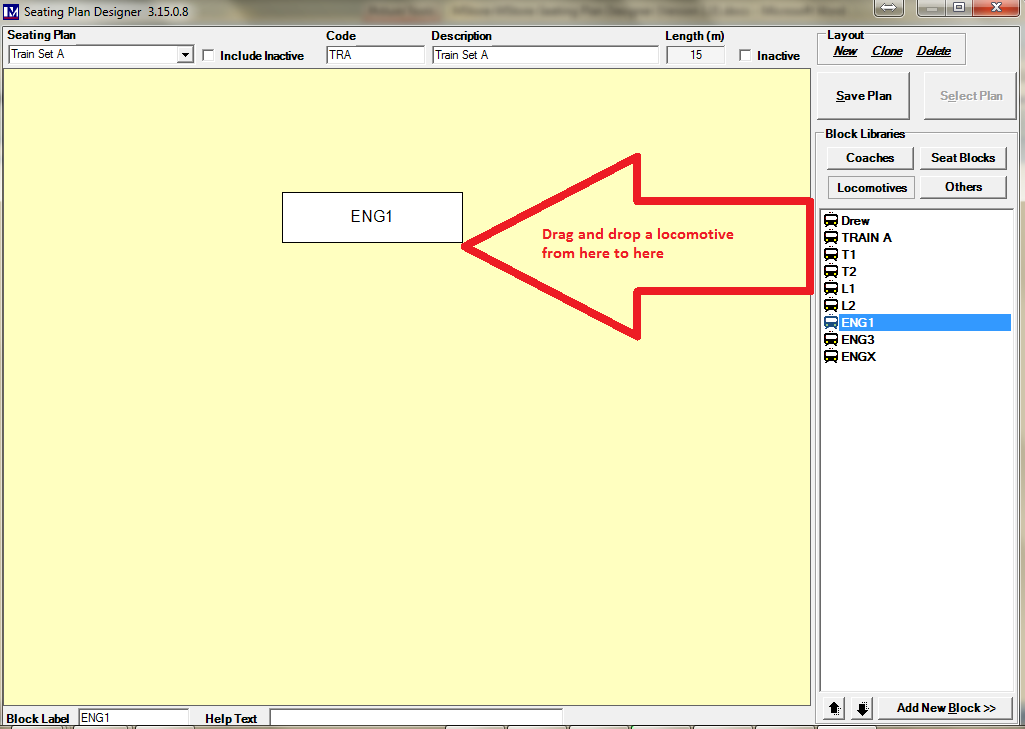
Make sure the correct seating plan name is selected in the ‘Seating Plan’ dropdown.
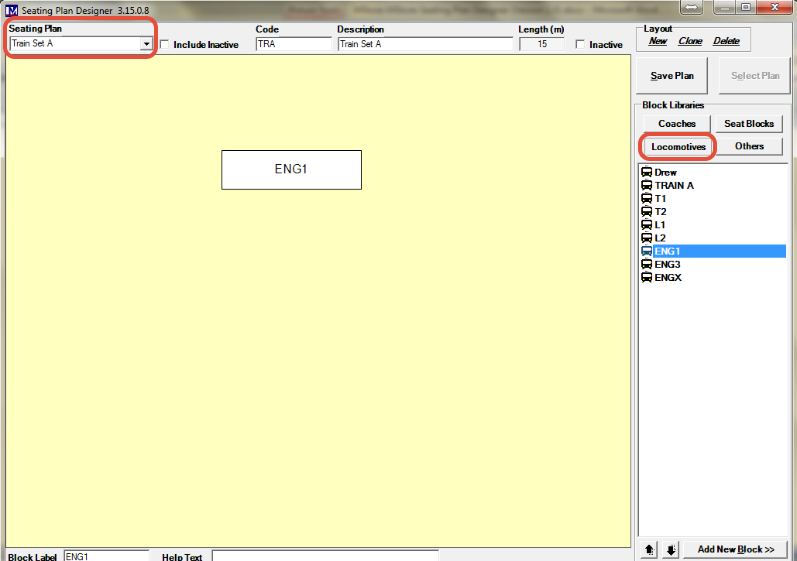
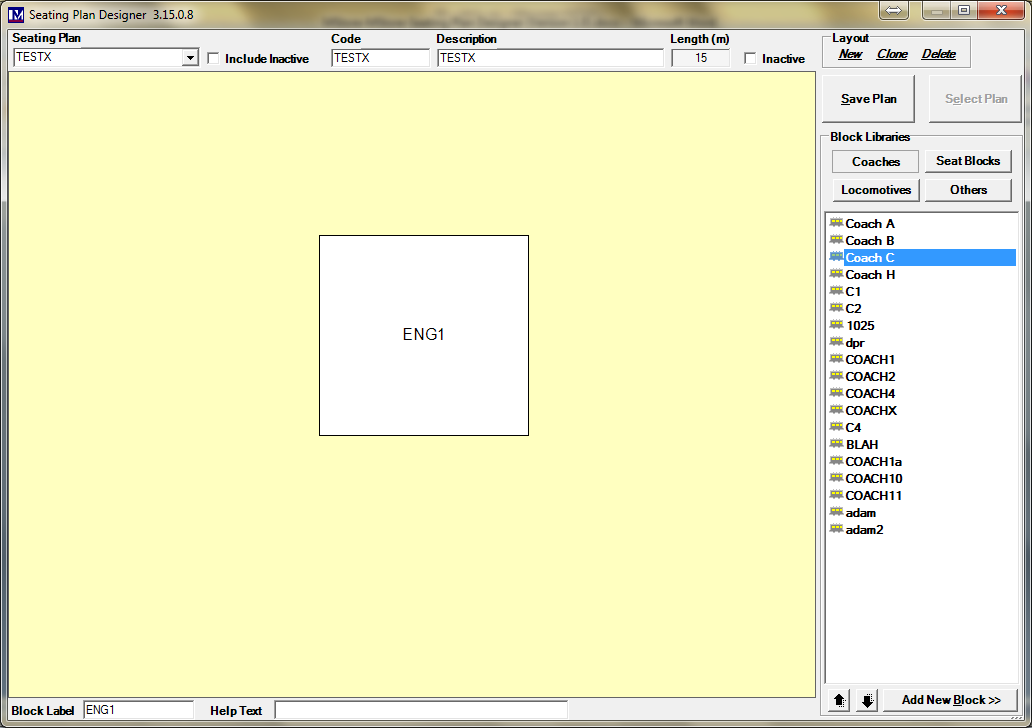
In the ‘Block Libraries’ section, click the ‘Locomotives’ button.
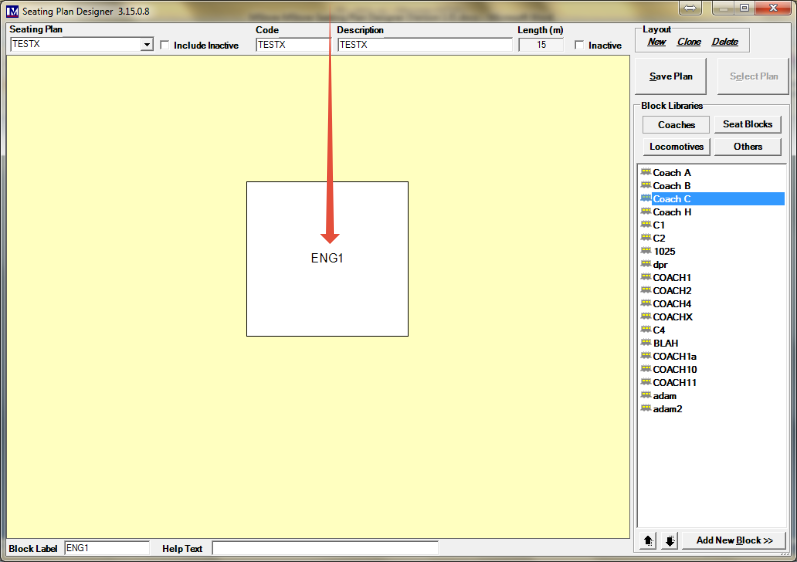
Drag and drop a locomotive to the required position.
Now you can click and drag the locomotive to adjust its position.
At this point you can resize the block for the locomotive you have just added.
Right click on the locomotive block and then left click on the ‘Resize Block’ option.
Click and drag anywhere in the block (using the left mouse button) to resize the block as detailed below:
- Click and drag vertically (up or down) to adjust the height of the block as required.
- Click and drag horizontally (left or right) to adjust the width of the block as required.
- Click and drag diagonally to simultaneously adjust both the height and width of the block as required.
Use any of the three resizing methods above to resize the block as necessary.
Amending Locomotive Dimensions
Double click on the locomotive ‘block’ to amend its dimensions.
Enter the required details here.
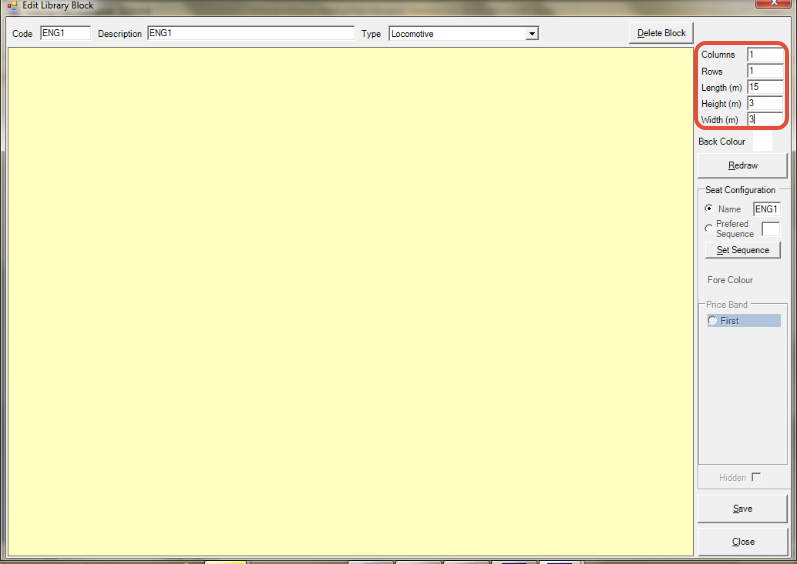
Rows and columns are used to design the seating layout for carriages that have seats.
For a locomotive that has no bookable seats, enter 1 in the ‘Columns’ box and 1 in the ‘Rows’ box.
If required, enter the length of this locomotive in the ‘Length box for information purposes only.
If required, enter the height of this locomotive in the ‘Height (m)’ box for information purposes only.
If required, enter the width of this locomotive in the ‘Width (m)’ boxes for information purposes only.
N.B. the length will be used to calculate the total length (m) for a seating plan.
Once the required details have been entered click the ‘Redraw’ button.
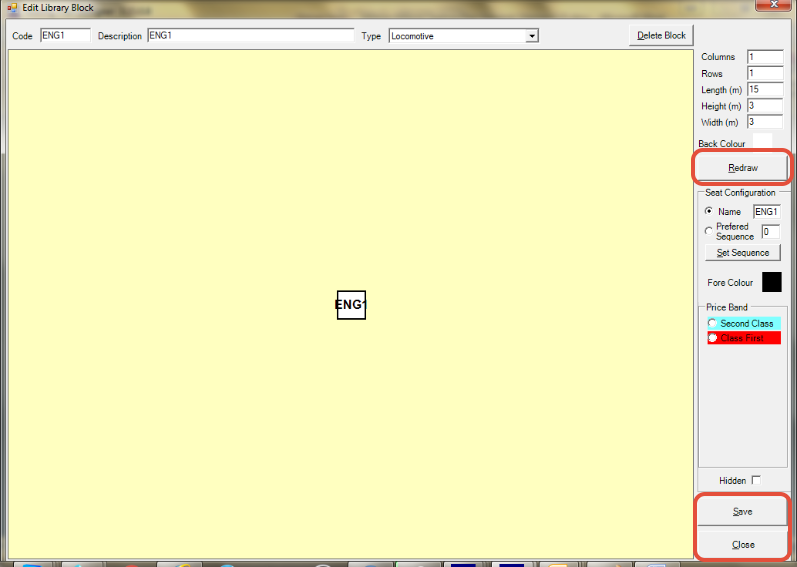
Click the ‘Save’ button, then click the ‘Close’ button.
You now know how to add a locomotive to a seating plan.
Repeat as required to add locomotives to all relevant seating plans.
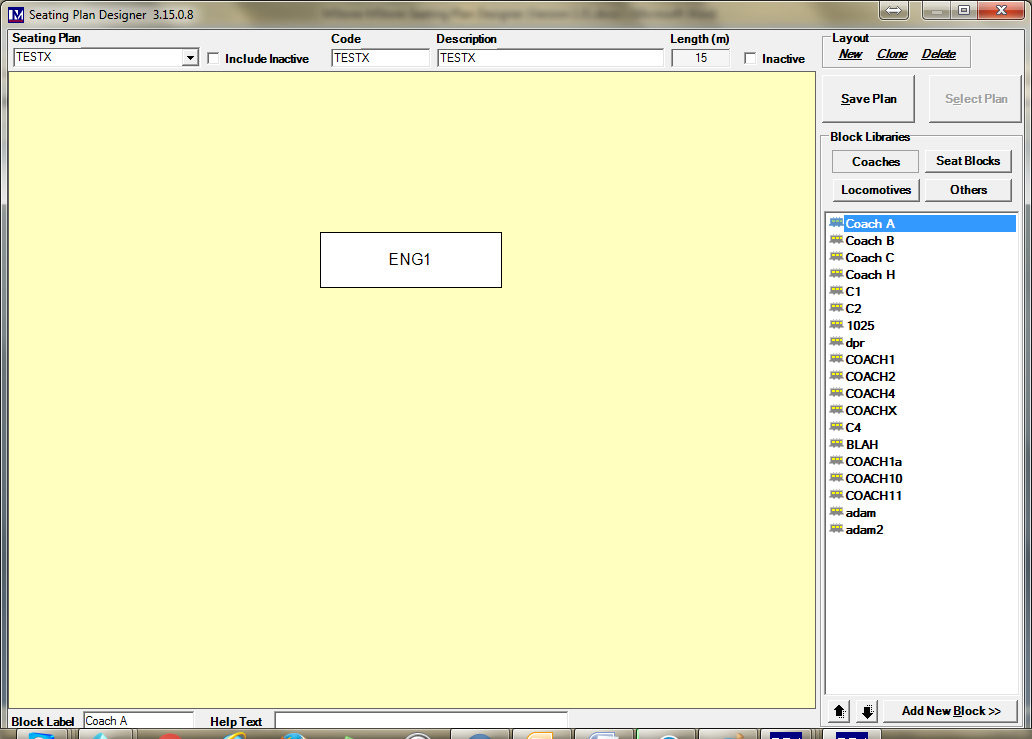
Adding Coaches to a Seating Plan
Make sure the correct seating plan is selected in the ‘Seating Plan’ drop down (in the top left corner).
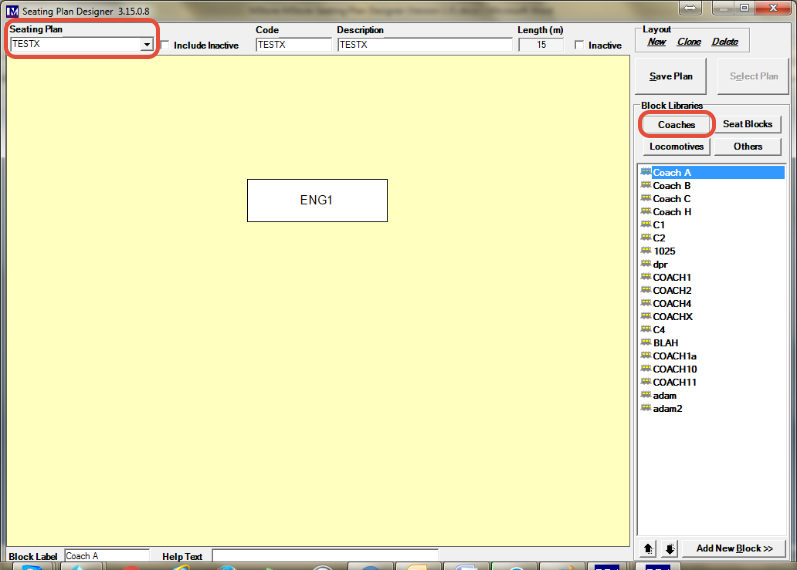
In the ‘Block Libraries’ section click on the ‘Coaches’ button.
(Remember for customers not using the ‘Trains’ functionality, here you select ‘Seat Blocks’ instead)
The list of all the coaches you have created will now be showing here.
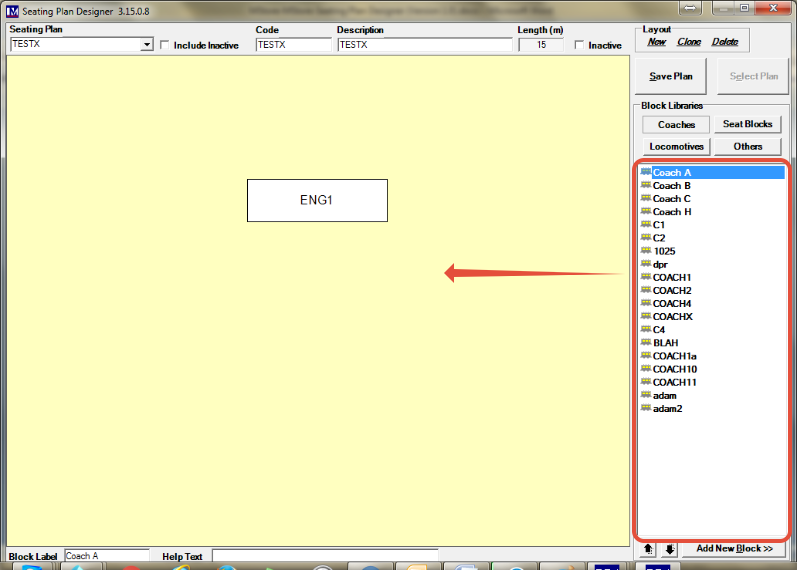
Click and drag the first coach (from the list of coaches) to the required position.
Now click and drag the coach you added, so that it is in the required position on the page.
Please note at this point you may wish to resize the coach you just created.

Repeat the process to add all the new coaches that are required.
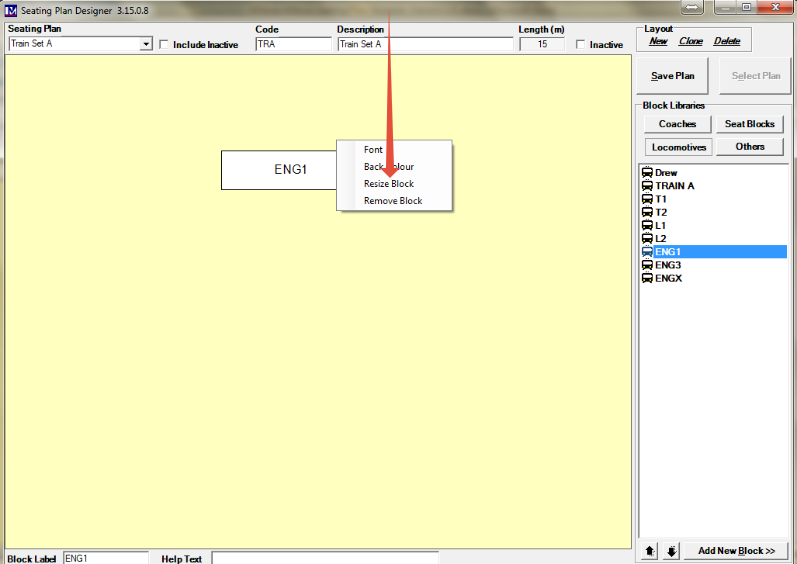
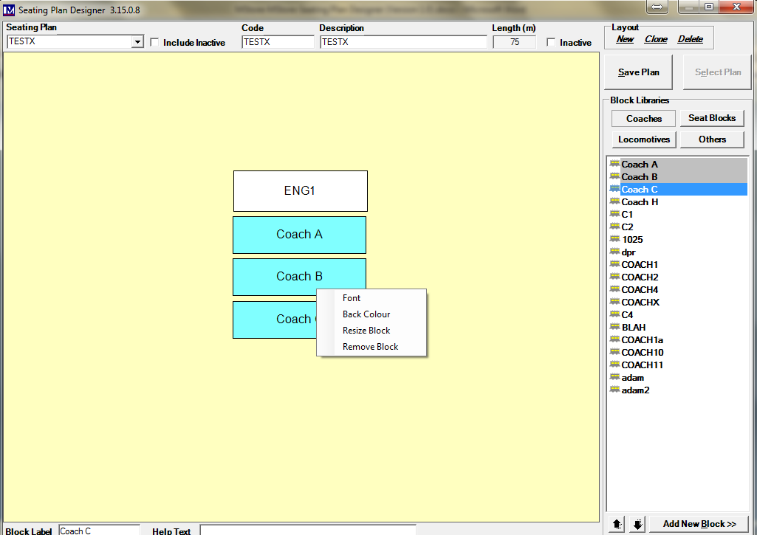
Please note, you can right click on a locomotive or coach to see the additional options shown below.

After right clicking, select the required option using a left mouse click.
If you select the ‘Font’ option, you will see the screen below.
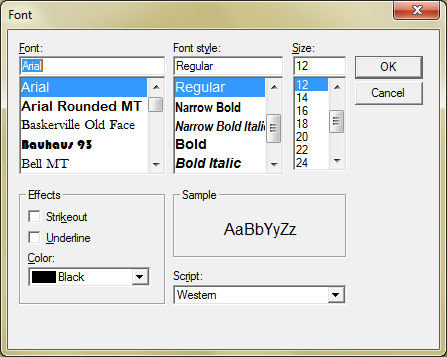
Make the required changes, then click the ‘Ok’ button.
If you select the ‘Back Colour’ (background colour) option, you will see the screen below.
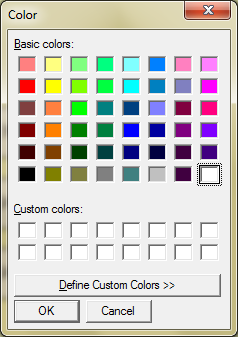
Select the required colour, then click the ‘Ok’ button.
If you want to remove a coach or locomotive from the seating plan, right click the block in question.
Now left mouse click the ‘Remove Block’ option to remove the selected locomotive/coach from the seating plan.
How to use the ‘Resize Block’ option is explained in Amending Locomotive Dimensions.
Amending Coach Dimensions & Adding Seats
Double click the block in the seating plan to amend its details.

Enter the details as required here for this coach.
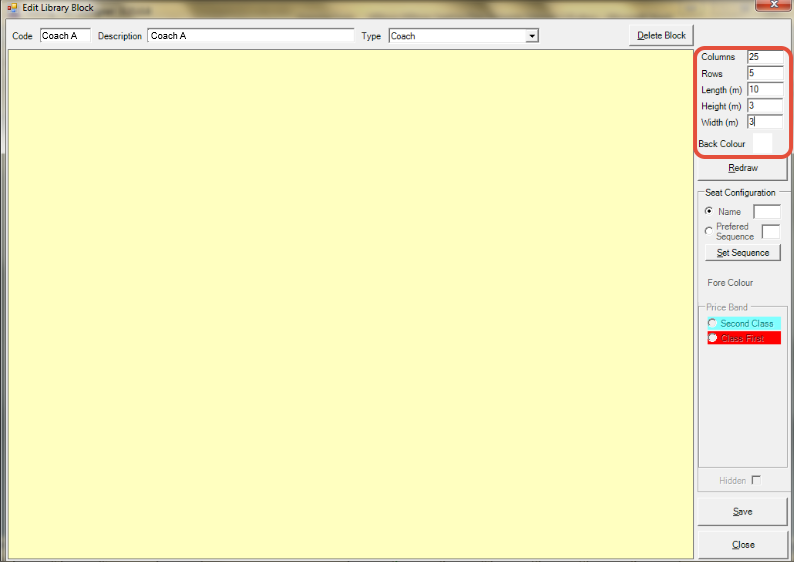
Columns: Enter the required number of ‘Columns’ here
(N.B. extra columns may be needed for creating aisles – creating aisles is detailed later).
Rows: Enter the required number of ‘Rows’ here.
(N.B. extra rows may be needed for creating aisles – creating aisles is detailed later).
Length (m): Enter the length in metres.
(this will be used to calculate the total length of the train).
Height (m): Enter the height in metres (this is entered for information only).
Width (m): Enter the width in metres (this is entered for information only).
Back Colour: Click here to select the default background colour.
(this will change the colour of any seats marked as ‘Hidden’ – see Creating Aisles)
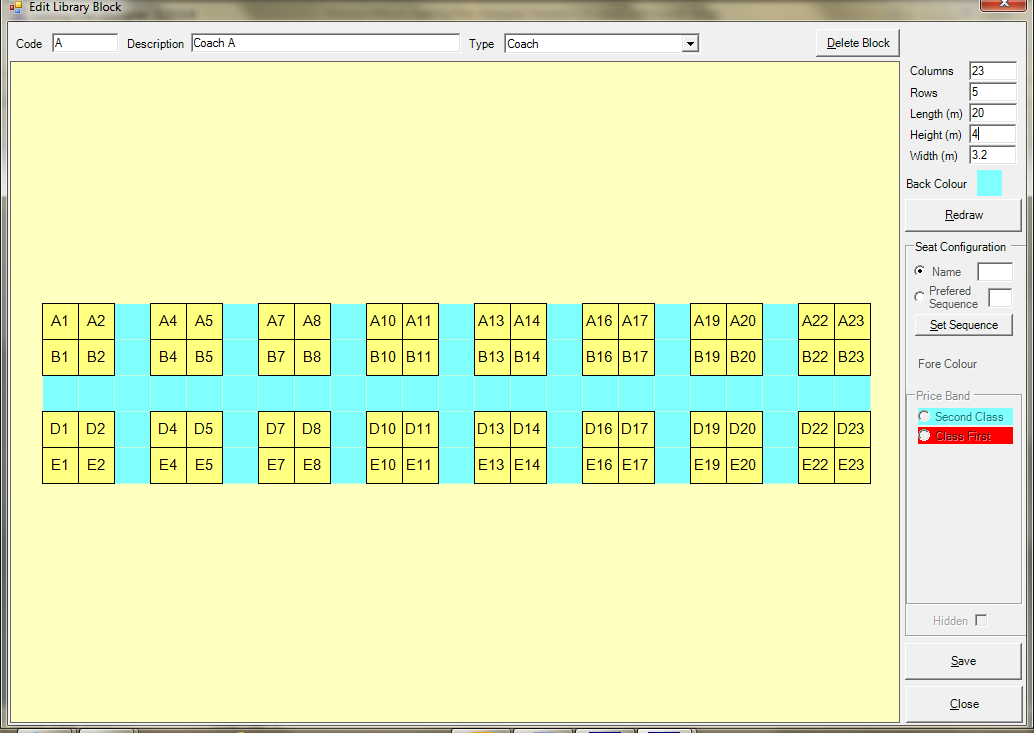
Click the ‘Redraw’ button and you will see the grid of seats appear as shown below.
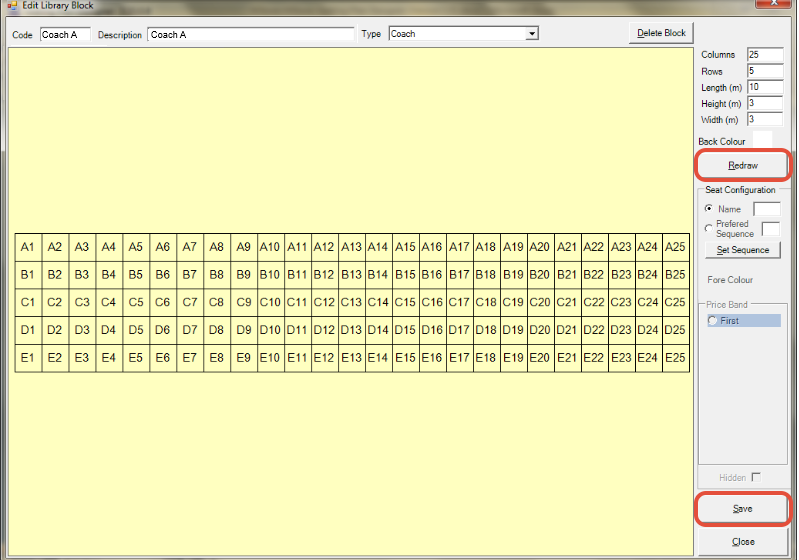
Click ‘Save’ at this point to save these changes.
You will notice a default seat numbering system is used (changing seat numbers is detailed in Renaming Seats).
Creating Aisles
If you want to make aisles click on a specific seat where the aisle will start.
Next click the ‘Hidden’ tick box and the seat will turn white (indicating the seat is hidden).
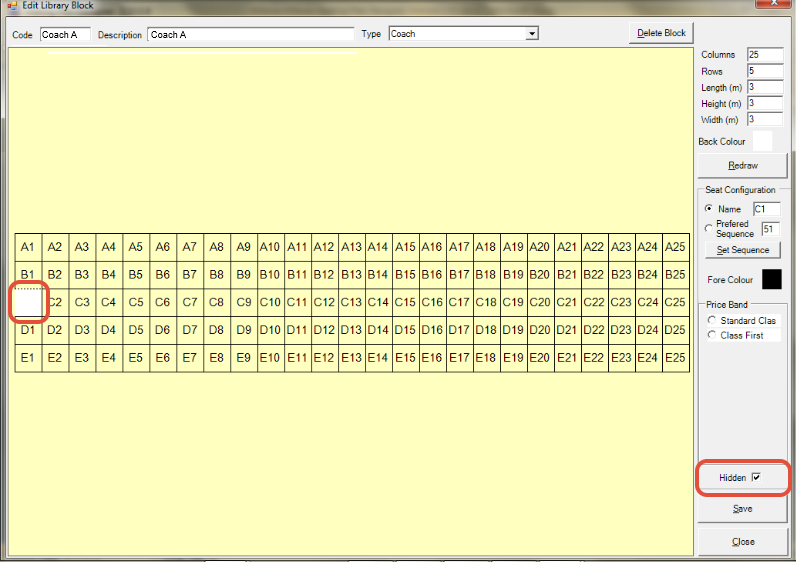
You can repeat this process a seat at a time, to mark all the required seats as hidden.
Alternatively, you can mark a range of seats as hidden by using “click and drag”.
Simply click on any hidden seat, then click and drag vertically or horizontally to another seat.
This will change all the seats you just selected to be hidden (i.e. they will turn white by default).

Repeat the process until all the required aisles have been created, then click the ‘Save’ button.
Renaming Seats
You can rename the seats as required to reflect the seat numbering you need for each coach.
To do this click on a seat you wish to rename.

Type in new name for this seat in the ‘Name’ box, e.g., “16D” and you will see the name change.
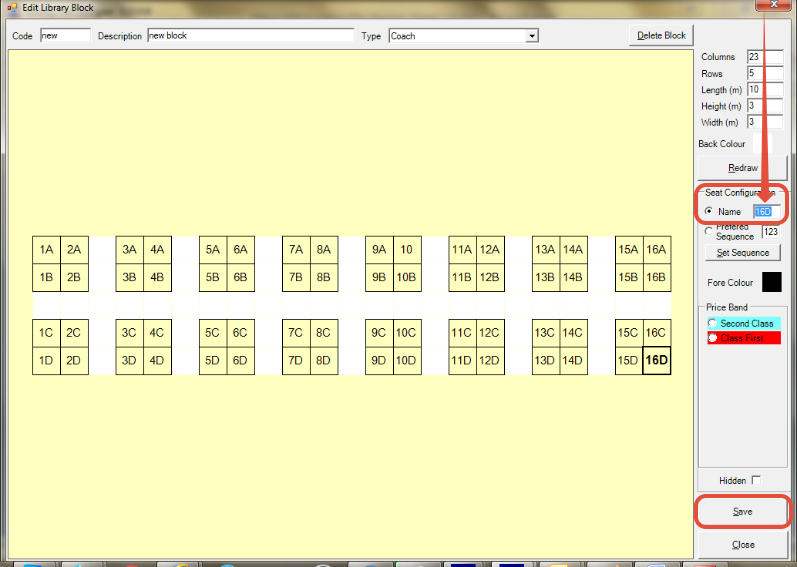
Click in the next cell and repeat the process until all the seats are renamed.
Click the ‘Save’ button once all the seats have been renamed.
Adding Seats to a Price Band
Where different classes of seats are available, ‘Price Bands’ can be set up to represent each available class of seat (e.g. you might create ‘Price Bands’ called ‘Standard Class’ and ‘First Class’).
Please note, that even if you do not offer different “classes” of seats then at least one price band must be set up in the Merac back office software (e.g. in this scenario one price band called “Standard” might be created).
For this reason, each ‘Price Band’ that is required must be set up before you can assign seats to a specific ‘Price Band’. Setting a ‘Price Band’ up is not covered in this manual, so please follow the procedure as per your training to add the required price bands (reminder this is done in Setup > Pricing > Price Bands).
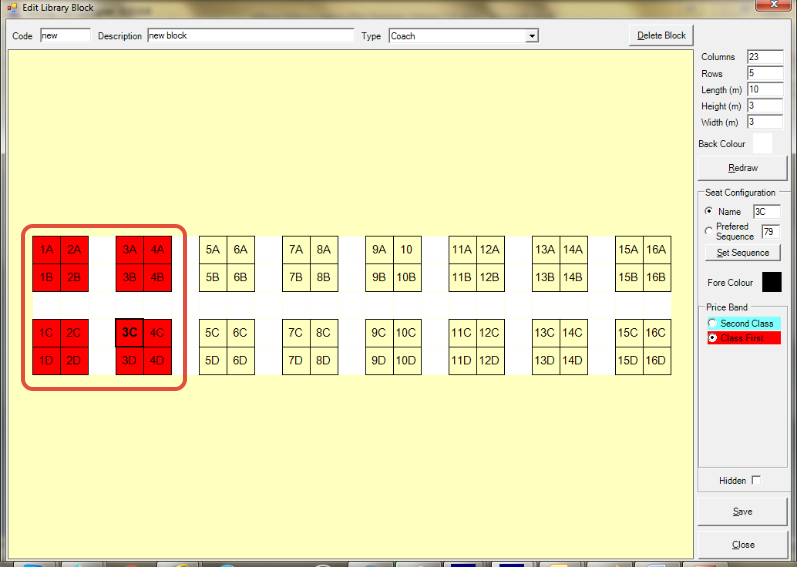
Once each ‘Price Band’ has been created you can then assign each seat to the required ‘Price Band’, this process is detailed below. Click on the first seat that you will need to assign a ‘Price Band’ to (e.g. 1A).
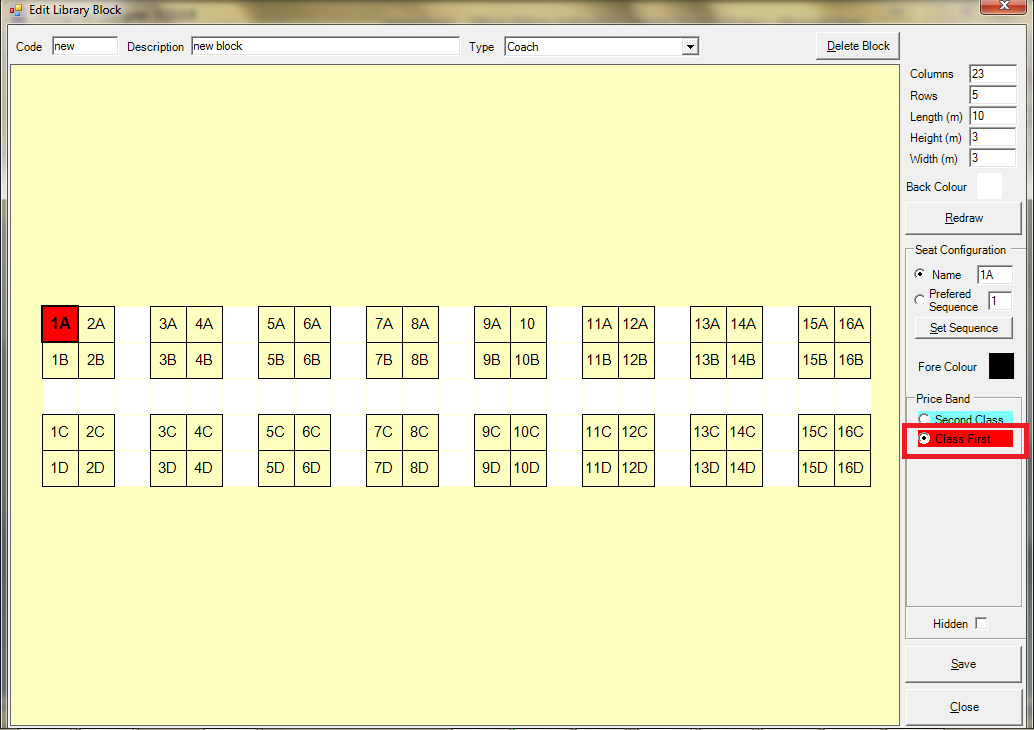
Next click the required ‘Price Band’ and the seat will then change to the colour of that ‘Price Band’ (in this seat "Class"
Repeat as required until all the seats are in the correct ‘Price band’.
Alternatively, you can mark a range of seats as hidden by using “click and drag” (see Creating Aisles).
Now click on the first cell (“seat”) that will be in the next ‘Price Band’ (e.g. 5A).
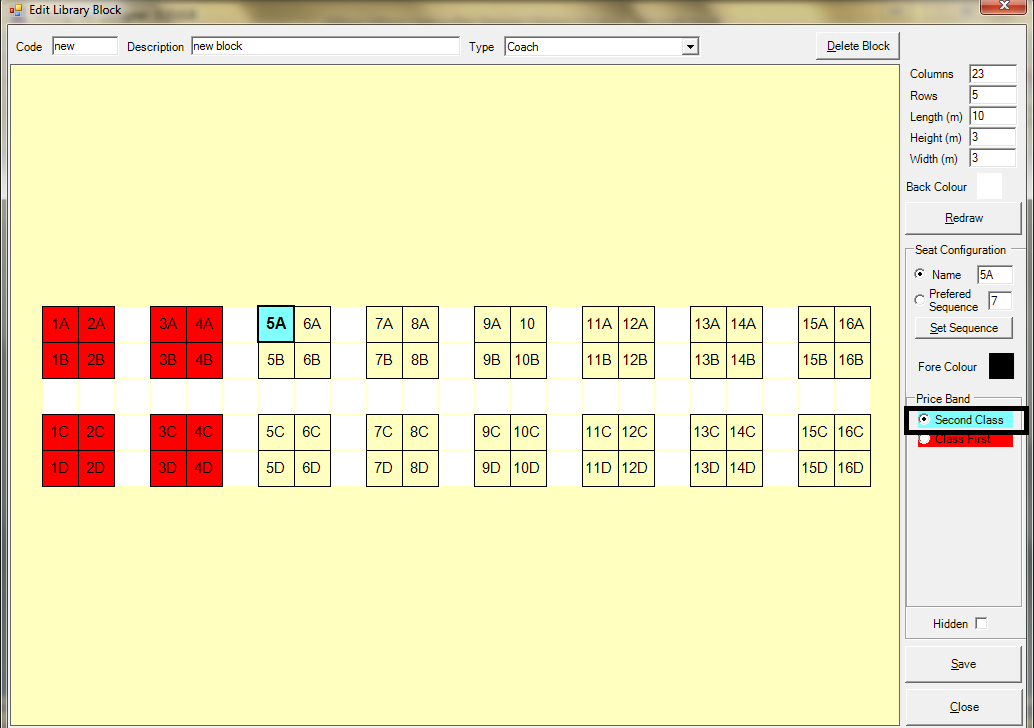
Next click on the required ‘Price Band’ (“class”) for this seat here, so that it is selected (in this case 'Second Class).
Repeat as required until all seats have been allocated to this ‘Price Band’ (or use “click and drag”).
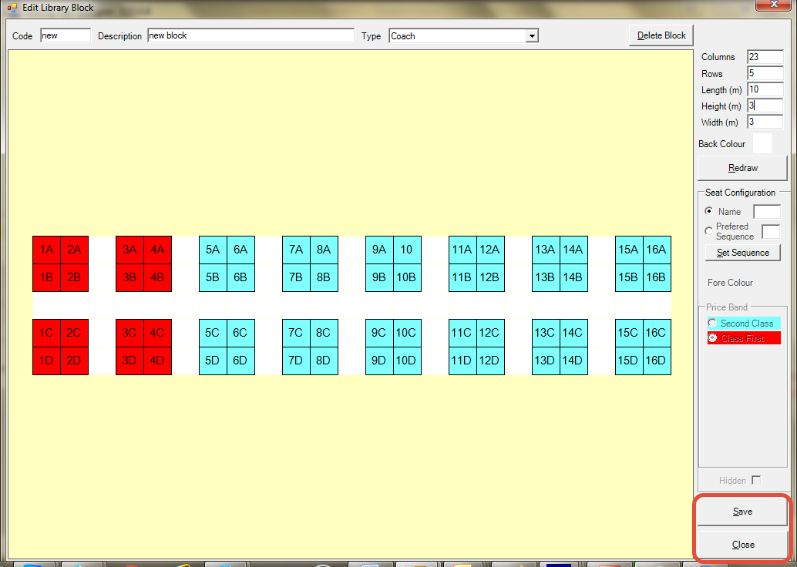
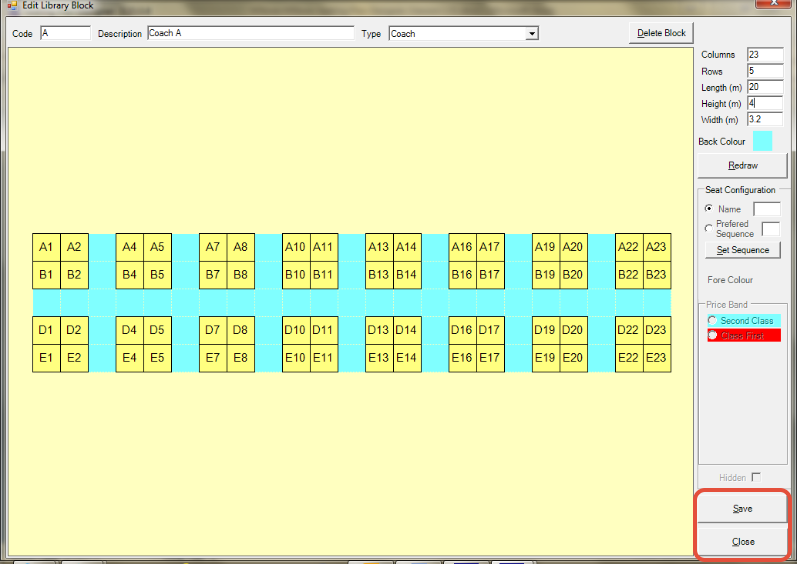
Once you have finished this process click the ‘Save’ button to save the changes.
Next click the ‘Close’ button.
Repeat the same process for all coaches to allocate all seats to the required ‘Price Band’(s).
Once you have finished this process click the ‘Save Plan’ button to save the changes to this ‘Seating Plan’.
You now know how to create a seating plan.
Repeat the entire process described in this manual to create each ‘Seating Plan’ that is required.
Remember to click the 'Save Plan' button to save the changes to this ‘Seating Plan’ as required.
Once all the seating plans you need have been created, then click the ‘Close’ ('X') button in the top right corner.
Editing Existing Seating Plans
You will recall there are two different ways of accessing the ‘Seating Plan Designer’.
See Accessing Seating Plan Designer which details in full how to access this module.
Pick the required ‘Seating Plan’ from the dropdown selector here.
If necessary, you can move / amend the position of a block by clicking and dragging it as explained previously.
You can also right click a block to access the additional options for this block
(‘Font Colour’, ‘Back Colour’, ‘Resize Block’ and ‘Remove Block)’ to change them as required.
Once any changes have been made, click the ‘Save Plan’ button.
Editing Existing Coaches and Locomotives
Select the type of block you want to edit by clicking on either ‘Coaches’ or ‘Locomotives’ here.

Next double click on the specific coach or locomotive you want to edit here.
The specific coach or locomotive will now be showing.
Amend all the details of the specific coach or locomotive as required (as detailed previously).
Click the ‘Save’ button to save any changes you made.
Repeat as required to make changes to any other coach or locomotive.
Click the ‘Close’ button (in the above screen), once you have finished making the required changes.
Click the 'X' button in the top right corner of the screen to exit the ‘Seating Plan Designer’.
You now know how to create and edit seating plans, coaches and locomotives.
Assigning a Seating Plan to a Specific Session
You will recall there are two different ways of accessing the ‘Seating Plan Designer’.
See Accessing Seating Plan Designer which details in full how to access this module.
Once you are in the ‘Seating Plan Designer’:
- Pick the required ‘Session/Tour Date’.
- Pick the required session ‘Location’.
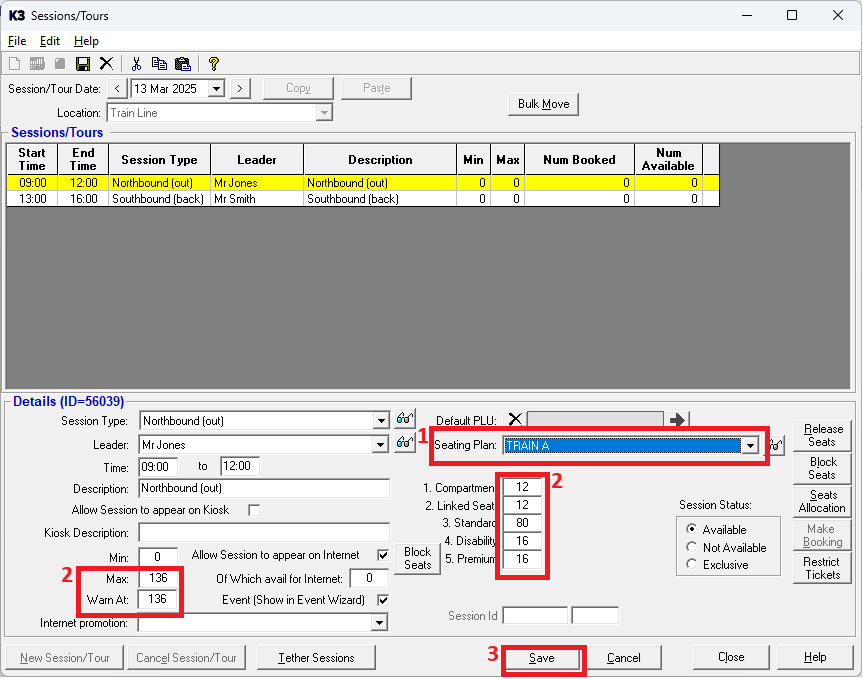
Click on a specific session that will have a ‘Seating Plan' (so it becomes highlighted yellow).
Select the required ‘Seating plan’ using the dropdown shown.
1. Once the required seating plan has been selected then it will be seen where shown below.
2. Where shown the figures will update to reflect the seat numbers in the selected seating plan
3. Click 'Save' to save the changes.
You now know how to assign a session to the required seating plan.
Repeat this process to assign each session to the relevant seating plan.