Introduction
‘Sessions’ are often required where there are events that need capacity management and can happen in multiple locations, at multiple times, and the capacity is made up of multiple different ticket types. The Merac back office software has the facility to set up ‘Sessions’ to cater for exactly this scenario. Sessions are events that must have a location, leader, time and a capacity (per session time). The main benefits and also some examples of typical ‘Sessions’ are outlined below:
- The session capacity (e.g. 1000 total) can be made of multiple PLU’s (admission tickets).
For example, a concert of 1000 capacity can be made up of adult, child, or concession PLU’s.
- The same ‘Session Type’ can happen in multiple locations.
For example, the ‘Santa’s Grotto’ session might happen in both the ‘Garden Centre’ and the ‘House’.
- The same session type can happen at multiple times in a day.
For example, the Santa’s Grotto ‘Session’ runs every 15 minutes from 9:00 am until 4:00 pm.
(each 15 minute session can have the same, or a different capacity as necessary).
If required, each session can be assigned the person (‘leader’) that is responsible for managing / running that session, so that you can see at a glance the staff member, or external person running each session.
Setting Up Sessions
Creating ‘Session Types’
‘Session Types’ are often thought of as the type of activity i.e. guided tour, outdoor theatre, ice skating. These could be for anything where strict capacity management is required to a quantity of total tickets (across multiple ticket types) per time.
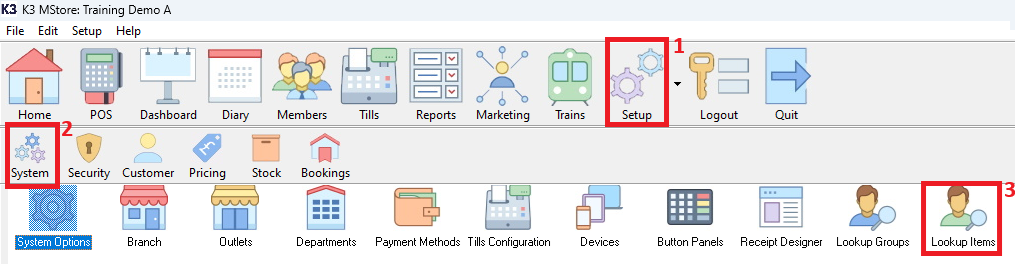
To create new ‘Session Types’ 1. click Setup then 2. click System, then 3. double click Lookup Items.
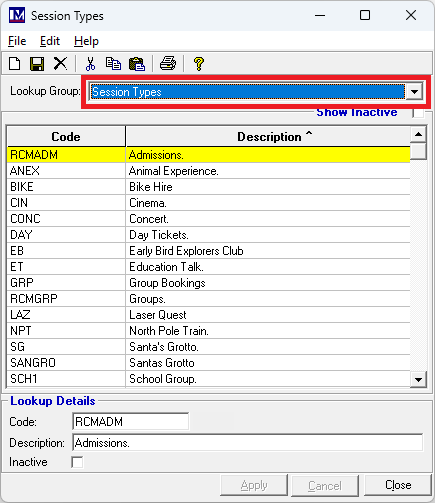
In the ‘Lookup Items’ window, click on the dropdown next to ‘Lookup Group:’ and select ‘Session Types’.
Create a new ‘Session Type’ click on the ‘New’![]() button that is located in the top left corner of the screen.
button that is located in the top left corner of the screen.
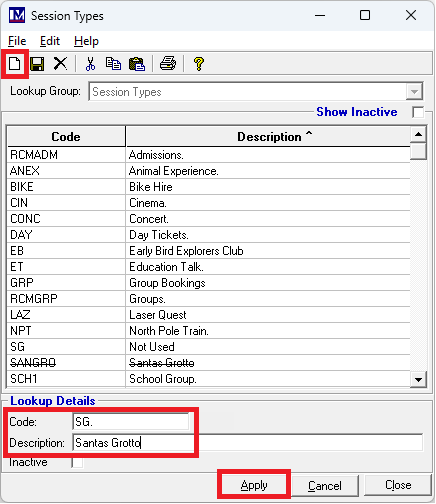
Next enter a ‘Code’ and ‘Description’ for the new ‘Session Type’ and click ‘Apply’.
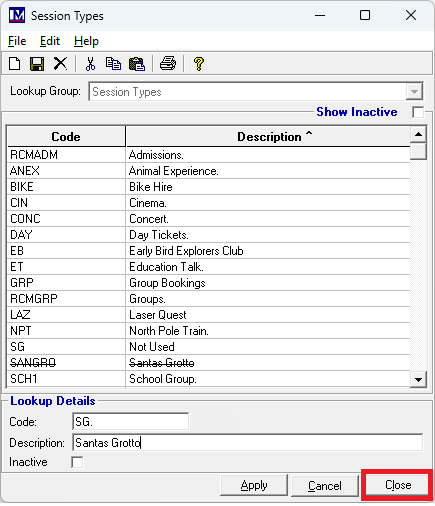
A new ‘Session Type’ has now been created.
Repeat the above steps if more ‘Session Types’ are required, otherwise click on ‘Close’.
Creating ‘Session / Tour Leaders’
Once the ‘Session Types’ have been set up, the next stage is to set up the ‘Session/Tour Leaders’.
This is the person that will lead the tour or session. If these are not required, create one e.g. called ‘N/A’.
This is because the system requires a ‘Session/Tour Leaders’ to be assigned to each session you set-up
To create a new ‘Session/Tour Leaders’ :
1. click Setup then 2. click System then 3. double click on ‘Lookup Items’.

In the ‘Lookup Items’ window, click on the ‘Lookup Group:’ dropdown and select ‘Session/Tour Leaders’.
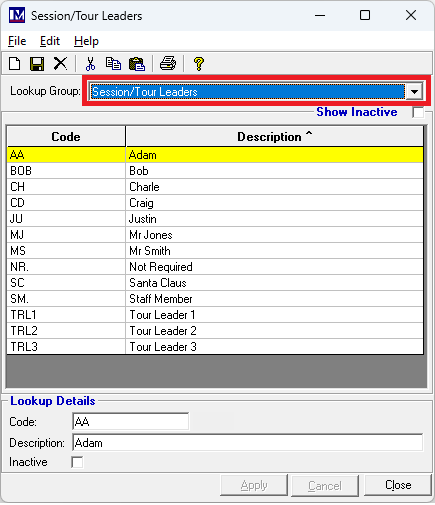
Create a new record by clicking on the ‘New’![]() button, located in the top left corner of the screen
button, located in the top left corner of the screen
Next enter a ‘Code’ and ‘Description’ as required and click ‘Apply’.
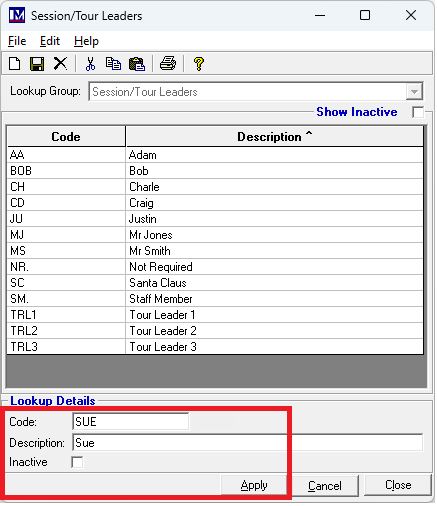
This has now created a new ‘Session / Tour Leader’.
Repeat the above steps if more ‘Session/Tour Leaders’ are required, otherwise click on 'Close'.
Creating ‘Session Locations’
Your attraction may have several different locations where events, sessions or tours can take place.
To create new ‘Session Locations’:
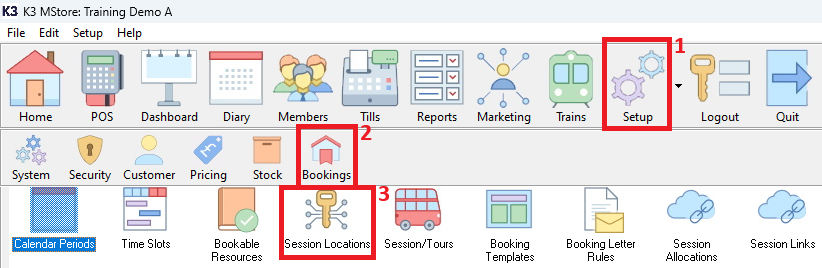
1. click on Setup then 2. click on System then 3. double click on Session Locations
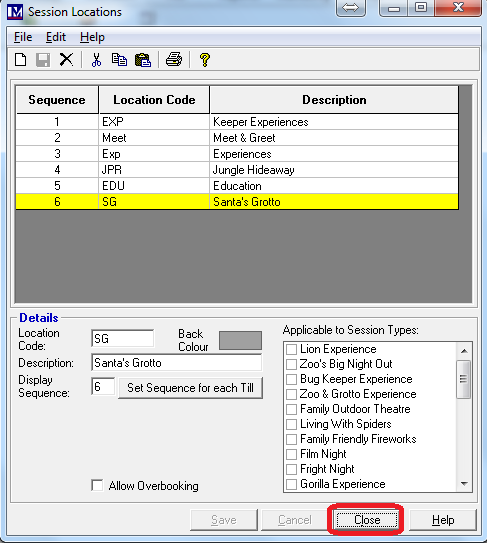
When you create a new ‘Session Location’ the system needs to know what ‘Session Types’ can take place in that location. Create a new ‘Session Location’ by clicking on the ‘New’![]() button, located in the top left corner of the screen.
button, located in the top left corner of the screen.
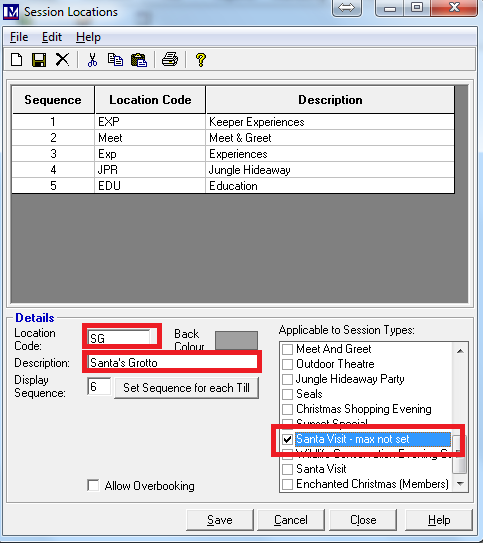
Enter the ‘Code’ and ‘Description’ for this Session Location’ by filling in the relevant boxes.
The ‘Display Sequence’ box is only relevant for customers who are using ‘Timelines’ till layouts.
For those that use ‘Timelines’ till layouts, the ‘Display Sequence’ is the order in which these ‘Session Locations’ appear on the ‘Timelines’ till display. This sequence can be set per till as required. If you are not using ‘Timelines’ till layouts, please ignore this setting. This number automatically defaults to the next number in the sequence, so no action is necessary. Setting up and using ‘Timelines’ till layouts, it outside of the scope of this manual, so if you require any training / consultancy on this functionality, please contact your Customer Success Account Manager for more information and a quote.
The final step is to select the ‘Session Types’ that can take place in this Location. This is done by clicking in the box next to the ‘Session Type’ required, so that it becomes ticked (under the heading ‘Applicable to Session Types’). It is possible to select more than one ‘Session Type’ per ‘Session Location’, e.g. a Location of ‘Main Garden’ could have ‘Outdoor Theatre’, ‘Movie Nights’ and ‘Garden Parties’. Click on as many of the ‘Session Types’ as required, so the required ones become ticked for that location.
Click on ‘Save’ and a new ‘Session Location’ has now been created.
Repeat the above steps if more ‘Session Locations’ are required, otherwise click on ‘Close’.
Creating ‘Sessions/Tours’
Once the required ‘Session Type’, ‘Session Location’ and ‘Session/Tour Leader’ have been created (as detailed above), the new ‘Session/Tours’ can be added.
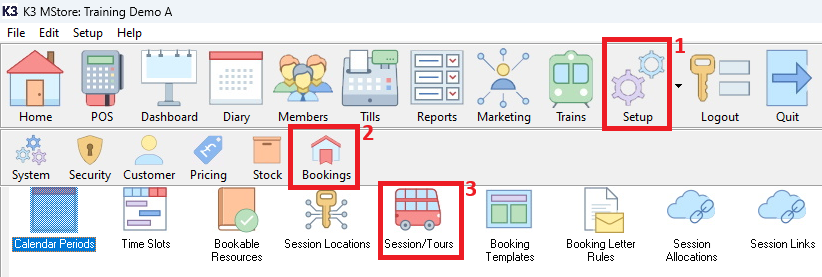
To create a new Session 1. click Setup then 2. click Bookings then 3. double click on Sessions/Tours.
Now, select the date of the first session using the ‘Session/Tour Date’ dropdown.
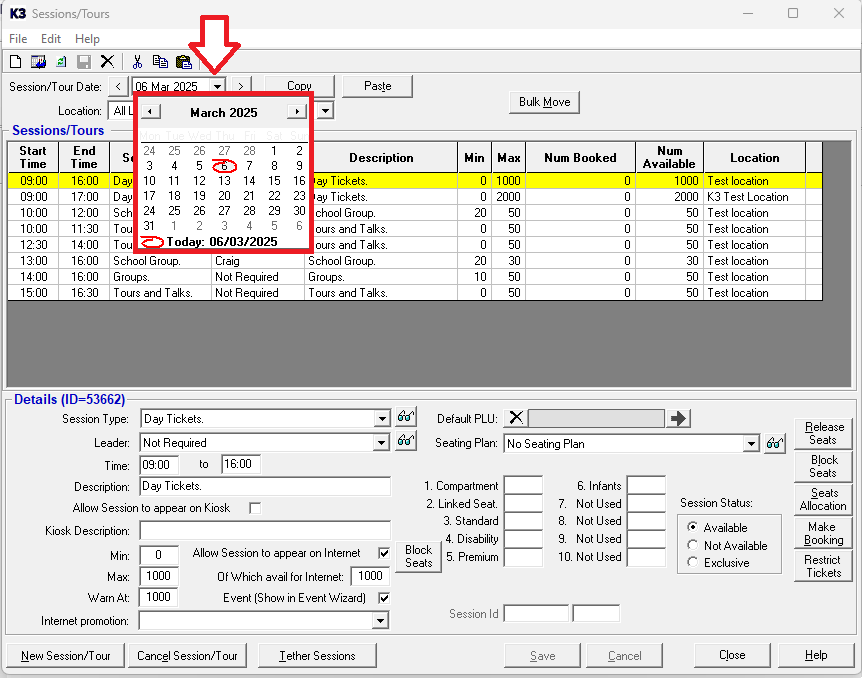
Pick the required date from the calendar. You can use the left / right arrows to go back / forward a month.
Alternatively click on the month text (e.g. click on the text 'March') to bring up a month selector pop-up and click the month.
If you click the year text (e.g. click on '2025') up and down arrows appear which can be used to select the required year.
1. You will now see the selected date showing here  2. Next click the ‘Location’ dropdown selector and 3. select the required 'Session Location' (e.g. 'Santa's Grotto')
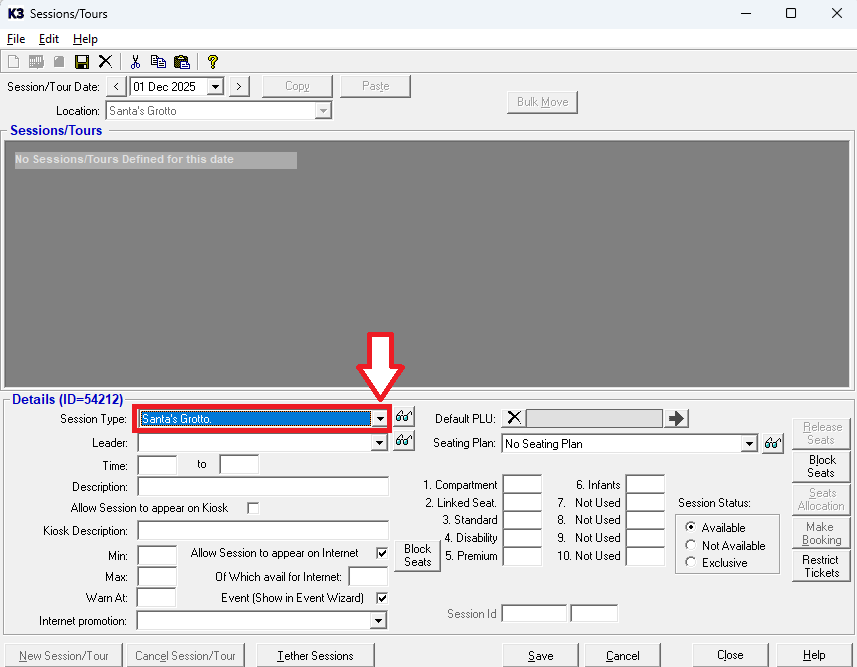
When the ‘Session/Tour Date’ and ‘Location’ have been selected, click the ‘New’![]() button (in the top left corner)
button (in the top left corner)
A new (blank) session record has been created and you will now need to enter the required data. First select the required ‘Session Type’ from the relevant dropdown selector. The selected session type will then show in the ‘Session Type’ field.
Now select the required session ‘Leader’ from the relevant dropdown selector.
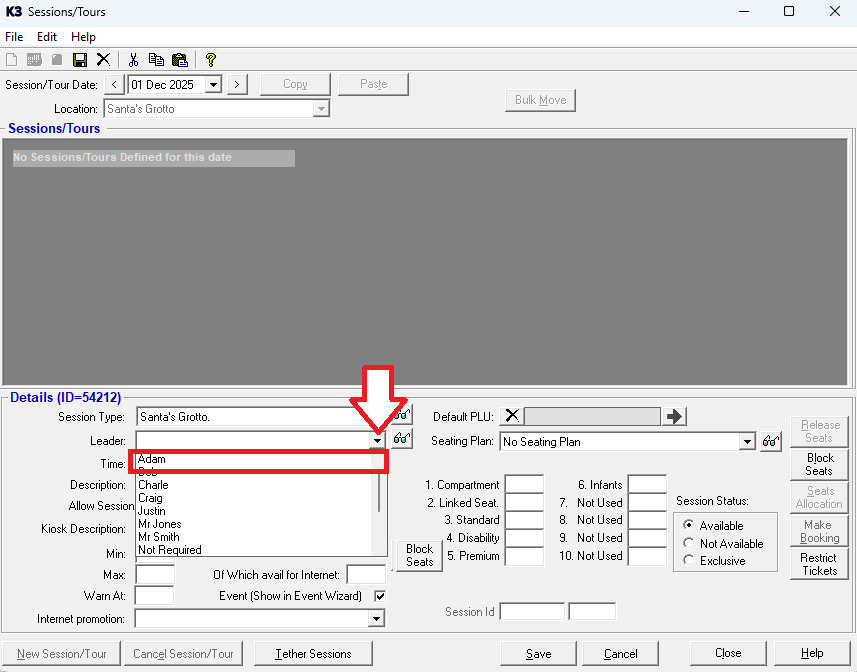
If there is no requirement to record a 'Session Leader' create a session leader called e.g. 'Not Required' and select this leader.
Enter the session start time in the ‘Time’ box using the 24-hour clock format. For example, 9:00 am needs to be entered as 0900. Note: No punctuation is required, just enter the figures as the colon (:) is entered automatically.
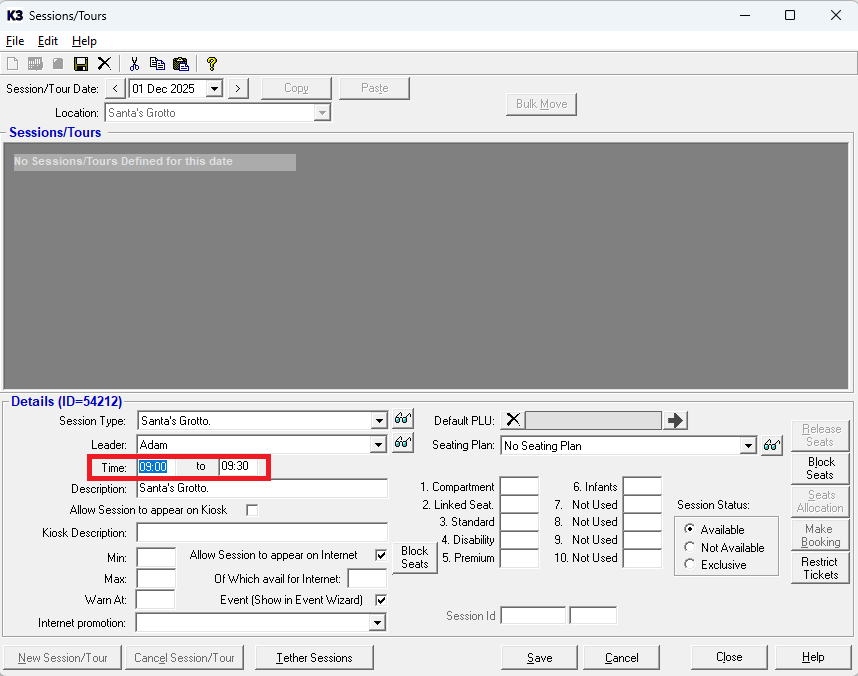
Enter the session end time in the ‘to’ box using the 24-hour clock format (e.g. 9:30 am needs to be entered as 0930)
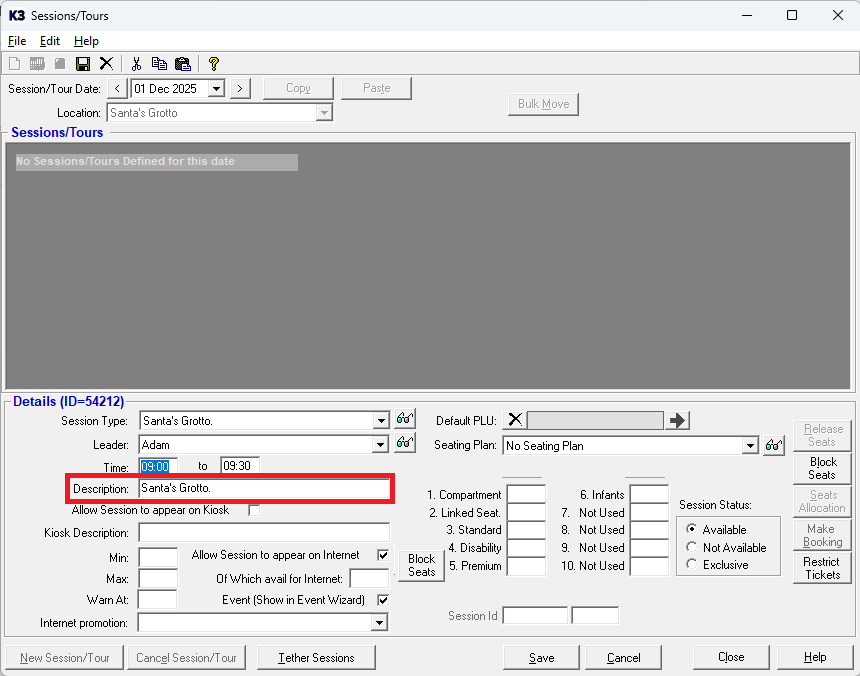
Please note the ‘Description’ box defaults to the same as the ‘Session Type’.
Amend this ‘Description’ (if required) by typing in the relevant box marked ‘Description’.
If required this 'Description' can be shown online instead of the name of the 'Session Type'
Please note the tick box options 'Allow Session to appear on Kiosk' and 'Kiosk Description' are only used for customers who have purchased our 'Kiosk' solutions. These do not need to be selected / populated for any other customers.
Now specify the following criteria for the session:
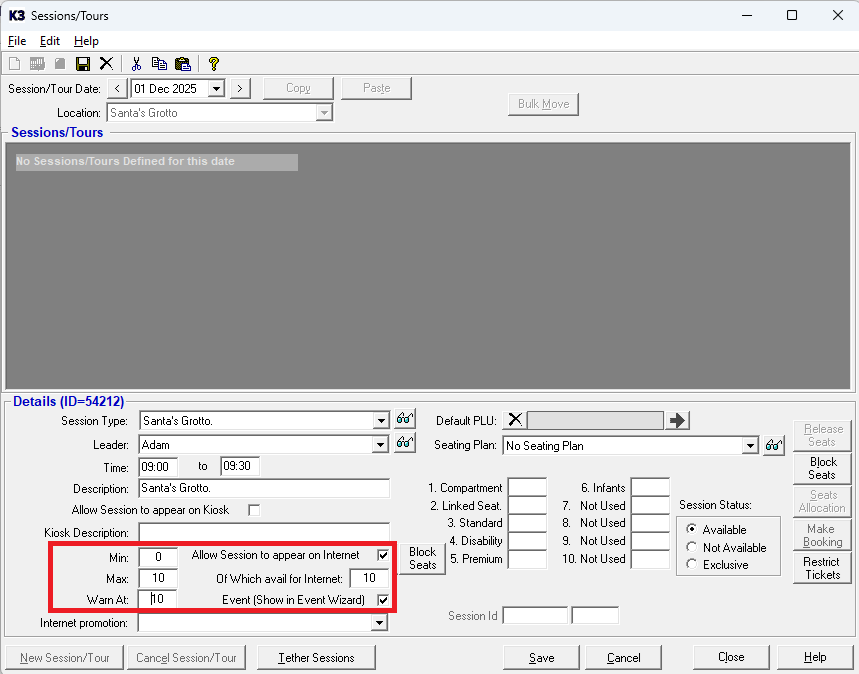
‘Min’:
Enter the minimum number of people that can be booked onto this session. (N.B. this is usually set to ‘0’ to specify there is no minimum requirement). In some scenarios, however, you may wish to specify a minimum number of people that must book onto a session. If so, just enter the required minimum figure in the ‘Min’ box (e.g. 20). An example may be when lectures or talks are offered to schools and you want to specify you can only book a minimum number of people onto a session. Please note this is for information only, the "in house" system will not restrict the minimum required number to this quantity, this will need to be policed by the staff taking these bookings. Online settings can be put in place to restrict this minimum number automatically, these settings are detailed later.
‘Max:’
Enter the maximum number of people than can be booked onto this session as required. This will be enforced automatically.
‘Warn At’:
When making a booking in the back-office software, a warning can be displayed when the session is approaching capacity. When clicking in this box, it automatically populates with the figure in the ‘Max’ box. However, this number can be altered according to requirements. For instance, a session set up for a concert with a maximum capacity of 200, may require a warning when the number booked exceeds 180. The required number of 180 would be entered in the ‘Warn At:’ box.
‘Allow Session to appear on Internet’:
This is only selected (by clicking the box) if this specific session will be sold online. If it is unticked this session will only be bookable "in house". Please refer to the ‘Setting Up Online Session Bookings’ section of the manual for more information.
‘Of Which avail For Internet’:
A number can be entered in this box to limit the total number of places that can be booked online. This can be used to essentially "reserve" some of the capacity, so it can only be booked "in house" (e.g. for phone based / till bookings), or sold as "walk up" tickets at the till (by selling the same PLUs at the till on a till button where no booking is made). Please refer to the ‘Setting Up Online Session Bookings’ section of this guide for more information on the internet-specific configuration.
Event (show in Event Wizard)
In the till and back office there is a Session specific booking tool called the 'Event Wizard'. For sessions to be bookable in the till / back office software using the 'Event Wizard' then click the ‘Event (show in Event Wizard)’ box, so it is ticked.
Now specify the remaining criteria for the session:
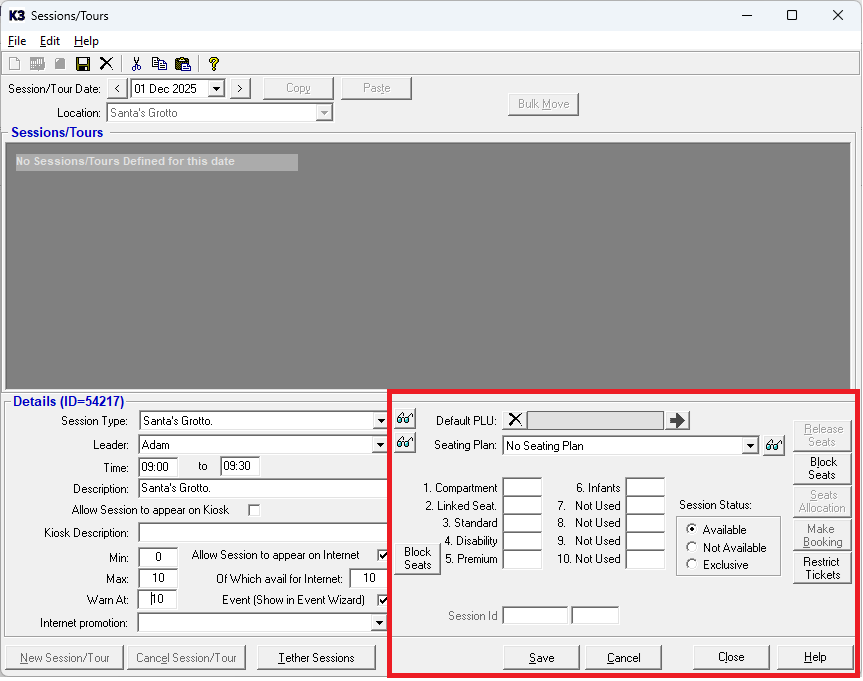
‘Default PLU’:
This functionality is not required (it is for bespoke functionality created for a specific customer).
‘Seating Plan’:
This is only required where a ‘Seating Plan’ is used. This is not covered in the scope of this manual
‘Release Seats’ button:
This is only required where a ‘Seating Plan’ is used. This is not covered in the scope of this manual.
‘Seats Allocation’ button:
This is only required where a ‘Seating Plan’ is used. This is not covered in the scope of this manual.
‘Make Booking’ button:
This functionality is not required (it is for bespoke functionality created for a specific customer).
‘Session Status’:
There are three different options for the ‘Session Status’, as explained below:
‘Available’:
By default, any new session will be marked as ‘Available’, allowing it to be booked once set up.
‘Not Available’:
If a session must not be available for booking immediately, then select ‘Not Available’ by clicking on this option. Please note, once the ‘Not Available’ option has been selected, to make the relevant session(s) bookable again, then each session must have this setting changed back to ‘Available’.
‘Exclusive’:
With this option selected, as soon as a single booking is made into a specific session, then no one else can book that session (even if there are still some spaces available). This is most often used for group talks, when, for example, only one organisation or one school party can book into that specific talk/session.
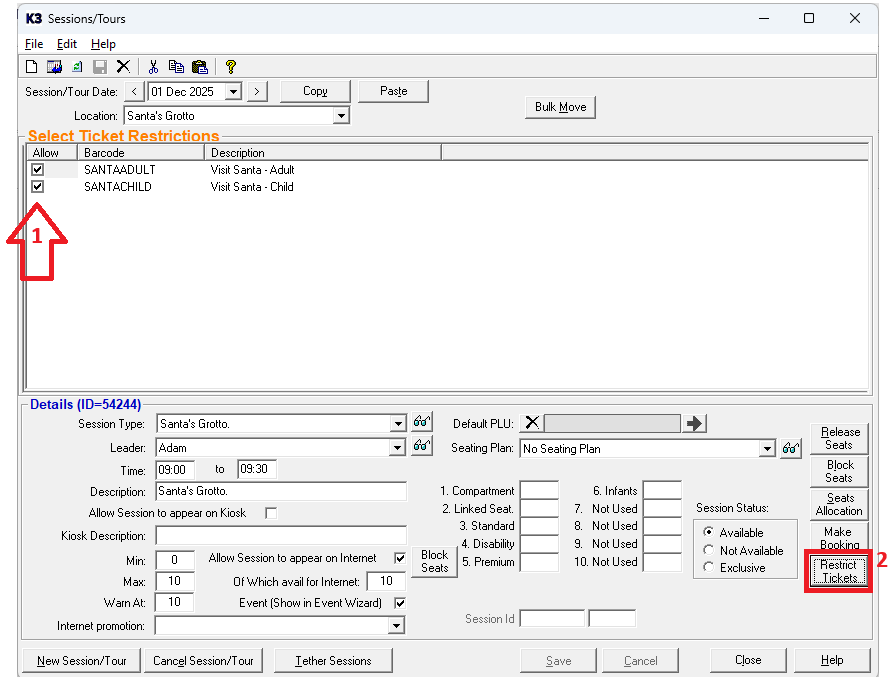
'Restrict Tickets':
This button can only be used once the PLU's have been linked to a 'Session Type'.
1. Clicking on the 'Restrict Tickets' button for a specific session time takes you to the below screen.
If required you can then click in the the box next to the ticket (PLU) description, so it becomes unticked.
Any 'unticked' PLUS will not be able to be sold for that specific session date / time only.
2. Clicking on the 'Restrict Tickets' button again returns you back to the previous screen.
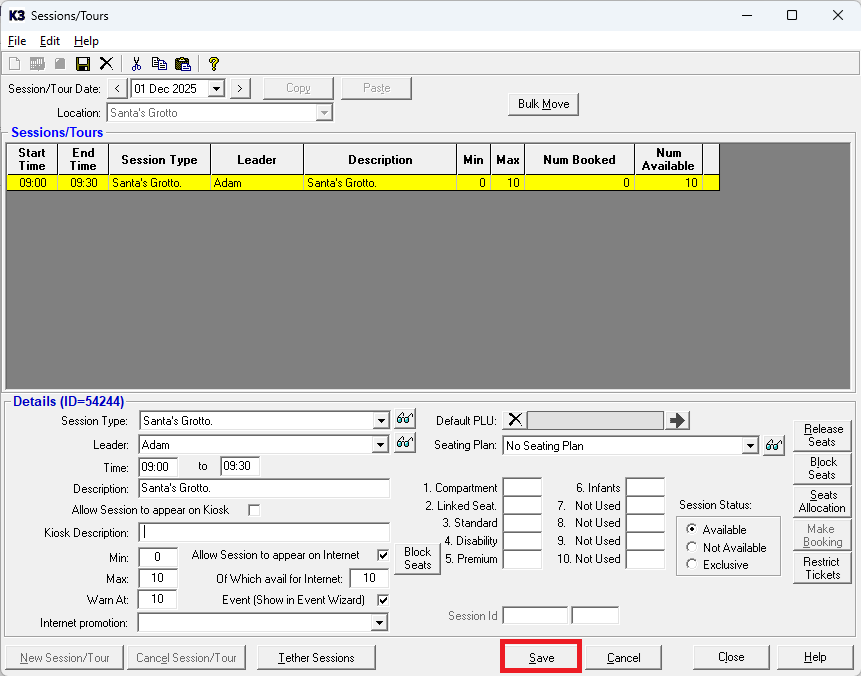
Once all options have been set as required, click on the ‘Save’ button to accept the changes.
If required, click the ‘New’![]() button and repeat the process to add sessions for all other times for that date.
button and repeat the process to add sessions for all other times for that date.
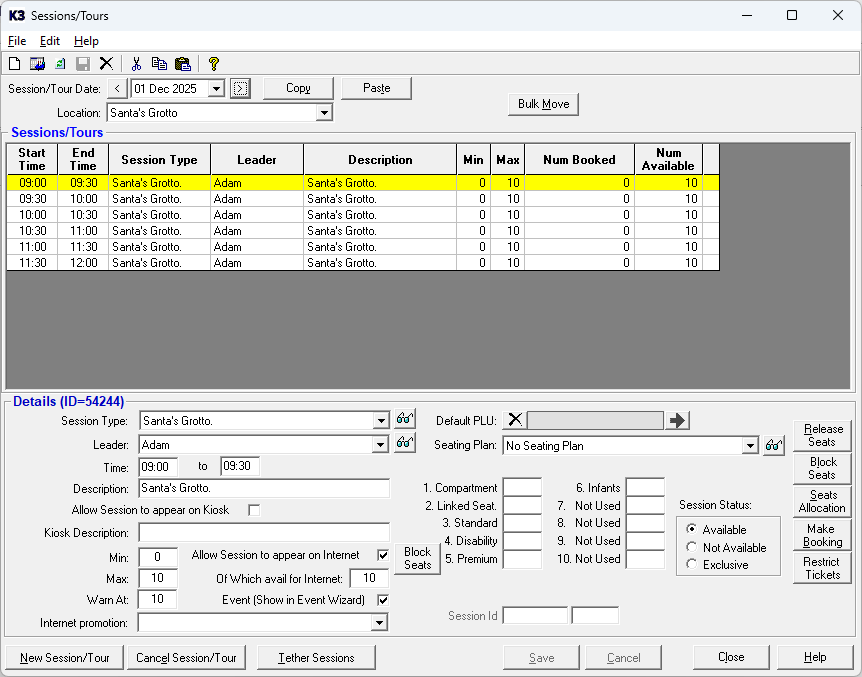
Once all the required sessions have been created for that date, they can be copied into other dates.
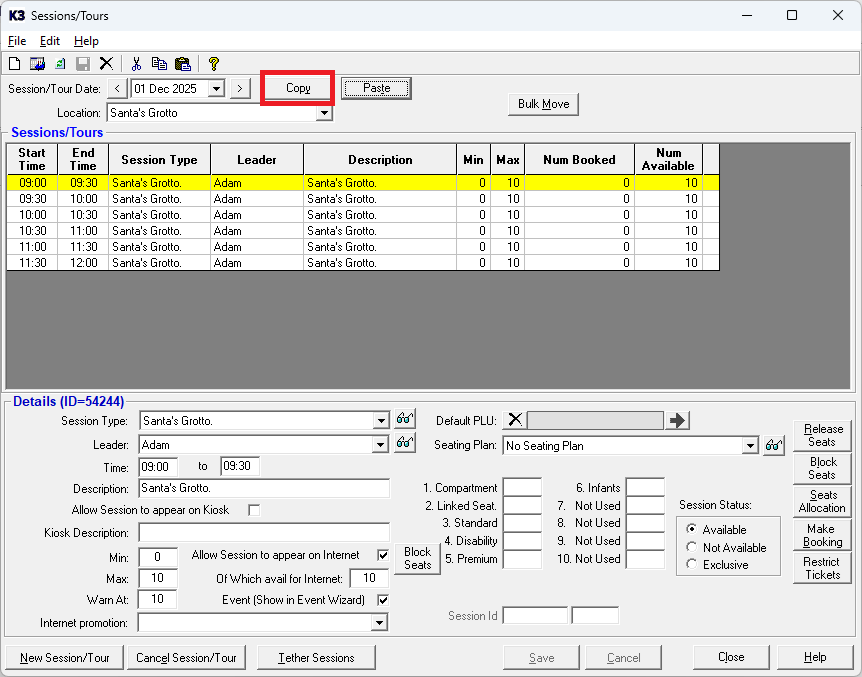
To do this click the ‘Copy’ button.
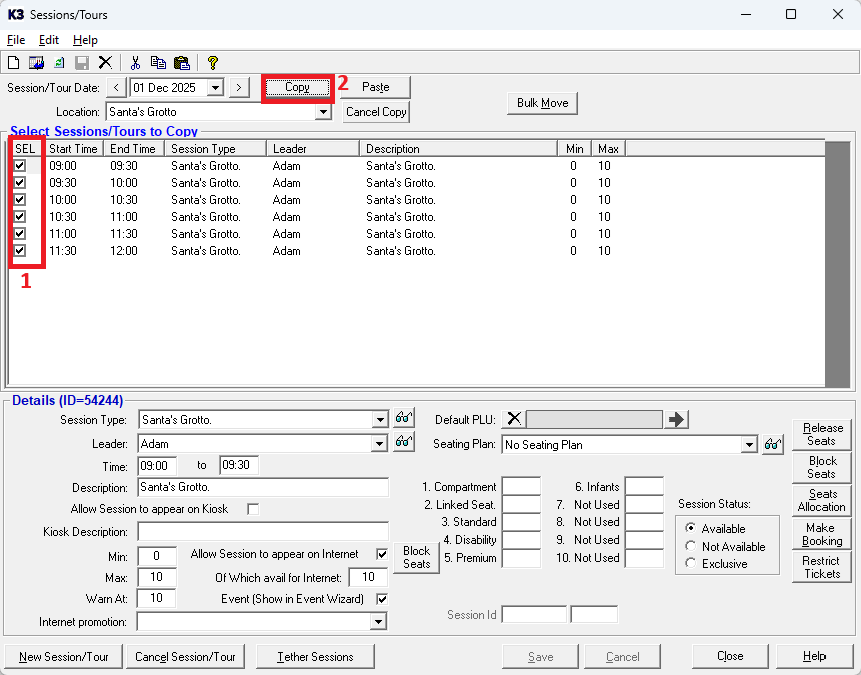
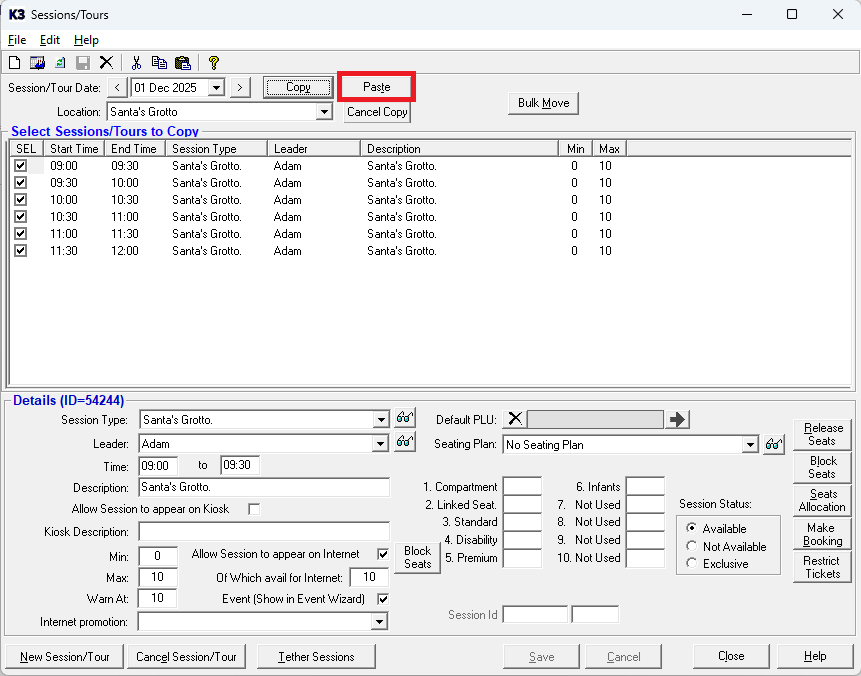
Now the screen ‘Select Sessions/Tours to Copy’ will appear like the one below.
1. Please not by default all the session times are selected for that date. If you only want to copy specific session times only, you can click in the tick box for a specific time, so it is unticked. Any unticked session time will not be copied.
2. Next click the 'Copy' button.
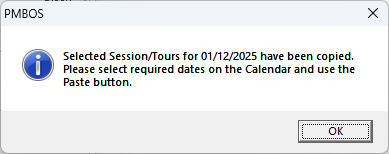
The following screen will appear, click ‘OK’.
The following ‘Calendar Period’ window will appear. Click and drag to select the required date range to copy to.

The required date range will now be highlighted in yellow (as above).
Click ‘Select’ and the date range will now show highlighted in green (as below).
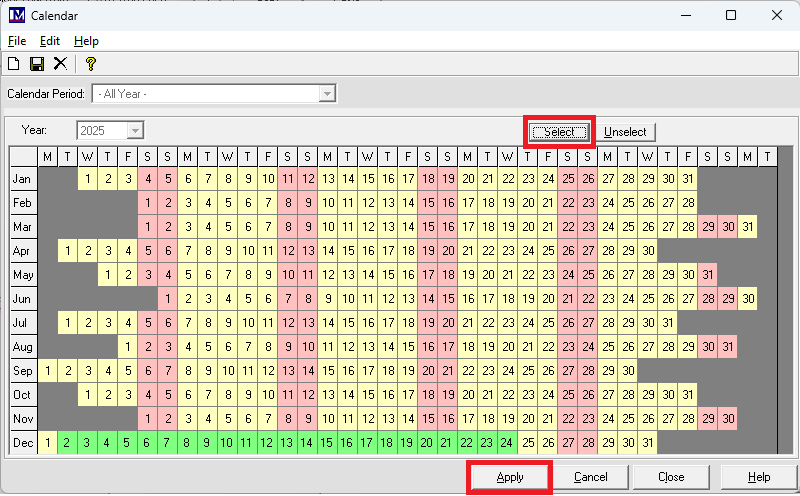
Repeat as necessary, so that all the required dates to copy the sessions to are highlighted in green. Click the ‘Apply’ button.
Next click the ‘Paste’ button.
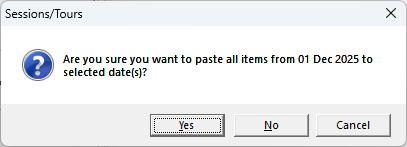
Next click on the ‘Yes’ button.
You will then return to the sessions/tours setup screen shown below.
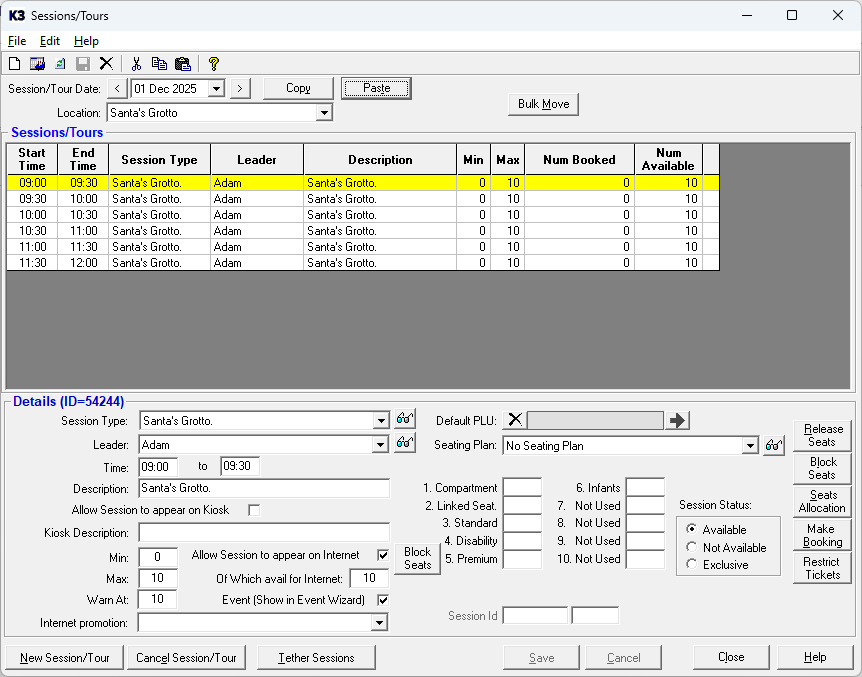
The selected sessions have now been copied into the specified date(s) but please check to make sure you did this correctly. Please note you cannot copy and paste the same sessions again as it's a one off. Once specific session types / dates / times have been copied into a session location, those same session session types / dates / times cannot be copied over the top of the existing ones. This is by design and to prevent overwriting existing data.
Repeat as required then finally click ‘Close’.
Assigning PLU’s to a Session
Now the session has been created, the required PLU’s need to be linked to the ‘Session Type’.
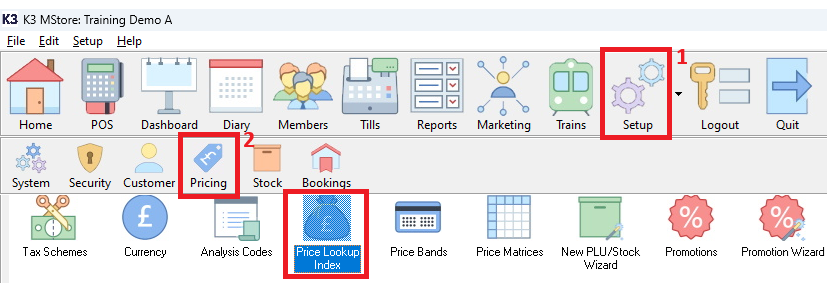
To do this you need to 1. Click Setup 2. click Pricing then 3. double click Price Lookup Index.
Now find the relevant PLUs. The quickest way to do this is by
1. Selecting the 'Session Type' using the 'Session Type' filter.
2. Then click the 'Search' button
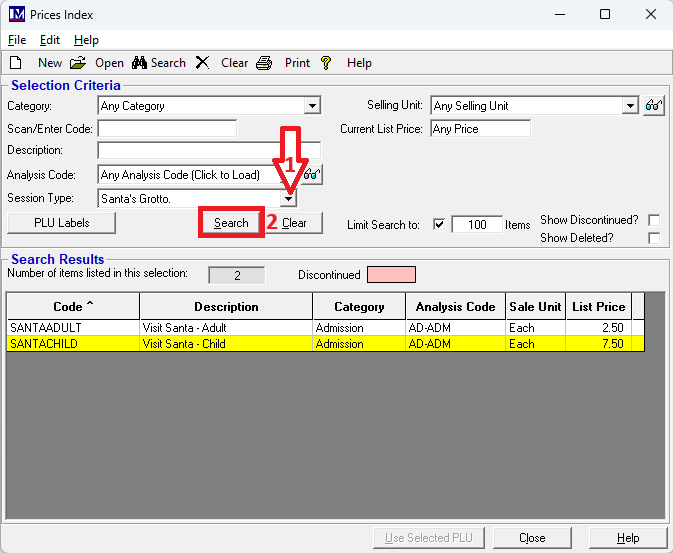
Double click on the first PLU you want to link to a 'Session type'
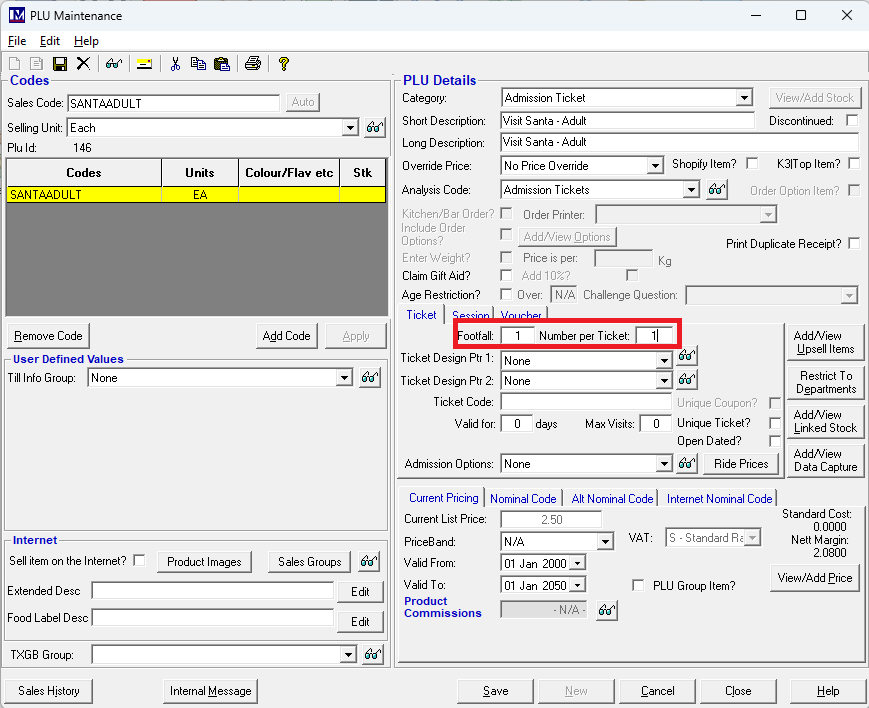
Next specify the number that will be deducted from the session availability when this PLU is booked.
To do this enter the required number in the ‘Number per Ticket’ box (e.g. 1).
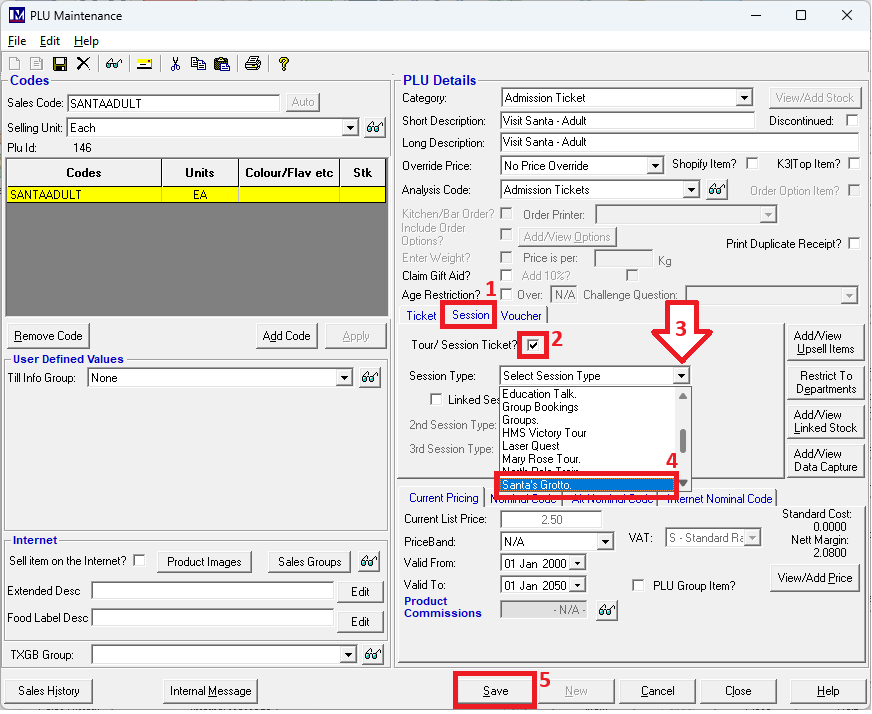
1. Click on the ‘Session’ tab.
2. Click the ‘Tour/Session Ticket’ box so that it becomes ticked.
3. Click the dropdown selector.
4. Pick the required ’Session Type’ to link the PLU to, using the dropdown selector here.
5. Click on the ‘Save’ button to accept the changes.
Find all the other PLU’s and repeat the process to link them to this ‘Session Type’.
These sessions can now be booked in the Merac software from the ‘Diary’ main menu option (Diary>New).
Session bookings can also be made using the ‘Event Wizard’ functionality. This can be accessed either from the ‘Diary’ screen in the back-office software (Diary > Event Wizard) or via the ‘Event Wizard’ button on the till. You will need to make sure you have put the ‘Event Wizard’ command button on the relevant till screens in Merac and updated your tills.
Please do not click 'Close' on the above screen as it will be needed in the next steps. Once you have done the next steps for the first time, then this can be done immediately after applying the above settings, i.e. without coming out of the 'PLU Maintenance' screen. This will save you time.
Setting Up Online Session Bookings
To make sessions bookable online, several additional steps required, which are detailed in the following sections.
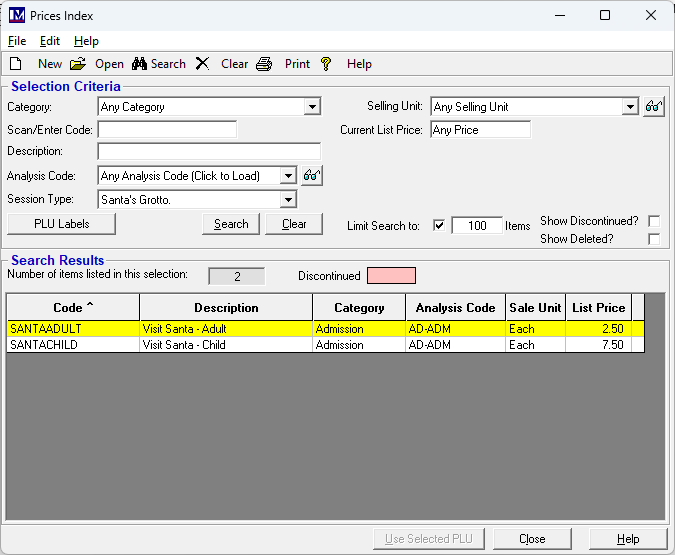
Internet Prices
You should already have the 'Prices Index' screen open. If not follow the instruction in the previous section on how to search for PLUs. Once the PLUs have been searched for and can be seen in the 'Prices Index' screen, double click the first PLU you want to check the online (internet) price for.

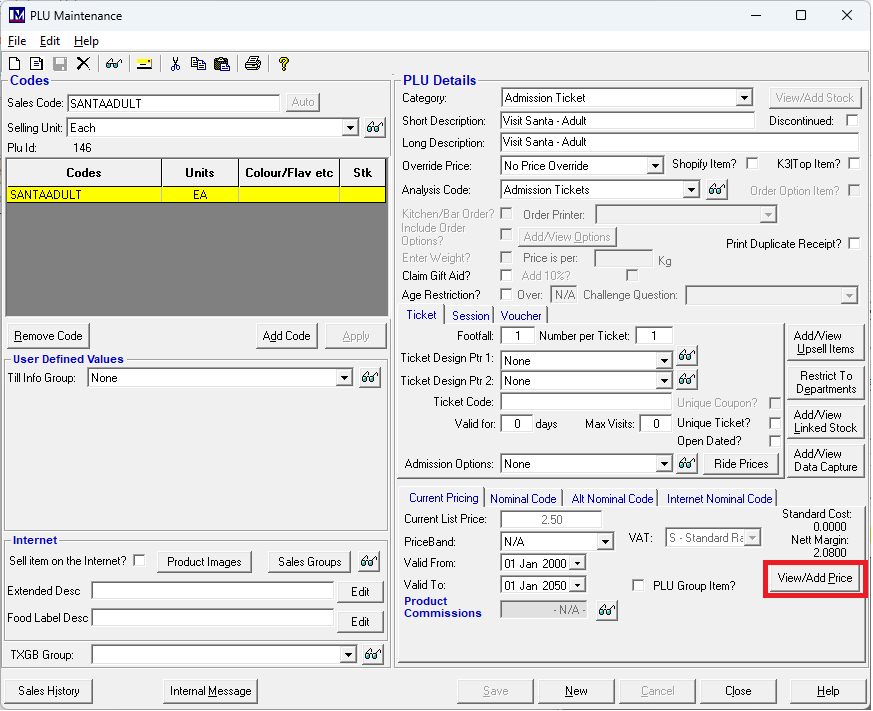
With the ‘PLU Maintenance’ screen is open for the PLU, click on the ‘View/Add Price’ button.
Enter the required price in the ‘Internet Prices’ box.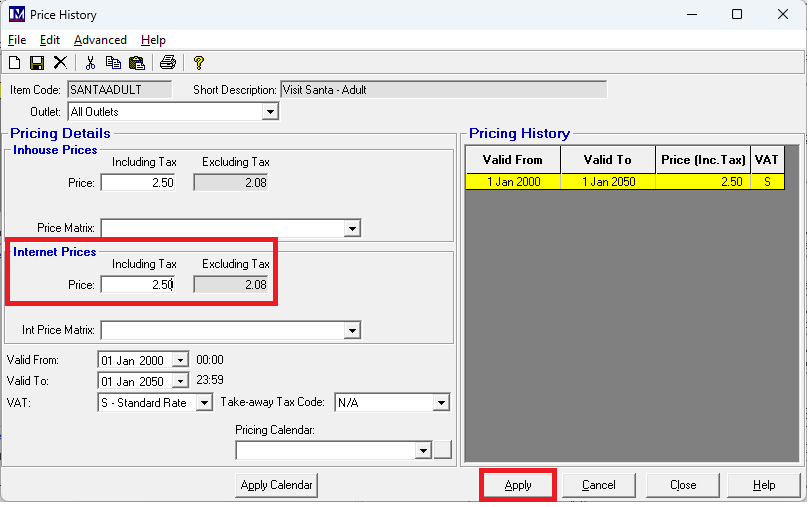
If the internet price was already correct and no change to the price was made, then the 'Apply' button will not be active.
Please also check the ‘Price’, ‘Valid From:’, ‘Valid To:’ and ‘VAT:’ rate is correct at this point.
If necessary, add any new prices for future dates ('Price Breaks') by clicking the ‘New’ ![]() button.
button.
Simply enter the relevant ‘Price’, ‘Valid From:’, ‘Valid To:’ and ‘VAT:’ rate(s), then click ‘Apply’.
Please not there is a separate user guide on setting up 'Price breaks' to allow for different prices on different dates.
Click the ‘Apply’ button if any changes were made.
Once all the internet price data has been entered, click on ‘Close’ to exit the 'Prices History' screen.
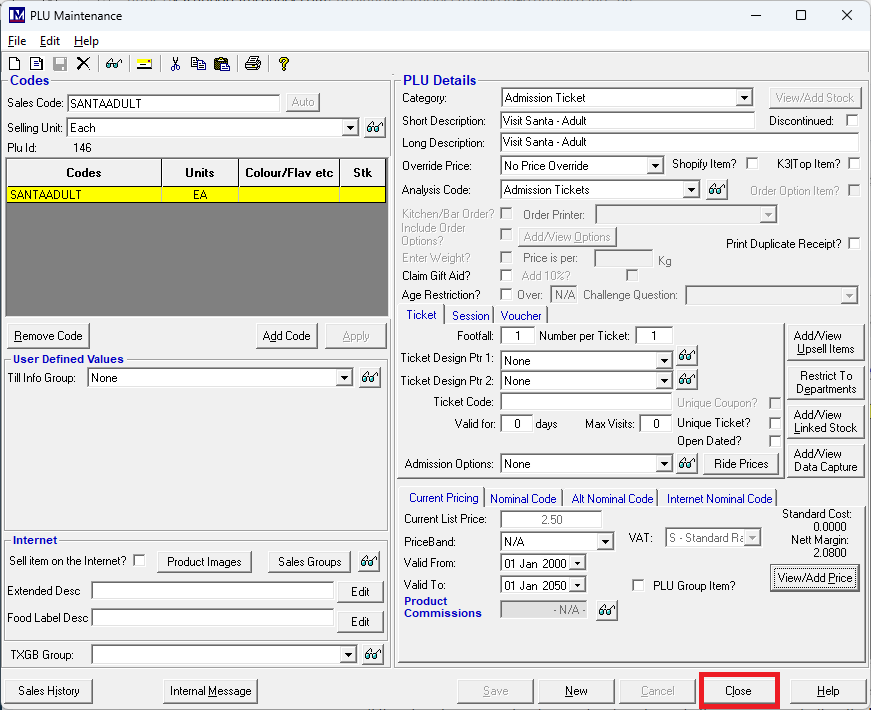
Click ‘Close’ again to exit the ‘PLU Maintenance’ Screen.
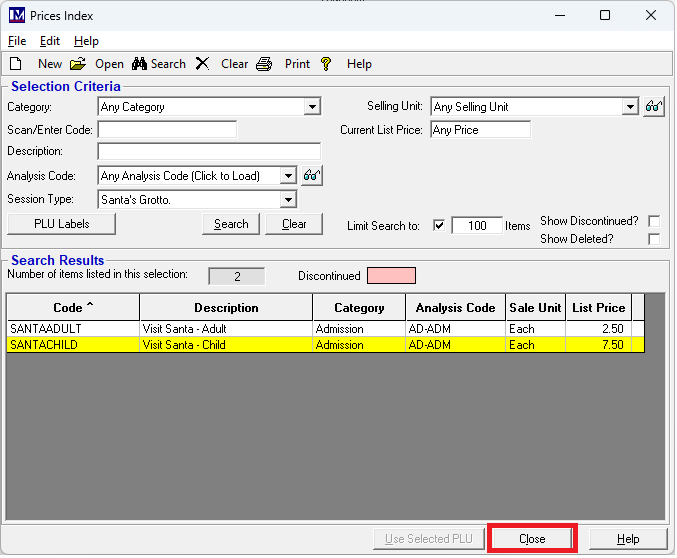
Repeat the above process as required to enter the 'Internet Prices' for all PLU's that are linked to the same 'Session Type'.
Once all the changes have been made click 'Close' to exit the 'Prices Index' screen.
Creating Bookable Resources
In order to book a session online, you need to create ‘Bookable Resources’ for all the PLU’s that are to be booked online. N.B. these PLU’s must first be linked to a ‘Session Type’, as explained previously.
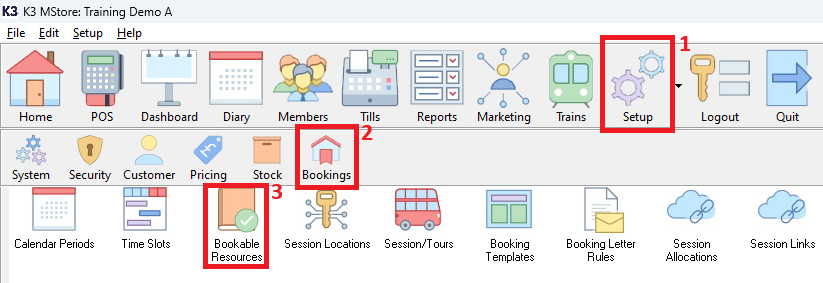
To create ‘Bookable Resources’, click on 1. Setup then 2. Bookings then double click on 3. Bookable Resources
You will now see a screen like the one shown below.
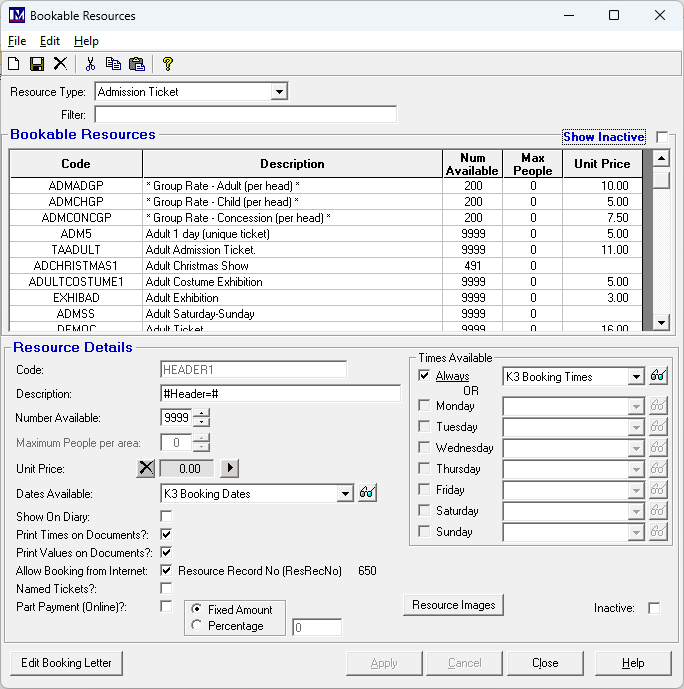
First you must select the correct type of bookable resource you wish to create.
To select the type of bookable resource you wish to create using the 'Resource Type' dropdown selector.
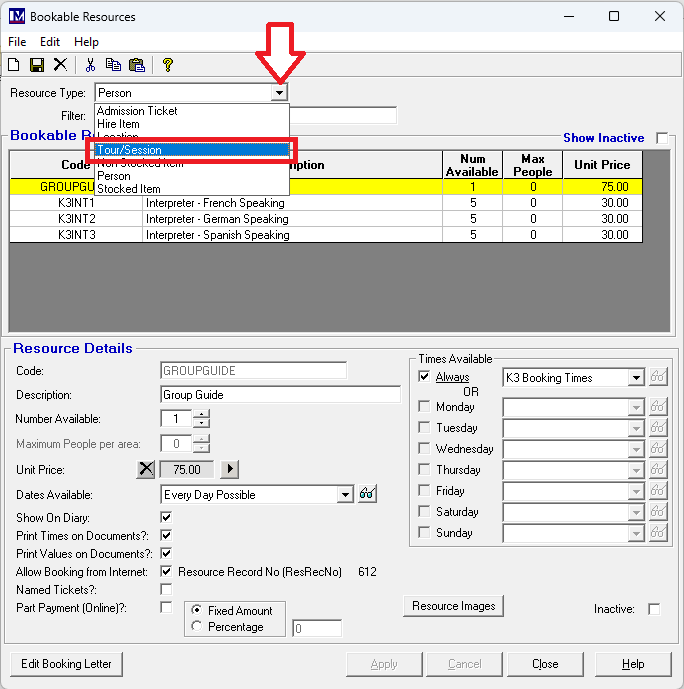
To set up online session you must select the ‘Resource Type:’ you must select the ‘Tours/Session’ option.
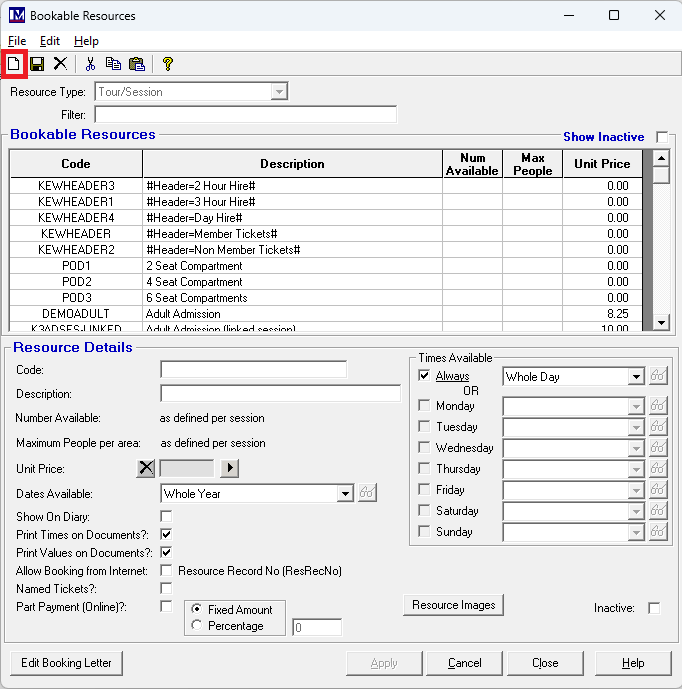
Now click the ‘New’ ![]() button.
button.
Next click on the arrow next to ‘Unit Price’ (to assign the price for the ‘Bookable Resource’).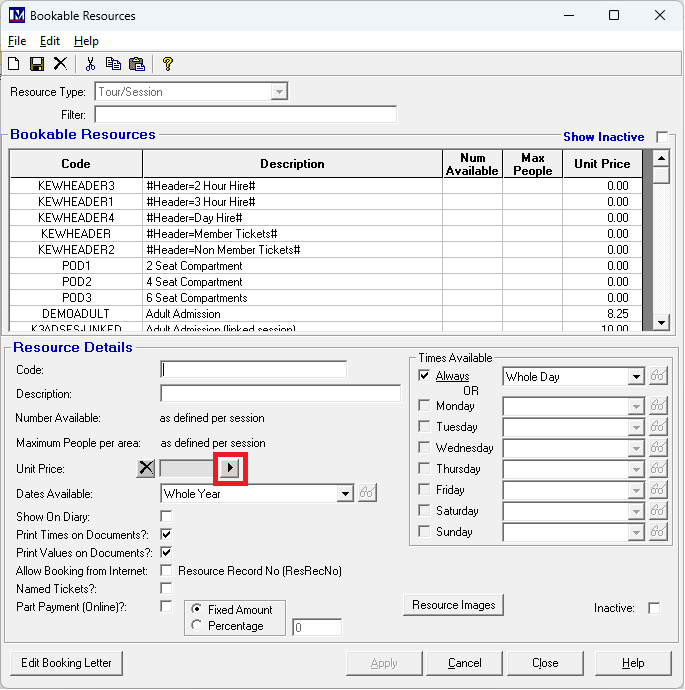
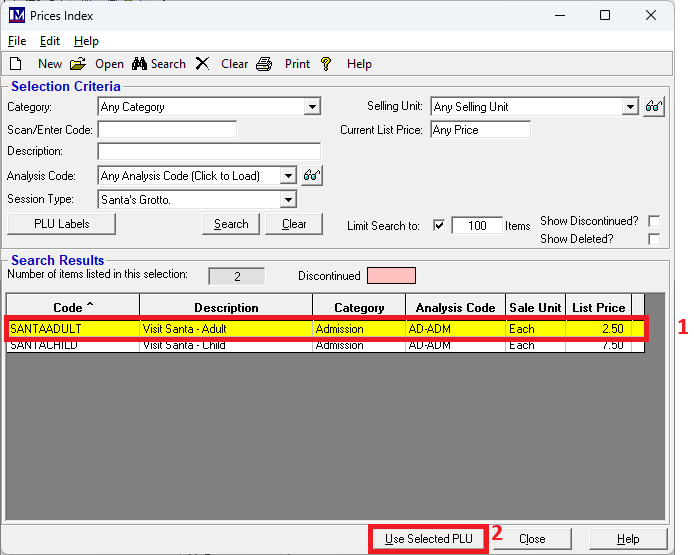
This will bring up the ‘Prices Index’ screen you are now familiar with. Search for the PLUS as detailed previously.
1. Click once once on the first PLU you wish to create a 'Bookable Resource' from, so it becomes highlighted.
Search for and select the required PLU by clicking on it (so it is highlighted in yellow).
2. Next, click ‘Use Selected PLU’ button.
The ‘Code’ and ‘Description’ of the new ‘Bookable Resource’ defaults to that of the PLU selected.
Amend these details as required, by typing the preferred ‘Code’ and ‘Description’ in the relevant box.
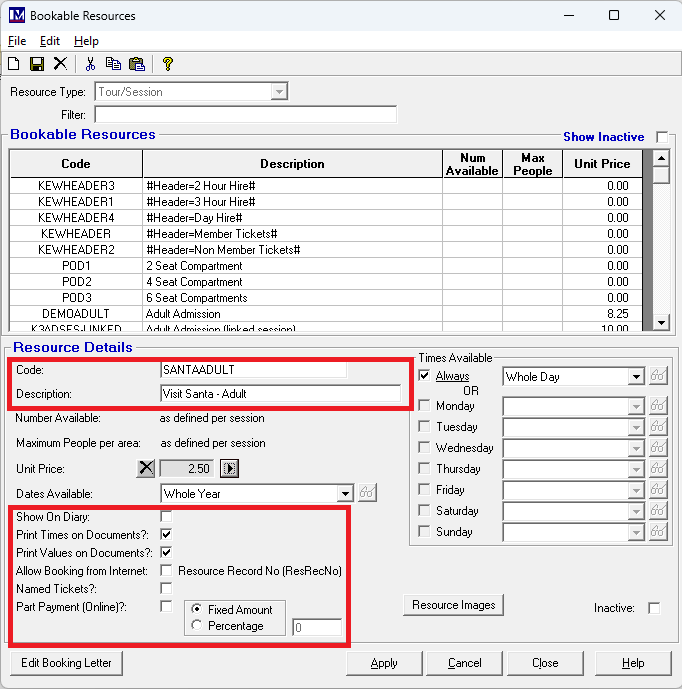
The other settings on a 'Bookable Resource' are detailed below.
‘Show on Diary:’
Click the box to the right of the text ‘Show on Diary’ so that it is ticked![]() if you want this bookable resource to appear on the Merac back office software ‘Diary’ screen (see section 9) when it's booked.
if you want this bookable resource to appear on the Merac back office software ‘Diary’ screen (see section 9) when it's booked.
‘Print Times on Documents:’
Click the box to the right of the text ‘Print Times on Documents’ so it is ticked![]() if you want the time that this resource was booked for to to be included on the default 'Booking Confirmation' letter (report) that is provided with Merac. this can be run as a report or can be provided. This can be run as a report (Report Bookings > Booking Confirmation) or is generated after opening a booking record by (1) clicking the 'Print' button in a booking, or (ii) is used to generate the attachment when clicking the the 'Email Conf' button (that can email a booking confirmation by Outlook - if your company have installed this.
if you want the time that this resource was booked for to to be included on the default 'Booking Confirmation' letter (report) that is provided with Merac. this can be run as a report or can be provided. This can be run as a report (Report Bookings > Booking Confirmation) or is generated after opening a booking record by (1) clicking the 'Print' button in a booking, or (ii) is used to generate the attachment when clicking the the 'Email Conf' button (that can email a booking confirmation by Outlook - if your company have installed this.
‘Print Values on Documents:’
This is the same as the above, except it adds the time in the same way to the relevant documents.
‘Allow Booking from Internet:’
This setting only applies if you have purchased K3's online ticketing module. If not then simply leave this setting un-ticked, as it is not applicable. Click the box to the right of the text ‘Allow Booking from Internet’ so that it is ticked only if you want customers to be able to book this resource on your bookings website. Only applies to customers who have purchased the Online Ticketing Module (e-commerce web pages) from Merac.
‘Named Tickets?:’
This is only for online bookings and is usually only used for birthday party bookings, when you need to record the name of the person the birthday party is for in the booking in Merac. Having this option selected means that when you book this resource online, a box appears in which you can enter a person’s name. To select this option, click the box to the right of the text ‘Named Tickets’ so that it is ticked ![]() .N.B. this name is not printed on tickets produced at the till (if applicable) when redeeming the booking.
.N.B. this name is not printed on tickets produced at the till (if applicable) when redeeming the booking.
Please Note:
The number of names to be entered corresponds directly to the quantity of the resource that is booked (i.e. if 5 of these resources are booked, then you will be required to record 5 names for this booking). Do not select this tick box, if you do not wish to record the name of each person a specified resource is booked for. Please note the name of the customer who is making the booking is recorded as standard.
Part Payment (Online):
This setting only applies if you have purchased Merac's online ticketing module. Part payment can be set on each 'Bookable Resource' as required to allow part payment when the resource is booked on-line only. Part payment can be set as either percentage of the item price or a specific amount as required.
‘Edit Booking Letter’ Button’
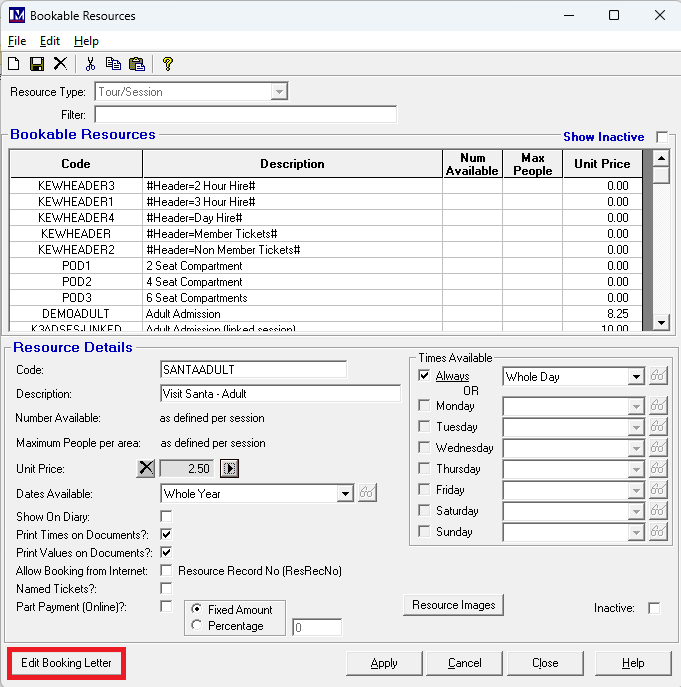
N.B. if you want to create your own booking letters in Microsoft Word then do not use this option. If you do not how to set up and use Microsoft Word mail merge templates in the Merac, then this would require chargeable training. Please contact your Customer Success Account Manager and they will be able to provide a quote for your training needs.
This option is only used if you want to use Merac's pre-defined single 'Booking Confirmation' letter (report) that is supplied with the Merac back office software and can be sent to a customer form within a booking record or run as a report (in Reports Bookings > Booking Confirmation report). If so, then you can add some additional text but only to specific sections of this letter by clicking on the ‘Edit Booking Letter’ button then you will see screen below. Please note you can only add text to three sections of this predefined Merac 'Booking Confirmation' letter letter as follows:
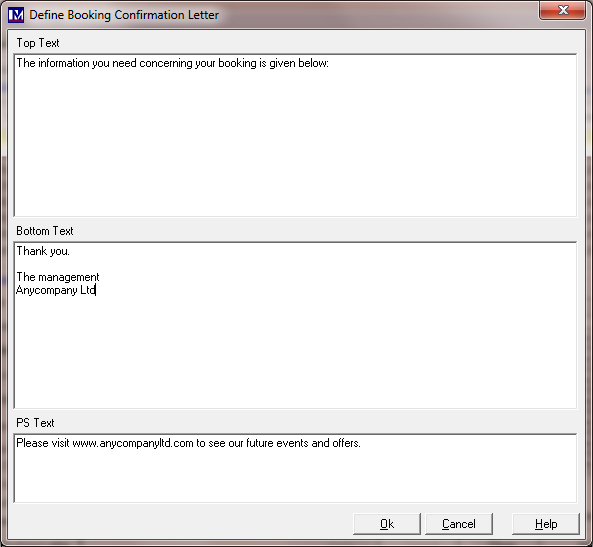
Please note you cannot amened the font size, style, or colour, as this is predefined.
Simply type in text as required in each section, then click on the ‘Ok’ button to accept the changes.
Once you have made the required changes click ‘Apply’.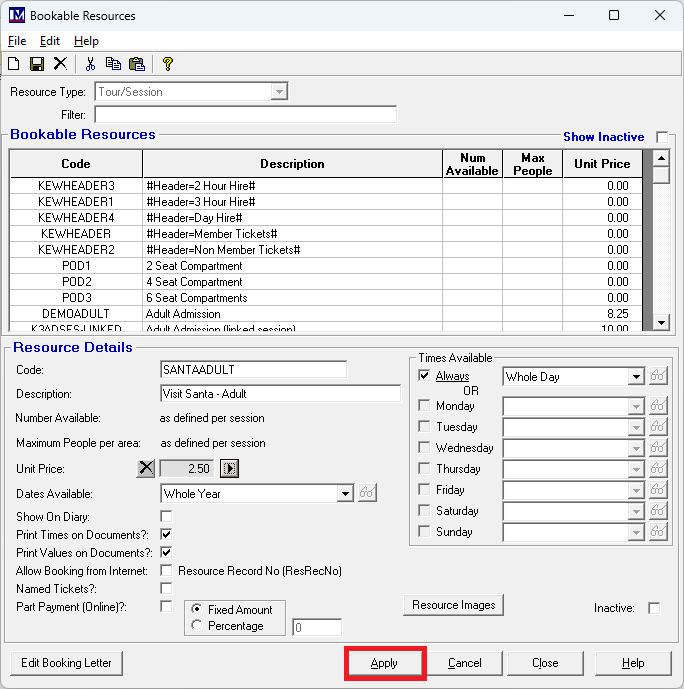
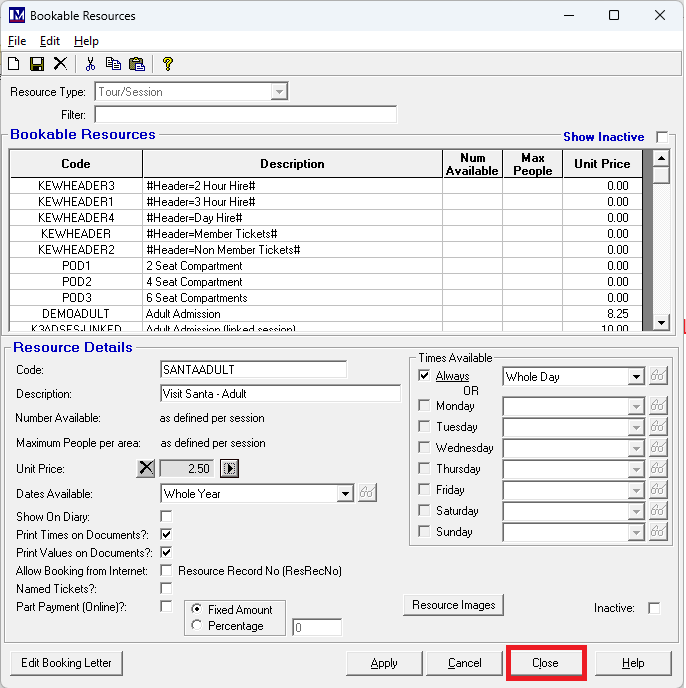
Repeat the process to create all the 'Tour/Session' type 'Bookable Resources' as required.
When all the relevant data has been entered then click ‘Close’ to exit the 'Bookable Resources' screen.
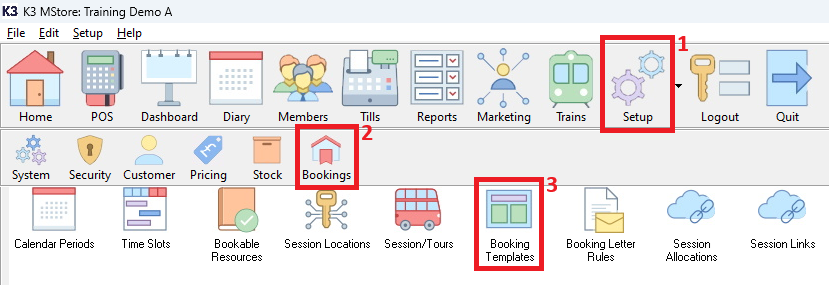
Creating Booking Templates
‘Booking Templates’ need to be created to determine the content and functionality your online session bookings web pages. Essentially, ‘Booking Templates’ are created and the required ‘Bookable Resources’ are assigned to each template.
On visiting a finished webpage, a customer will first be prompted with the available dates, followed by the available times.
Then the customer is able to select from the list of ‘Bookable Resources’ assigned to the ‘Booking Template’ and pick the quantity of each one as required. For each resource in a ‘Booking Template’ some basic rules can also be assigned, for example, the minimum and maximum quantity of each ‘Bookable Resource’, these are explained in the following sections.
To create a new ‘Booking Template’ 1. click ‘Setup’ 2. click ‘Bookings’. 3. double click ‘Booking Templates’.
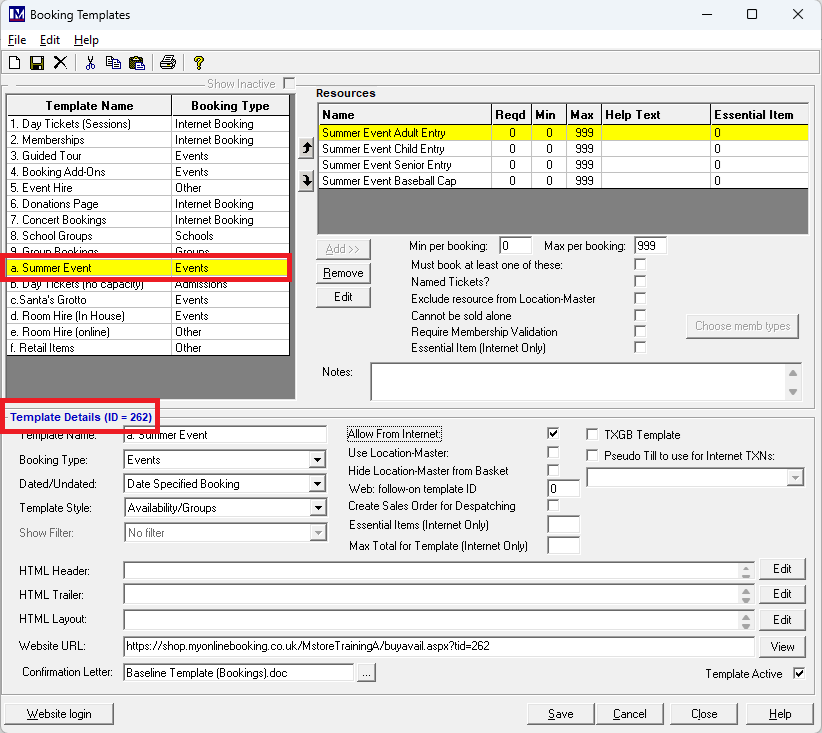
This opens the the ‘Booking Templates’ screen.
1. Click the ‘New’![]() button to create a new 'Booking Template'.
button to create a new 'Booking Template'.
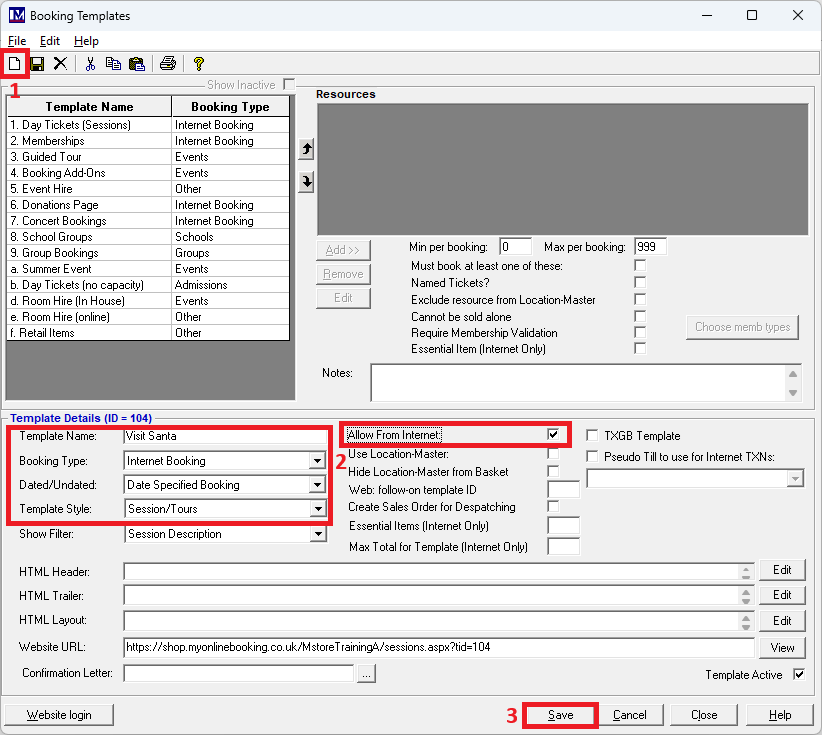
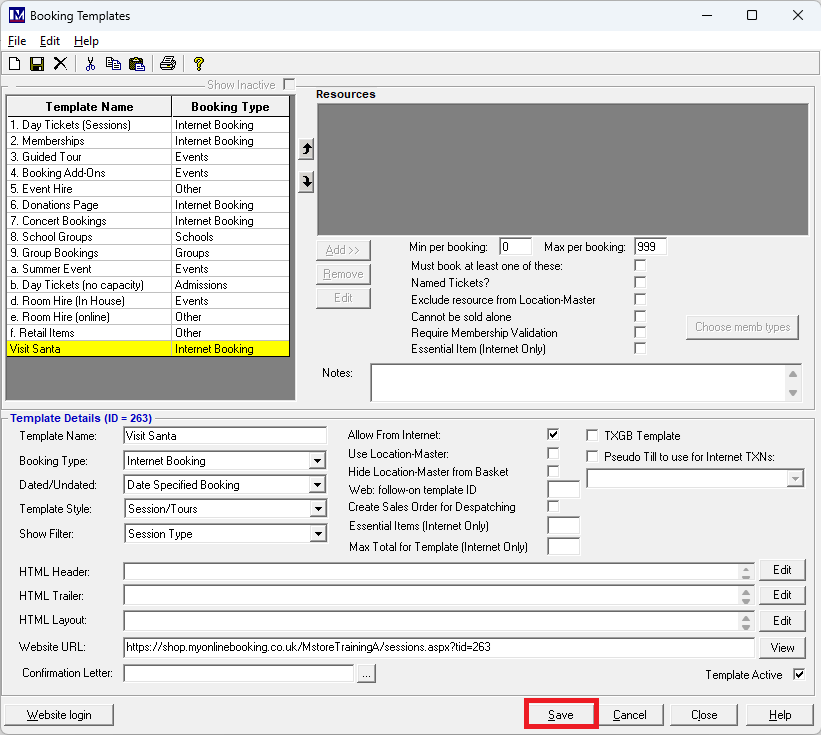
2. Next enter the basic details needed to set up a session based online 'Booking Template':
- Enter the ‘Template Name’ as required.
- Select the required ‘Booking Type’ (these are user definable and can be set up in Set System > Lookup Items).
- The ‘Dated/Undated’ option must be set to ‘Date Specified’ using the relevant dropdown selector.
- The ‘Template Style’ must be set to ‘Sessions/Tours’
Please note there are other template styles that can only be used with session assigned a seating plan.
Setting up sessions that require seat booking are outside the scope of this user guide
- ‘Allow From Internet’ tick box must be clicked, so that is becomes selected.
'Booking Template' Specific Settings
There are other settings on each 'Booking Template' that are explained below.
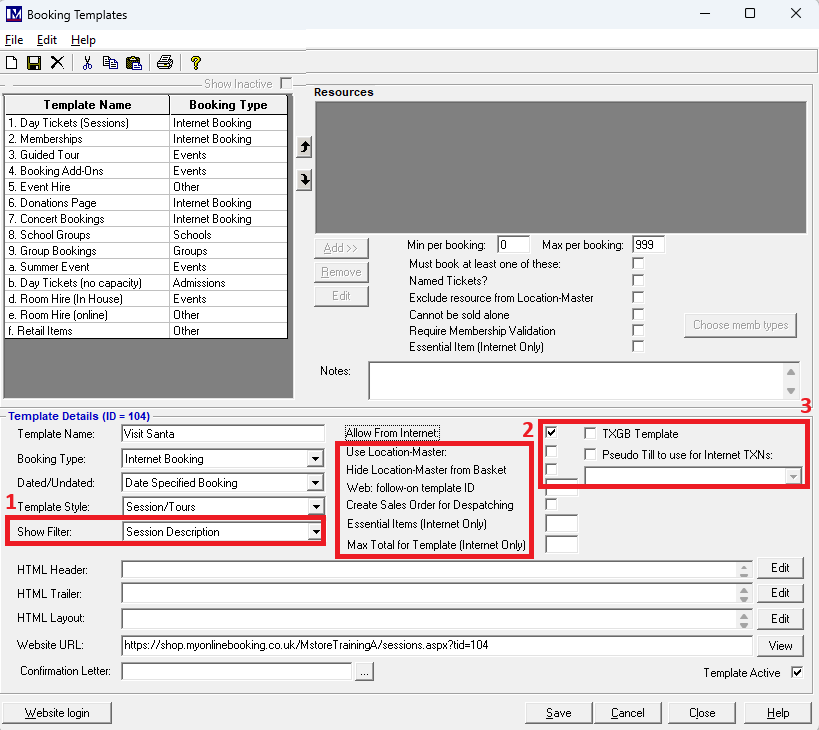
Session Filter.
This is assigned using the dropdown selector where shown in 1. on the above screenshot. The 'Session Filter' for this scenario needs to be set to 'No Filter'. This would only be used where there are 'Bookable Resources' in a single 'Booking Template' that are linked to multiple 'Session Types'. This would not be used by the majority of customers and would only often be used by e.g. heritage railways. This is because such attractions might offer multiple different sessions for the various different train journeys that may have been set up as different 'Sessions Types'. Such attractions may want to offer these via one online booking template (web page). So this is a scenario a "filter" is often required to assist the customer user experience.
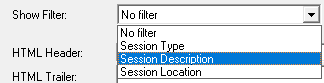
For customers that may use this there is an option for a filter to show on session based web pages only, that can show either the 'Session Type' or the 'Session Description' or the 'Session Location'.
Other Settings
These refer to the other settings shown in sections 2. and 3. on the above screenshot and are detailed below.
Use Location Master
This setting is not required used – please do not use this setting.
Hide Location Master from Basket
This setting is not required used – please do not use this setting.
Web follow on Template ID:
This option is only applicable once you have created more than one online booking template in the Merac back office software. After a specific booking template is used online, rather than going directly to the payment screen you can automatically be directed to another Merac online booking template (web page). This is known as a "follow on template".
For example, if you want the ‘Visit Santa’ Template to be automatically directed to another template, you simply enter the ID number of the other template in the ‘Web follow on template ID’ field then click ‘Save'.
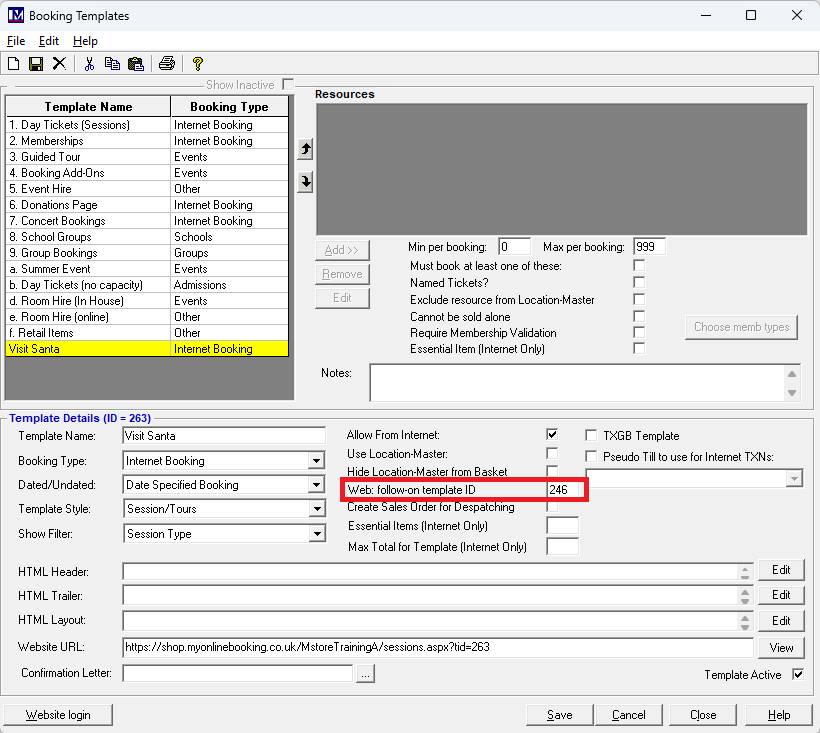
Please note the ID of a template can be found by clicking on any 'Booking Template' then note the ID number (e.g. 262).
Create Sales Order for Dispatching
This setting is not typically required for online templates that are used to sell admission tickets online. If ticked, when booked online a 'Sales Order' will be created in the relevant screen in Merac. This is typically only used for customers who have purchased our online shop module, where shop items needs to be picked and marked as dispatched. This is sometimes used by customers who have purchased the online membership module, to ensure member cards / packs are dispatched.
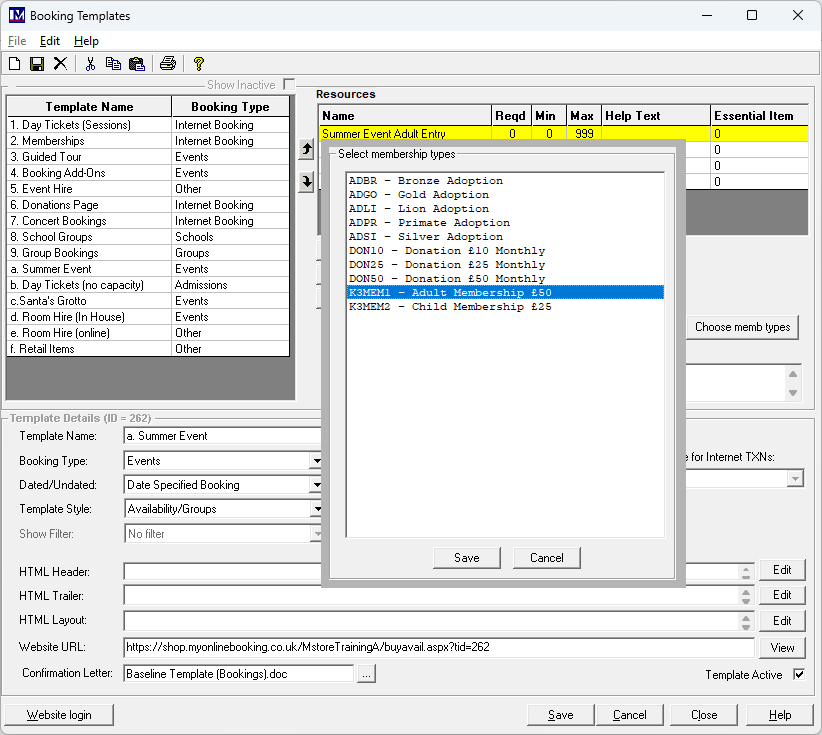
Essential Items (Internet Only ):
This functionality also requires each specific 'Bookable Resource' that counts to the number of "essential items" to have the 'Essential Items (Internet Only )' option ticked on the relevant 'Bookable Resources' (see below * in Section 2.3.3) . Here you then need to enter (where show) the total number "essential items" that need to be booked in total (in any combination)'.
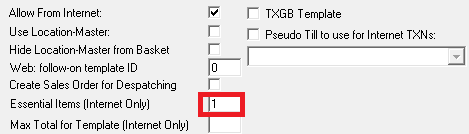
Please note: although any value can be entered here, the session will only allow the number to be booked that has been set up / allowed for the specific session date and time being booked (as defined in Setup > Bookings > Sessions/Tours).
Max Per Template (Internet Only)
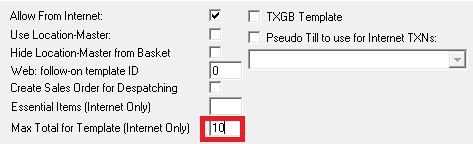
If you need to restrict the total number of resources booked per booking to X then enter the required number in this field.
Please note: although any value can be entered here, the session will only allow the number to be booked that has been set up / allowed for the specific session date and time being booked (as defined in Setup > Bookings > Sessions/Tours).
TXGB Template
This is only used for customers who have purchased an integration with TXGB. This is outside the scope of this user guide, please contact your Customer Success Manager and they will be able to provide a quote for your training needs.
Pseudo Till to Use for Internet Transactions
By default then a single till is used to record all internet booking transactions. If required then additional tills can be created and assigned using these settings. This allows the ability for multiple internet tills to be created and specific 'Booking Templates' (web pages) can be assigned toa specific till. You will not be able to add additional tills yourself, so if this is required then please contact your Customer Success Manager.
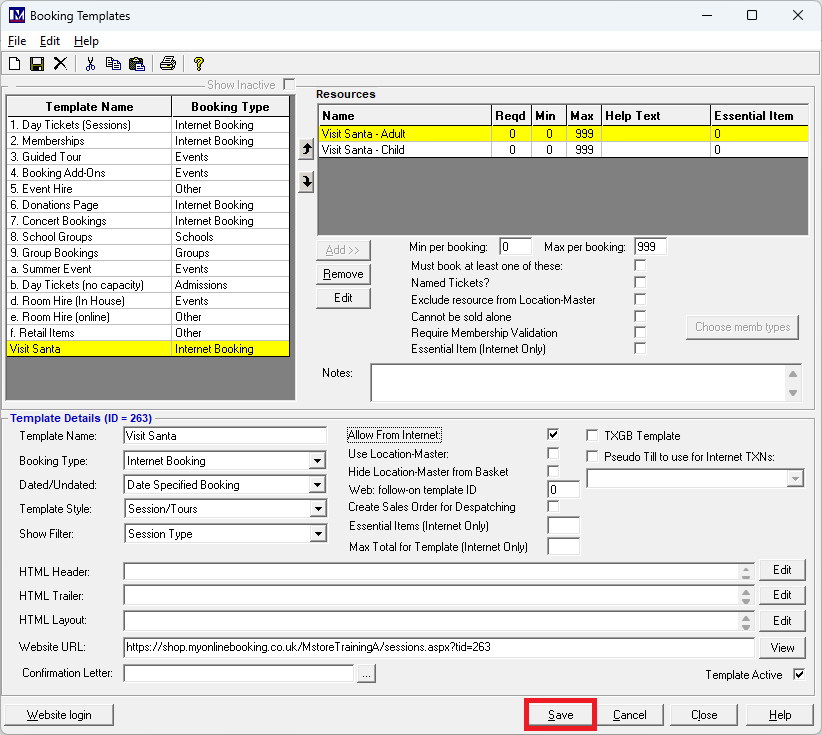
Once all the required settings have been applied click on ‘Save’.
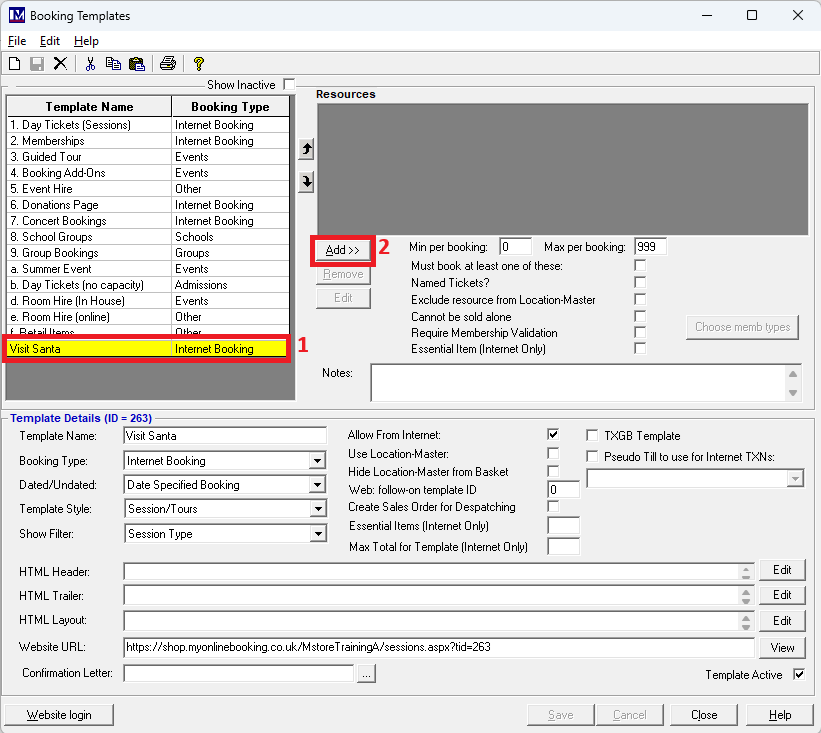
Adding Bookable Resources to a Booking Template
1. Next click on the 'Booking Template' name, so that it is selected (it becomes highlighted yellow).
2. Then click ‘Add’.
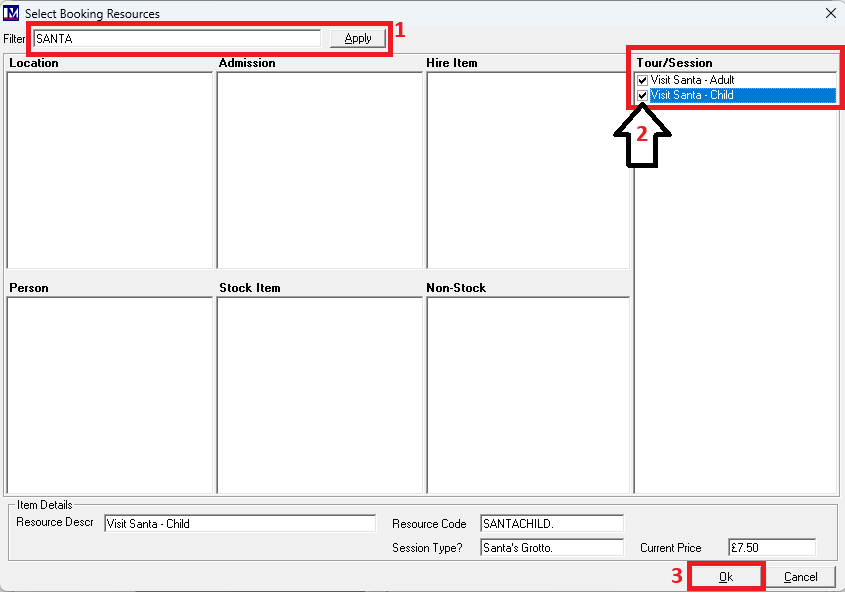
1. There is a 'Filter' field in which you can use to speed up finding 'Bookable Resources'.
It finds record containing the text / code entered enter part of a code or description, then click 'Apply'.
2. Click each box next to the required resources in ‘Tour/Session’ resources, so they are ticked.
3. Click ‘Ok’ to add these 'Bookable Resources' to your 'Booking Template'.
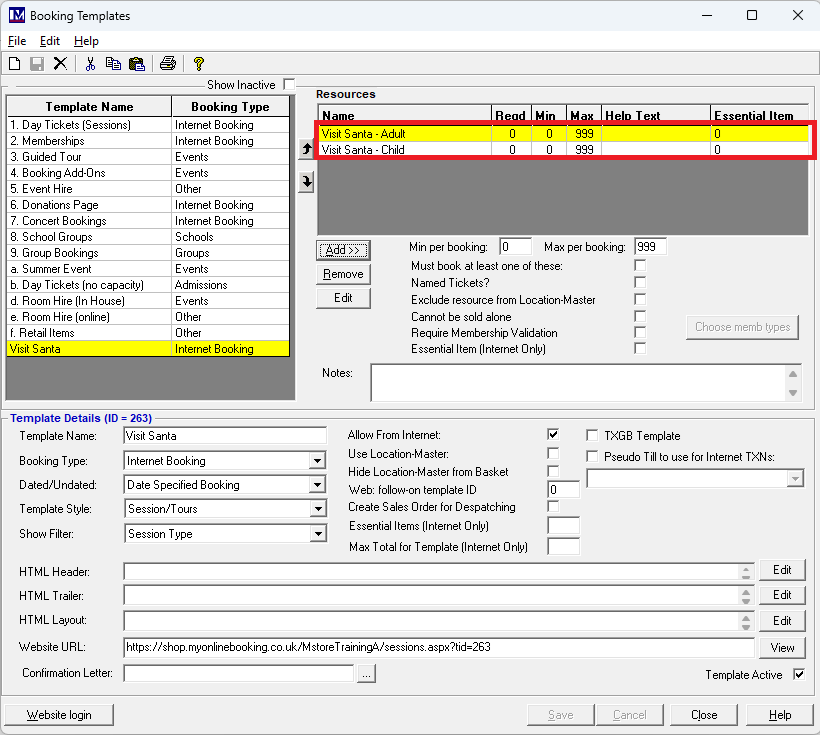
You will now see the selected resources added to the 'Booking Template'.
'Bookable Resource' Specific Settings
There are set per 'Bookable Resource' i.e. each "ticket" type can have different settings). Please note these settings only apply to online ticketing web pages, they do not apply to bookings made "in-house" (using the Merac till or back office software) To apply these you first need to click on a specific 'Bookable Resource' so that it is highlighted, then the settings can be applied. These settings referred to and shown on the screenshot and are detailed below.
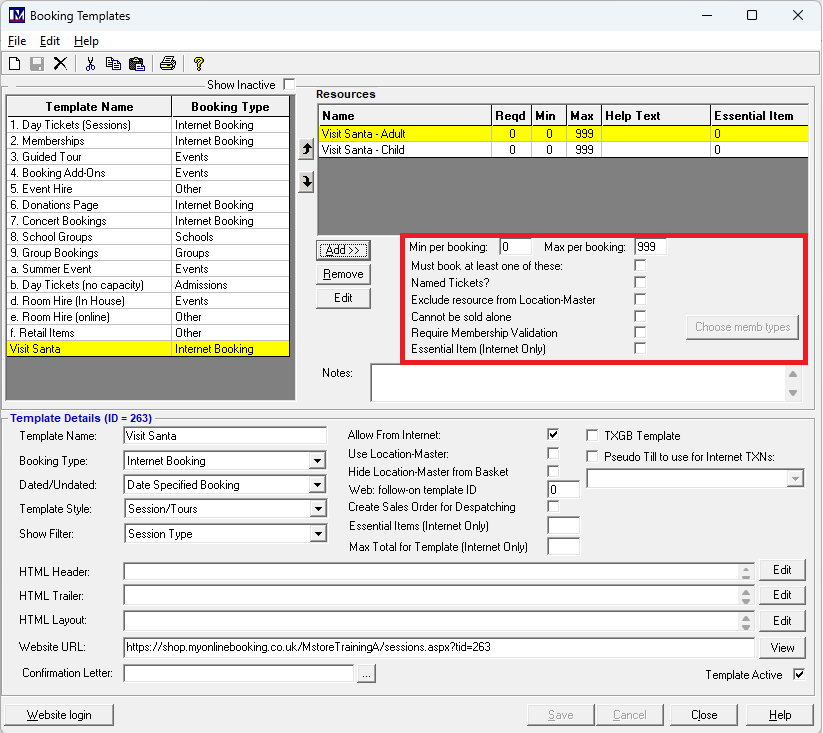
Min per booking:
This stands for “minimum per booking”. This enables you to define the minimum number of this resource that can be booked per booking. For example, if this resource was for a group admission ticket that can only be booked for parties of more than 10 people, then enter 10 in this box. N.B. if there is no minimum booking requirement, then leave a 0 in this box.
Please note: although any value can be entered here, the session will only allow the number to be booked that has been set up / allowed for the specific session date and time being booked (as defined in Setup > Bookings > Sessions/Tours).
Must book at least one of these
Select this option against a bookable resource to ensure at least one of this resource must be booked. For example, this could be selected against the resource for an adult admission ticket, to ensure at least one adult admission ticket must be booked. To select this option, click in the box to the right of the relevant text so that is becomes ticked![]()
Max per booking:
This stands for “maximum per booking”. This enables you to define the maximum number of this resource that can be booked per booking. For example, if this bookable resource was for a special event ticket and you want to limit people to book only 5 of this bookable resource per booking, then enter the number 5 in this box. N.B. if there is no minimum booking requirement, then leave a 0 in this box.
Please note: although any value can be entered here, the session will only allow the number to be booked that has been set up / allowed for the specific session date and time being booked (as defined in Setup > Bookings > Sessions/Tours).
Named tickets?
This is only for online bookings and is usually only used for birthday party bookings, when you need to record the name of the person the birthday party is for in the booking in Merac only. N.B. this name is not printed on tickets produced at the till (if applicable) when redeeming the booking. Having this option selected means that when you book this resource online, a box appears in which you can enter a person’s name. To select this option, click the box to the right of the text ‘Named Tickets’ so that it is ticked ![]() .
.
Exclude Resource from Location-Master:
This setting is not required used – please do not use this setting.
Cannot be sold alone:
Select this option against a bookable resource to prevent it being booked alone. For example, this may be used if we want to ensure that when booking children’s admission tickets that a responsible adult must also be booked. In our specific example we may select this on the ‘Summer Child’ resource, this will ensure either that at least one ‘Summer Adult’ or ‘Summer Senior’ resource must be booked first. To select this option, click in the box to the right of the relevant text so that is becomes ticked.
Require Member Validation:
This is only used where the memberships system has been set up and is in use. If needed specific ticket types (usually ones at special day / event ticket prices for members) can be set up so that they can only be booked if a valid membership card number is provided when booking online. To set this up the 'Require Member Validation' option needs to be ticked for each resource it is required on.

Once ticked then the 'Choose Memb Types' button becomes active and needs to be clicked.
A pop-up then appears in which you can click on the 'Membership types' that are allowed to validate that ticket type.
Selected membership types show highlighted (blue). Once all membership types are selected in this screen, click 'Save'.
Repeat for any other ticket types that require validation.
Validation online will be by entering a valid (non expired) member card number of the specified membership type(s).
Essential Items (internet only):
Specific 'Bookable Resources' can be set to be "essential" in order for a booking to be able to be made. If the correct number of these resources are not selected then you cannot complete the booking, the customer will be prompted online if they try and pay without selecting pre-requisite resources. If certain tickets are deemed "essential" then each of the 'Bookable Resources' resource that counts as an "essential item" needs to be ticked where shown below.
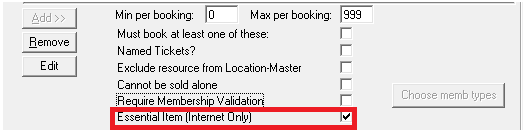
This then works in conjunction with one of the settings that is set at 'Booking Template' level (see above * )
Once all the required settings have been applied click 'Save'.
Updating Online Email Templates
To update your online web pages to reflect any changes made, click the ‘Website Login’ button.
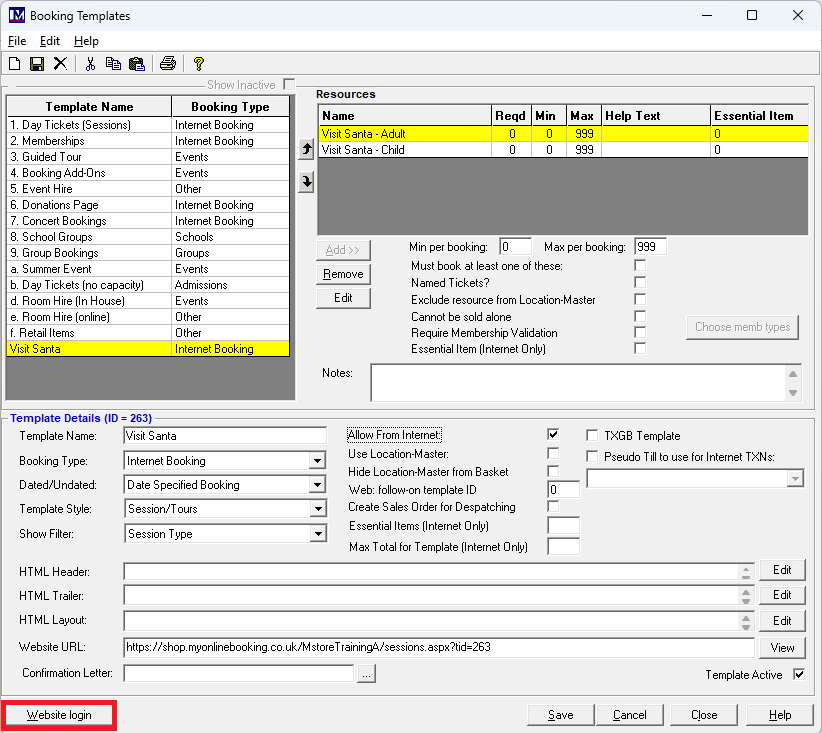
Clicking this button will open a web page, with a password box).
You will be now taken to your website administration login web page.
Type the password you have already been provided in the password field
Next press the ‘Enter’ key on your computer’s keyboard.
You will now be on the ‘Admin Menu’ page, click on the ‘Update Templates’ button.
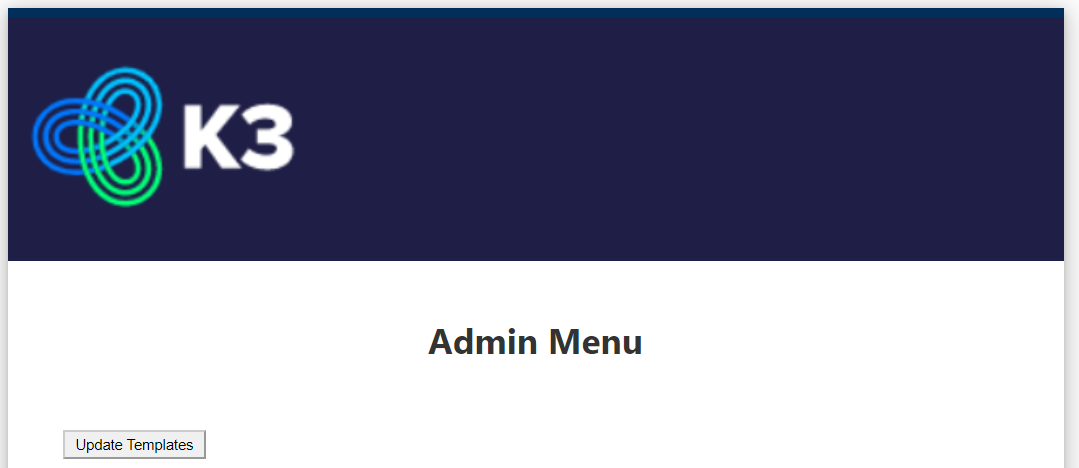
Wait for the ’Update completed successfully’ message. Please note these updates can take 5 minutes to take effect online.
Once this procedure has finished, you can then press the ‘Logout’ button which is located at the bottom of this screen.
The next section covers the recommended testing of your online session bookings pages.
Testing the Online Session Booking Page
Make sure you have clicked on the 'Booking template' name you wish to check.
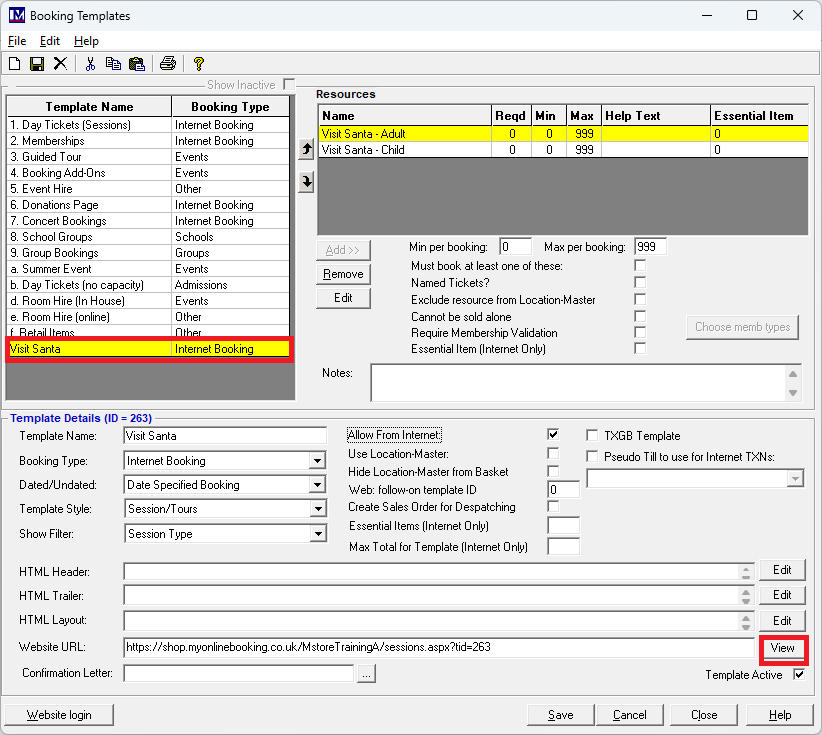
You can then view the online session booking page you created by clicking on the ‘View’ button
The webpage created should now be thoroughly tested to check all 'Bookable Resources' are showing and that all the dates times, capacitates are showing correctly. If times and capacities available vary per date, check all possible scenarios
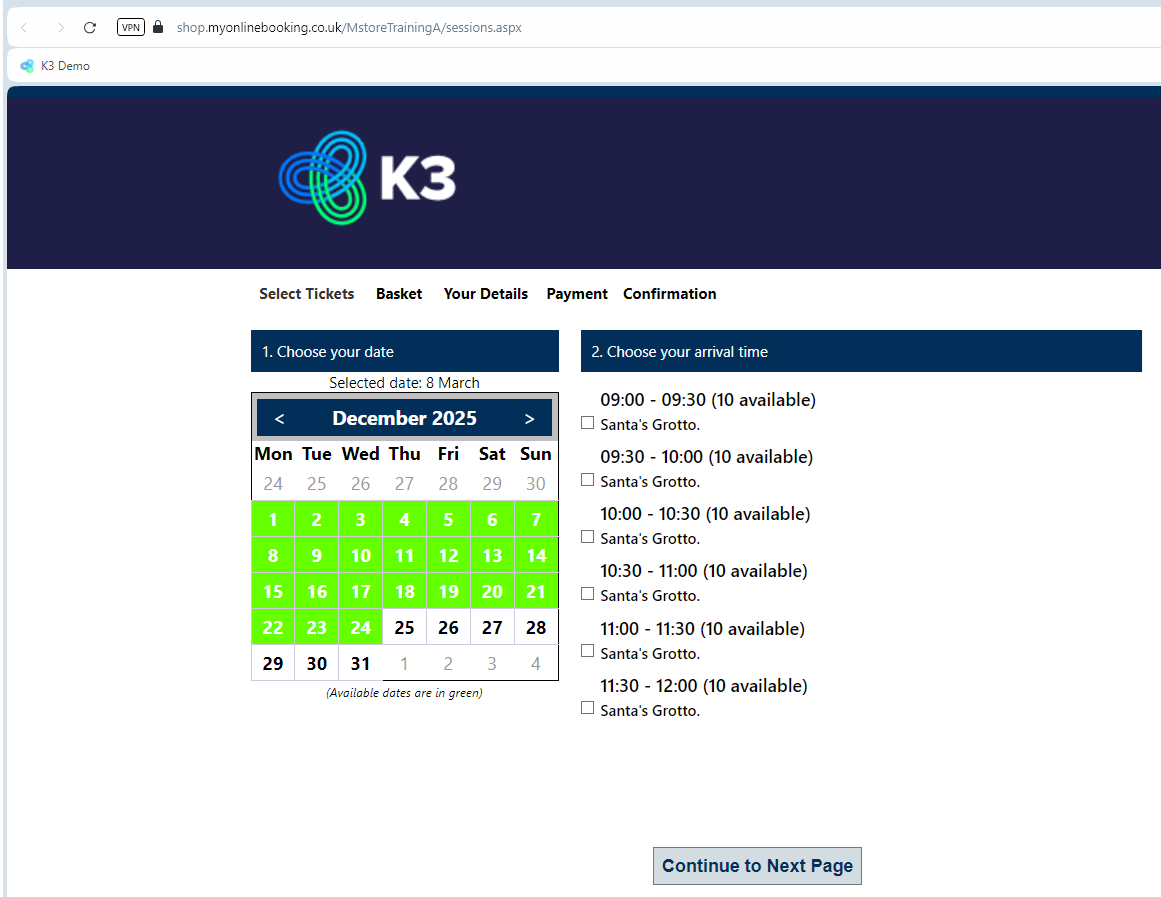
When clicking on the selected date, all the required sessions times show for that date.
Check everything is showing correctly, especially for specific dates / times where different capacities vary.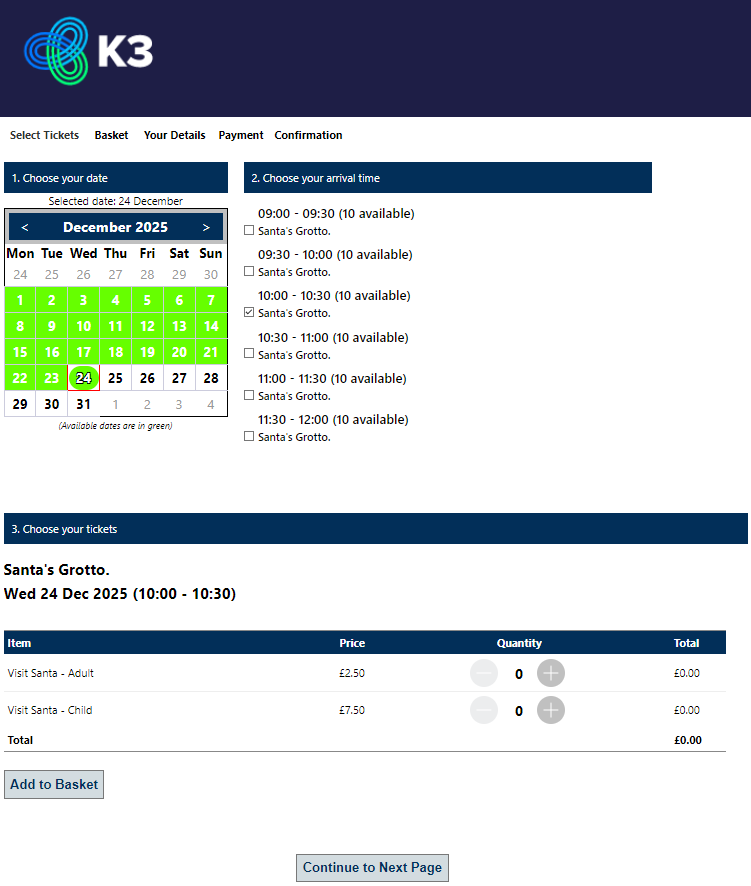
When a time has been selected then all the tickets show at the bottom of the screen.
Check you can select tickets and the numbers of these are restricted by the online session capacity sett for that date / time.
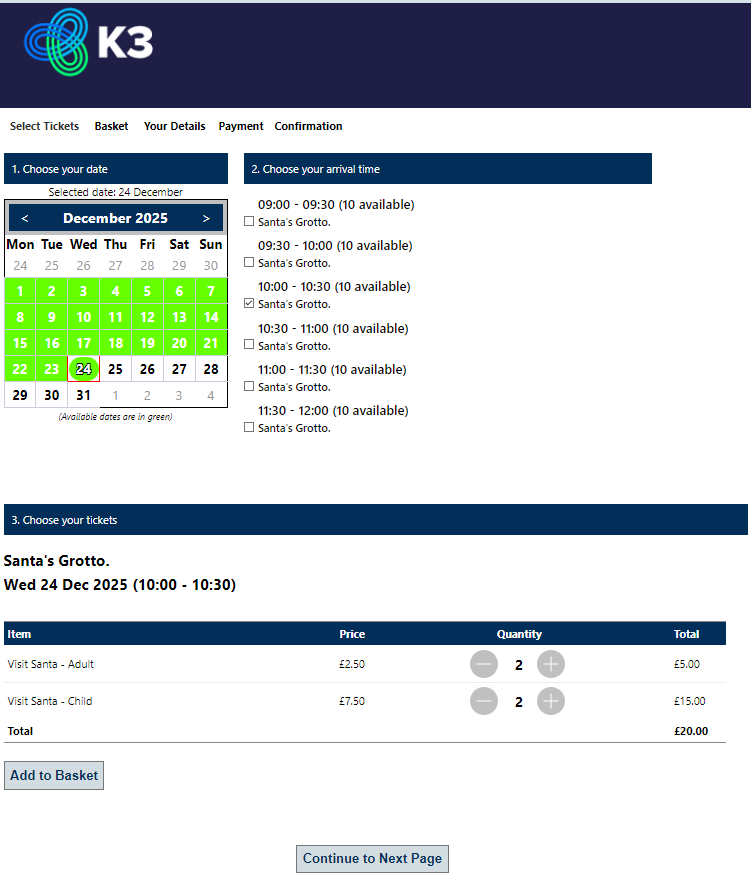
Selecting tickets is either by dropdown or the + and - buttons, depending on how your web pages are configured.
If any dates / times/ capacities / tickets / prices etc are incorrect / not showing please check all your set up.
Click 'Add to Basket' to proceed to the “Shopping Basket” page.
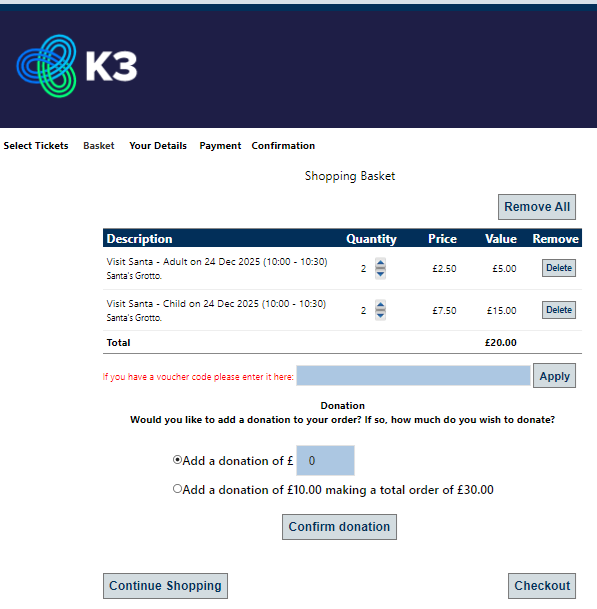
Now check the items added to the 'Shopping Basket' basket page correctly. Please note styling of this page and the following pages may look different to yours as this depends on what was agreed with Merac when the work to to create the pages was originally commissioned.
At this point you can click 'Remove All' however if you want to do full end to end testing (as long as your online payment provider integration work is live) then you can click 'Checkout' to progress to the 'Checkout' page where the payer enters their name and address details, selects their GDPR preferences, and enter their card details and pays. Please note if your online payment provider is live this will take money from your account and land a booking in Merac.
Any test bookings made on a live system would need to be refunded outside of Merac. Please speak to your online payment provider if you are unsure how to refund and they will be able to advise you. In the above scenario, you would also need to do a balancing refund transaction in the Merac, as refunds done via your online payment provider do not get passed to Merac. To make sure the figures in Merac are correct a balancing transaction needs to be carried out linked to the specific 'Booking Reference', this is known as a ‘Post Adjustment’ in Merac and these are covered in a separate user guide. Also to ensure the session availability is not affected you would also need to cancel any test bookings made, otherwise the test bookings will be withholding session availability.
Footnote:
If required there is also the ability capture extra data when selling specific items, this is know as PLU 'Data Capture' where up to 5 questions can be asked (per item) when it is sold. An example of how this looks is shown below and it is useful in events such as 'Visit Santa' type events where additional is required an is mandatory. However, please note the data can be set to not mandatory for other purposes as required. Data capture can also be set up and used for "in-house" Merac bookings.

This is also covered in a separate user guide.
If you require training on this or any of the above content, please contact your Customer Success Manager and they will be able to provide a quote for your training needs.