TABLE OF CONTENTS
Introduction
The 'Merac’ software has the ability to adjust the stock levels of stock items using the ‘Stock Adjustments’ option. This functionality can be used to adjust the stock levels by increasing, decreasing, or overwriting the stock level of an item at a time in a specified ‘Stock Location’. The full scope of what can be achieved using ‘Stock Adjustments’ in our 'Merac’ software software is covered in this manual. If you have multiple ‘Stock Locations’ set up in the ‘Merac’ software, then there will also be the ability to transfer the required quantity of a stock item between ‘Stock Locations’.
This functionality can be used to deliver stock, so that it is added to your stock holding for a specific stock location. Although this is a simple way of entering deliveries into the 'Merac’ software, this does require deliveries to be entered an item at a time. There is also no way of reviewing the previous stock adjustments made in this screen, or to e.g. associate all the stock items delivered as being part of one "delivery note".
If you are wanting to use more advanced functionality that allows you to build an order with a specific order reference that contains multiple stock items, then the ‘Purchase Order’ functionality may be better suited to your requirements. The ‘Purchase Order’ functionality allows an order to be reviewed and amended before it is delivered, and both order and delivery notes to be printed. In addition, any order can also be viewed after it has been delivered, so the ‘Purchase Order’ system is more suited to customers that need to have a greater degree of control and auditability over their purchasing process. Our 'Purchase Order’ functionality in the 'Merac’ software is covered in a separate guide.
Finding the Stock Adjustment Screen
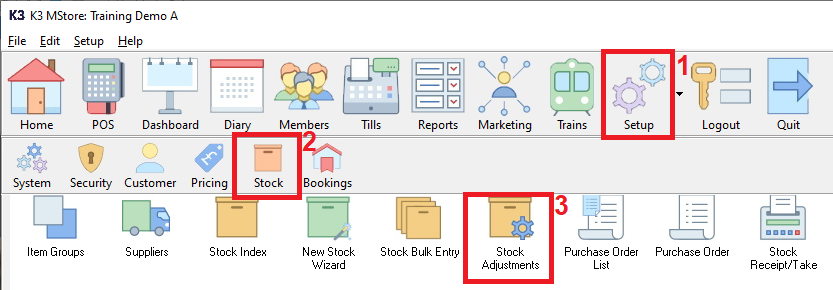
First 1. click on ‘Setup’ then 2. click on ‘Stock’ then 3. double click on ‘Stock Adjustments’.
Entering a Stock Adjustment
On double clicking ‘Stock Adjustments’, you will now see the following screen.
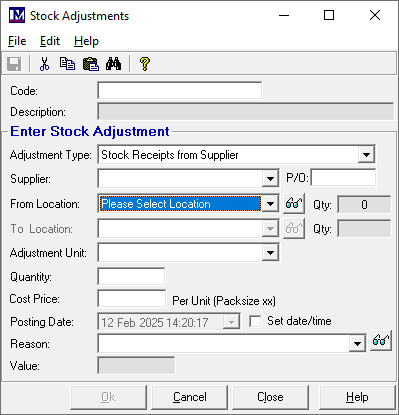
You must now enter the code of or find the item you want to adjust the stock level
If you have the item code to hand it can be typed in the code field directly, then press the enter key on your keyboard.
Alternatively, if a scanner has been purchased from and installed by Merac, the item barcode label could be scanned to select it.
If this information is not to hand and the item code is not known then click the binoculars button at the top of the screen,
Enter the required criteria to find the item in the 'Search Criteria' fields, then 1. click the 'Search' button.
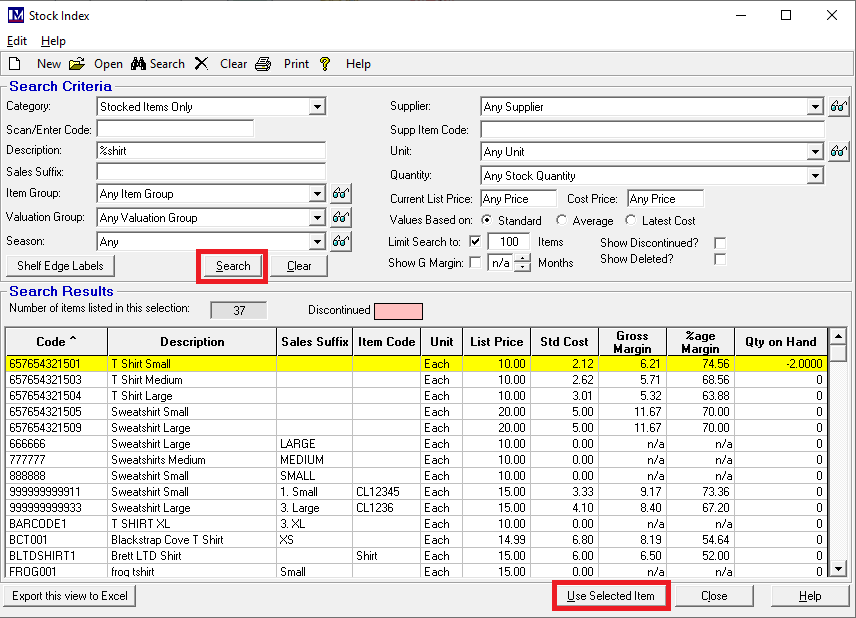
Click on the required stock item so it is highlighted yellow, then click the ‘Use Selected Item’ button.
You will now see the selected stock item’s details here.
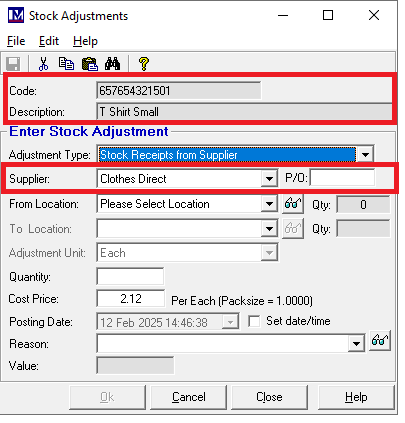
You will also notice that the main supplier for this item has already been selected.
Now you must select the ‘Adjustment Type’ from the relevant drop-down list.
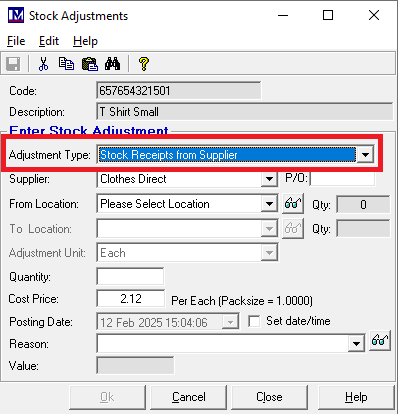
The different types of stock adjustments are explained below:
Stock Receipts from Supplier:
This option will ADD TO the stock level for this item, at the selected stock location.
This option can be used for entering deliveries of stock items.
Add to/Return to Stock:
This option will ADD TO the stock level for this item, at the selected stock location.
N.B. this will add the item to the stock level of this item (but will not be recorded in sales reports).
Stocktake (Replace Quantity Figures)
This option will OVERWRITE the stock level for this item, at the selected stock location.
(most commonly used to correct a count error entered during the ‘Merac’ stocktake process).
N.B. this is not how you enter a stocktake, a stocktake is a totally separate process in ‘Merac’.
Subtract From/Write-Off Stock:
Selecting this option will DEDUCT FROM the stock level for this item, at the selected stock location.
This option is used for writing off stock (e.g. wastage, breakage etc).
Transfer to Another Stock Location:
Please note stock transfers only apply to customers who have multiple stock locations.
When using stock transfers, you must select both a ‘From Location:’ and a ‘To Location:’.
Using ‘Transfer to another stock location’ option will:
DEDUCT FROM the stock level for this stock item for the selected ‘From Location:’.
ADD TO the stock level for this stock item for the selected ‘To Location:’.
Sale (Item was Sold):
Selecting this option will DEDUCT FROM the stock level for this item at the selected stock location.
N.B. this will deduct from the stock level of this item but will not be recorded in sales reports.
In this example we want to enter a delivery of a stock item, so select ‘Stock Receipts from Supplier’.
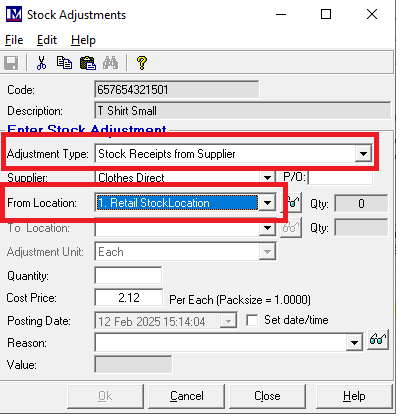
For customers who have multiple stock locations, you must now select the correct stock location
This the stock location that this item will be delivered to and increase the stock level of.
For customers that do not have multiple stock locations, then only one stock locations is available.
Typically this will be named the 'Main Stock Location' as this is the default stock location for a single stock location.
However, please note the single stock location could have a different name, as this name can be amended in Merac.
Next type in the required quantity in the ‘Quantity’ field.
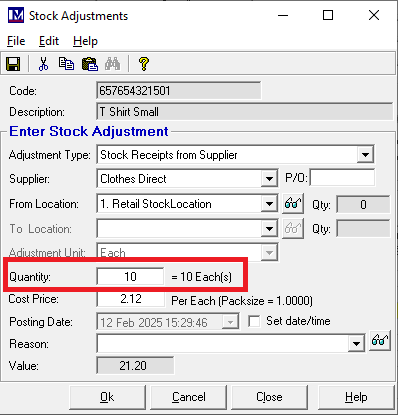
Please note at this point if this stock adjustment is to be posted for the current date / time then click the 'Ok' button.
However, if you want to record the stock adjustment for a different date / time do not click the 'Ok' button.
For example you want the stock adjusted yesterday at 10 am when the delivery actually came in.
To do this click the 'Set date/time box'.
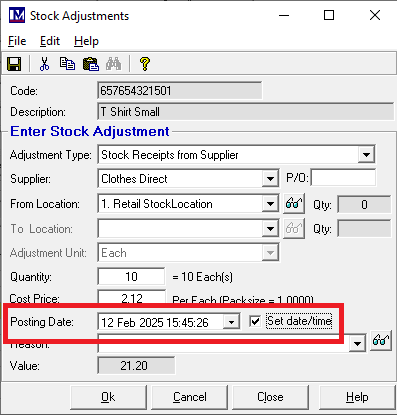
You can now use the dropdown to the right of the 'Posting Date' to select the required date.
The click on the hours ("hh") part of the time and enter the required hours in 24 hour clock format.
Next click on the minutes ("mm") part of the time and enter the required minutes.
Next (if required) click on the seconds ("ss") part of the time and enter the required seconds.
With either the date left as it is, or with a past date selected, either click the 'Ok' button to post the adjustment.
Alternatively, if you are not happy posting the adjustment click the 'Cancel' button to clear this form.
When you click the 'Ok' button to post the adjustment you will see the following message pop up.
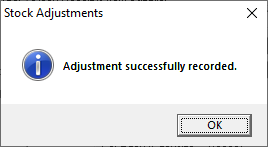
The stock has been adjusted by the amount specified in the stock location selected.
Repeat the above steps for the next stock item, double checking the data before posting each adjustment.
Click the ‘Close’ button once all adjustments have been entered.